If you are new to this, start out reading carefully this description, to get a feeling how this works. Then, apply the technique mentioned here to produce new content (sex poses), we'll put it into the B-Shop. Don't miss this opportunity, you can work with joy from anywhere, for good money. See more about working for real $
Quick Start Guidefor Animation Editor V1.51
1. Start up Animation Editor. Create a new project, find out how to open the base animation.
2. After learning basics, controls, click Focus person to view a character from an optimal angle of view, position characters to the chosen place in the room. Select the character root diamond, and move it freely in the room's 3 base directions via the appearing arrows and squares (aka "moving gizmo"). Do this all in the 0th frame of base animation.
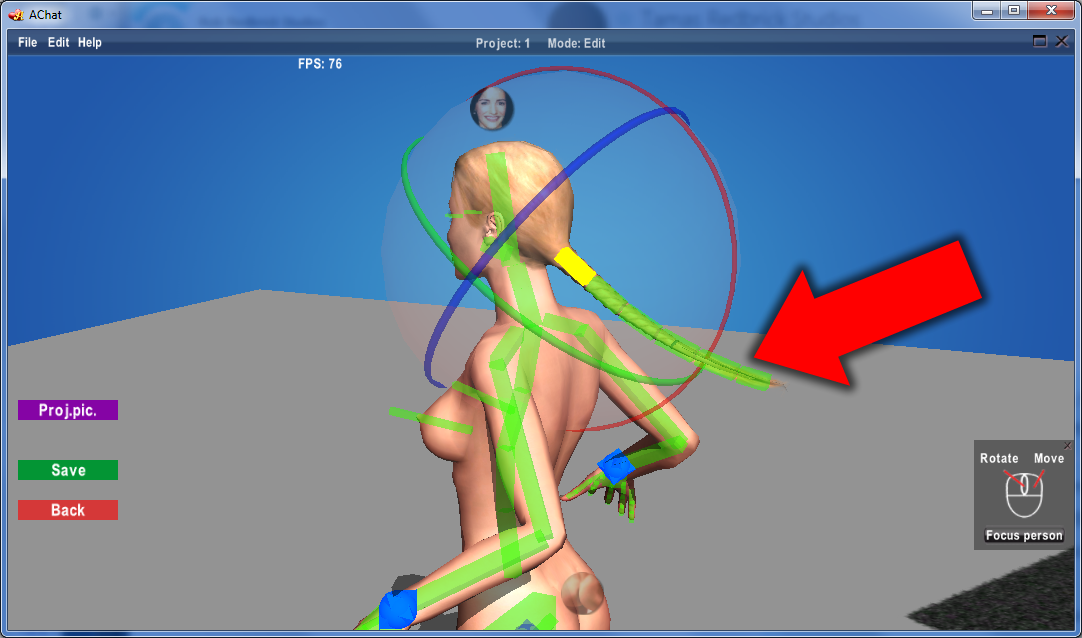
3. Become familiar with "bones" of the characters. You can show/hide them by pressing Ctrl-S. Move the mouse over them, and their name will be showed on top of your screen, in the middle.
4. For simple movements: select bones, adjust their angles with the appearing rings (aka "rotation gizmo"). Your character's body parts will be moving accordingly.
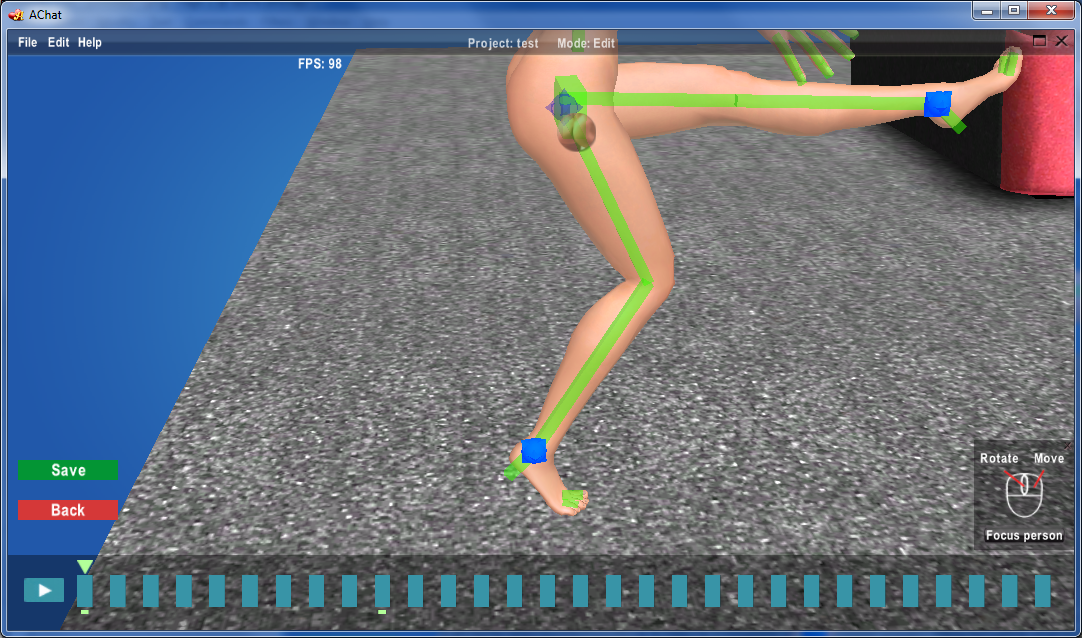
5. For more precise movements: learn how to move limb ends directly in the room's 3 base directions. Select a limb diamond, drag and move the limb via the moving gizmo. This makes superfluous the use of rotation gizmo for main limb bones.
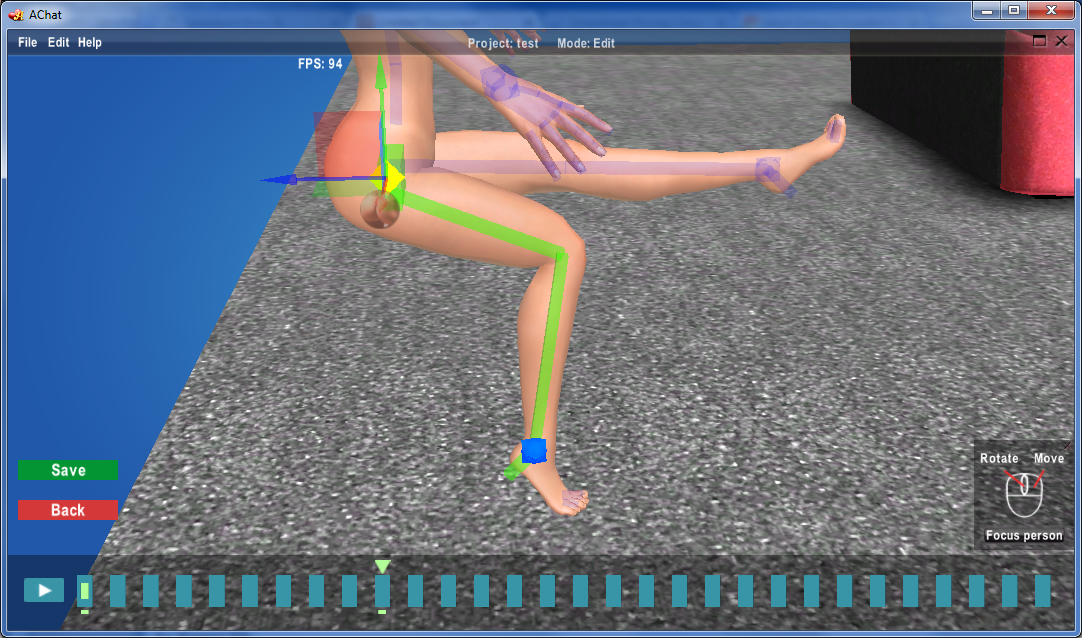
6. Learn how to lock limb ends. Moving character's root when limb ends are locked results in interesting animations like squat. Right-click a limb diamond to show lock options.
7. Get to know the timeline and the frames, and the fact that it is enough to set bone or limb positions only in a few frames, the system will interpolate between them.
8. In the selected frame, all bone and morph adjustments will result in bone- or morph keys which can be handled on the timeline (see also Controls, Hot keys).
9. Learn how to make limb locks effective on more frames, how to change or shut off them in "later" timeline frames. (Later means here, frame located on the right on the timeline.) Remember a few rules regarding lock types, their behavior when combining them with simple angle based bone adjustments.
10. Master adjusting lower limb bone's side angle, and end limb bones angle, for life like movements during animation.
11. Animate hairs, eyes, breast, cock as well.
12. Animate morphs for face, tongue, pussy, asshole. In the selected frame, also morph adjustments will result in keys which can be controlled on the timeline, similar as normal bone keys.
Note: for shemale animations, simply include a female with strap-on dildo.
Good work, and try to avoid these common mistakes when creating the animations.
Important:
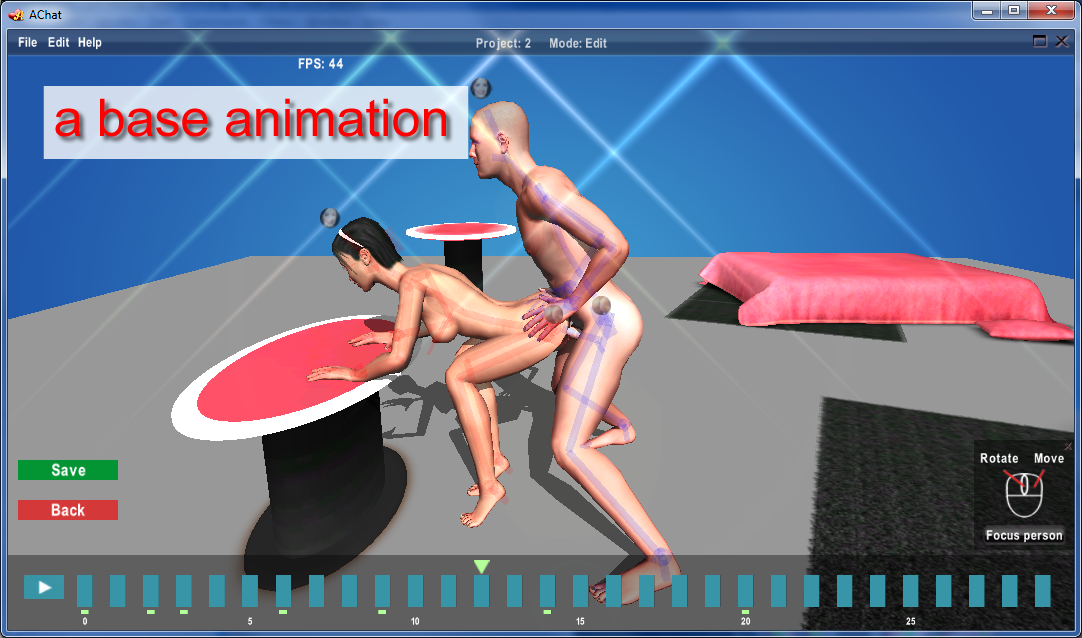
Start with the Base animation! What is a base animation? Choose any pose in AChat to see it:
Base animation definition: It's a 1 Sec long animation (in AChat, it will start to play cyclically right after pose selection, before any variation is started. In Animation Editor, you can play it with the Play button in bottom left corner of the screen).
It needs a perfect starting position. For this, also called Base position, adjust bones and locks in frame 0 to achieve optimal, believable result. It must be good base for the variants to start from (note: variants can contain bigger moves, as they are 90 frames long, in contrast with the base animation's 30 frames)
It must be clearly recognisable what the characters do. Both characters must make lifelike movements, no body parts should be rigid during the animation.
If you feel you've created a genuine valuable base animation, please send it to us for reviewing! During our review process we'll calculate a 0-100 Quality score for your artwork. Only after you've got a Quality score of 75 or above, start with variations (base animation wrong - everything wrong...).
Quality score of your Base animation will be calculated based on following criteria:
- Correctness
- Sexiness
- Aesthetics
- Uniqueness (among existing AChat poses)
- Imaginativeness (globally)
Correctness means complying following rules:
1. Must comply the "Base animation definition" above
2. The base pose must be in 0th frame of the base animation. Don't place it in eg. frame 14.
3. No major body part is inside or goes trough another major body part visible when playing with the Play button. This also means,
you must carefully plan what limbs or other body parts go from where to where during the animation. 30 frames aren't too much,
you can't do too big moves.
4. No body part makes a jump when playing with the Play button. Avoid to place keys for same bone in close frames!
If you got a Quality score below 75, don't give up, try to make it better. If needed, start from scratch to achieve the goal.
Animation Editor Online Help
Contents
Quick Start Guide
Overview of the GUI
Starting up
New project
Base animation
Variations
Import project
Creating the Base animation
Use as few keys as possible in your animation
In the 0th frame - Select place of action
Moving and rotating characters
Selecting bone of a character
Rotating selected bones
Moving hands and feet
Limbs need locks in 0. frame often
Locking hands and feet between frames - room key
Locking hands and feet between frames - buddy key
Adjusting face and tongue
Adjusting pussy/asshole
Frames on the timeline
Animation: keys on the timeline
Select, copy, move, delete keys
Copy limb pose
Key speed characteristics
Room key details
When to use room keys
How to switch off limb lock effectiveness
How to use room keys - example 1.
How to use room keys - example 2.
Buddy key details
Outer limb bone side rotation for locked limbs
Evaluation order when using more room or buddy keys for a limb
Animate hairs, eyes, breast, cock as well
Differences between editing base animation or variation
Frame interval
Slots: saving, loading animation parts
Controls, Hot keys
Tips and tricks
Base animation or Project is complete, send it to us
Change log & Release notes
Overview of the GUI
Starting up
Start up Animation Editor from AChat's enter screen, via the User created contents icon.
Video: Open Animation Editor, Create new project, Open base animation
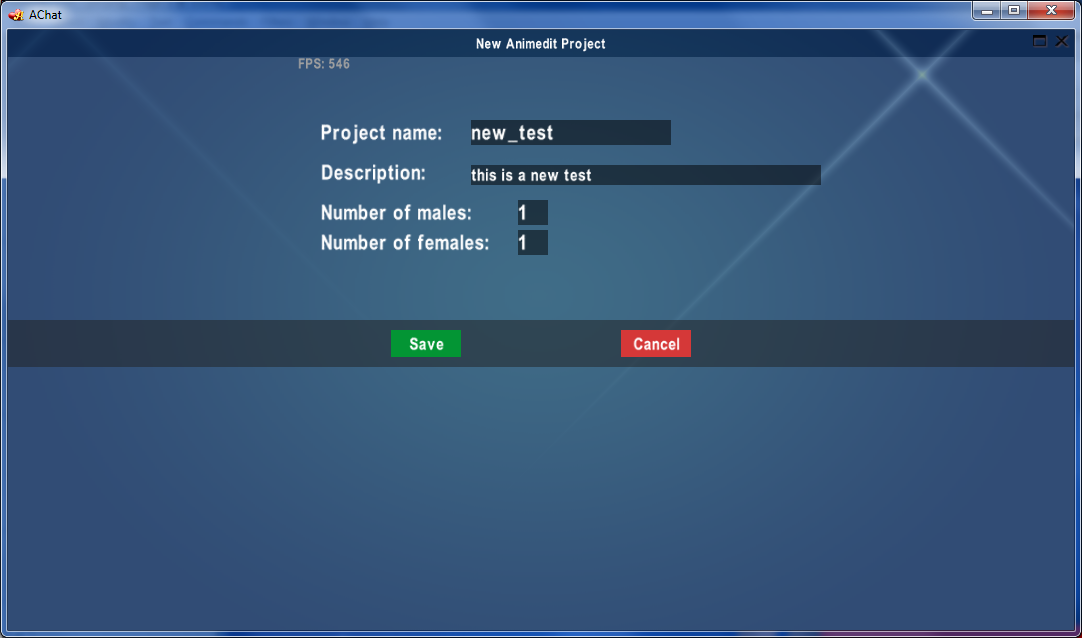
New project
Click "Create new" on the main page
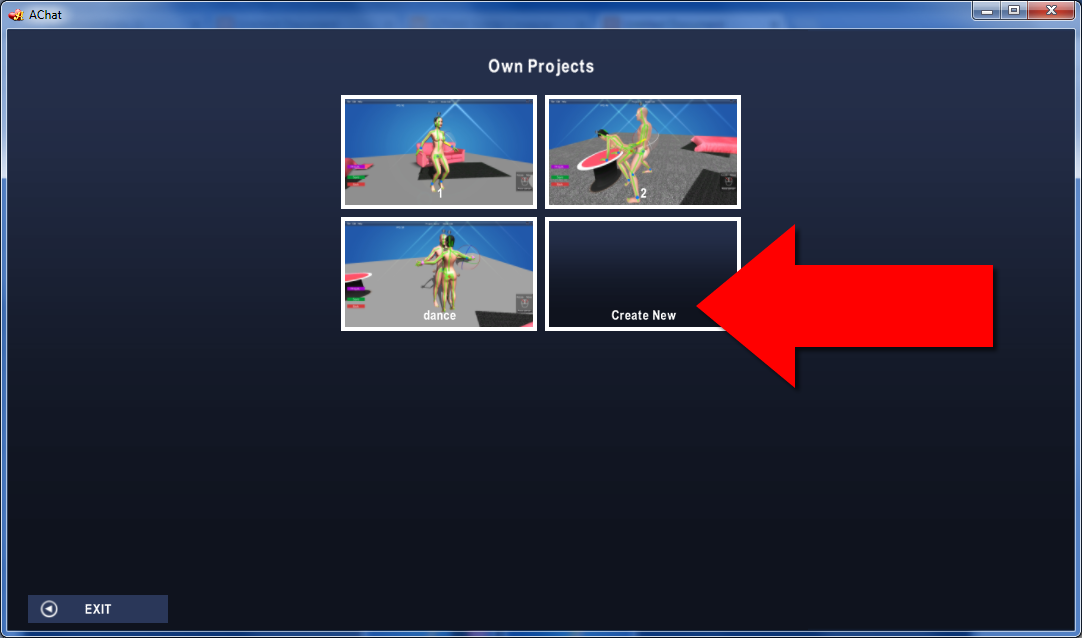
Enter data in the first 2 fields, click Save
Base animation
On the main page, click the project you want to open, then click Open in the pull down menu
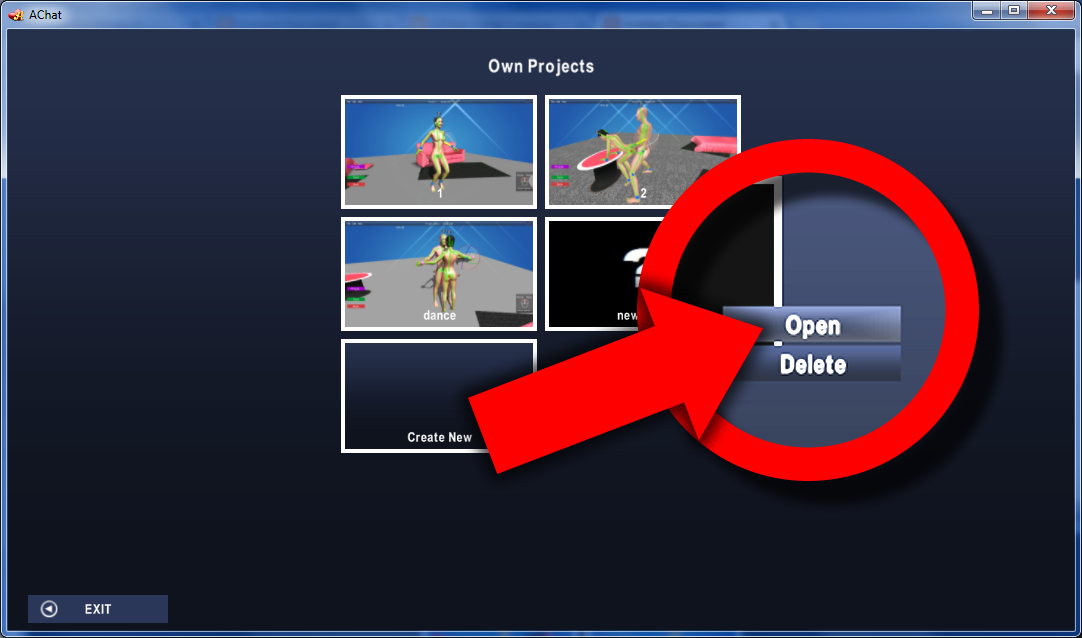
Click "Base animation / Edit"
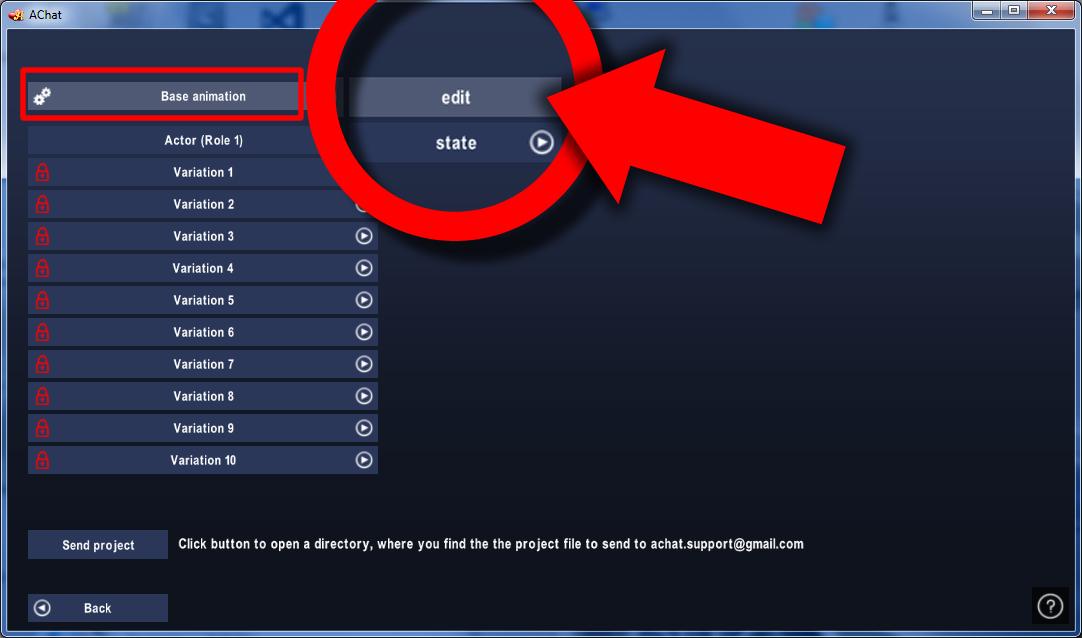
After finishing the base animation, set its sate to ready by clicking "Base animation / State / Ready"
Variations
Select for which actor do you want to process an animation
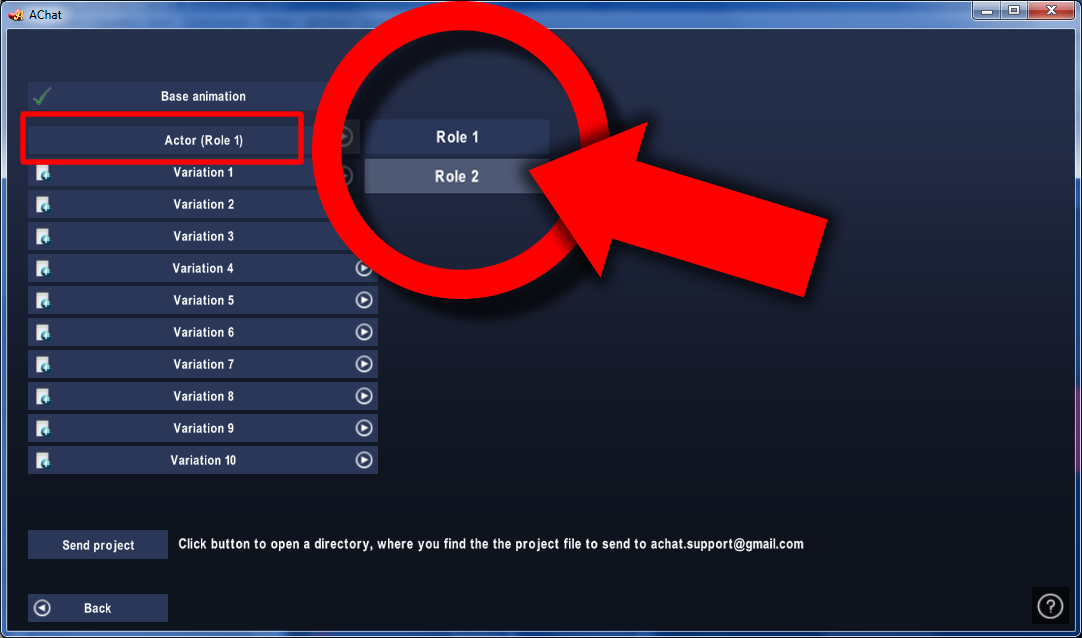
Click "Variation 1 / Edit"
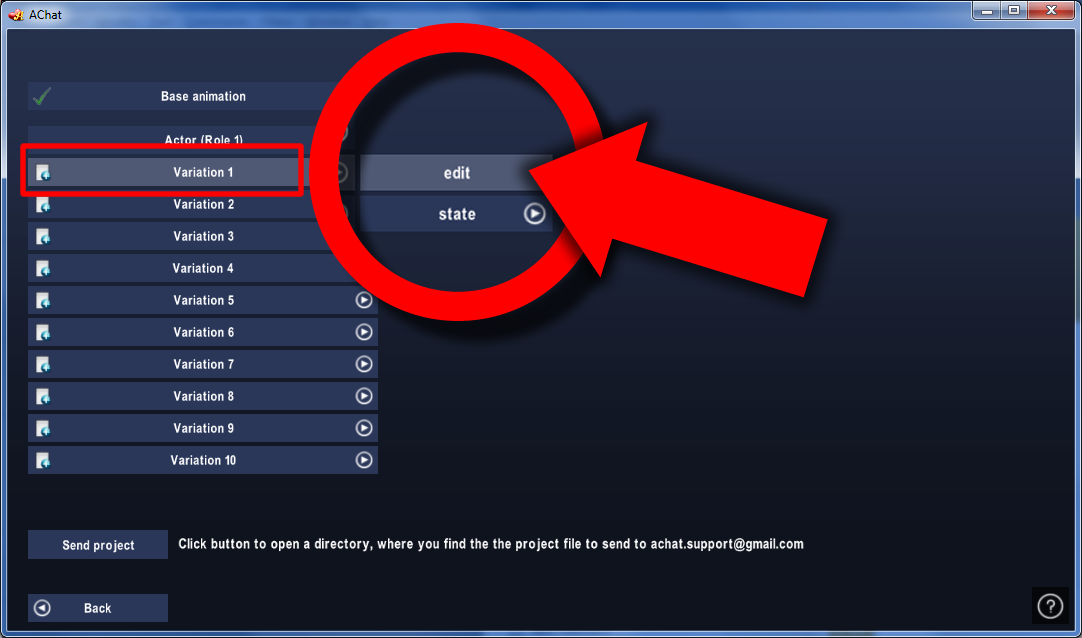
After finishing the variation, set its sate to ready by clicking "Variation 1 / State / Ready"
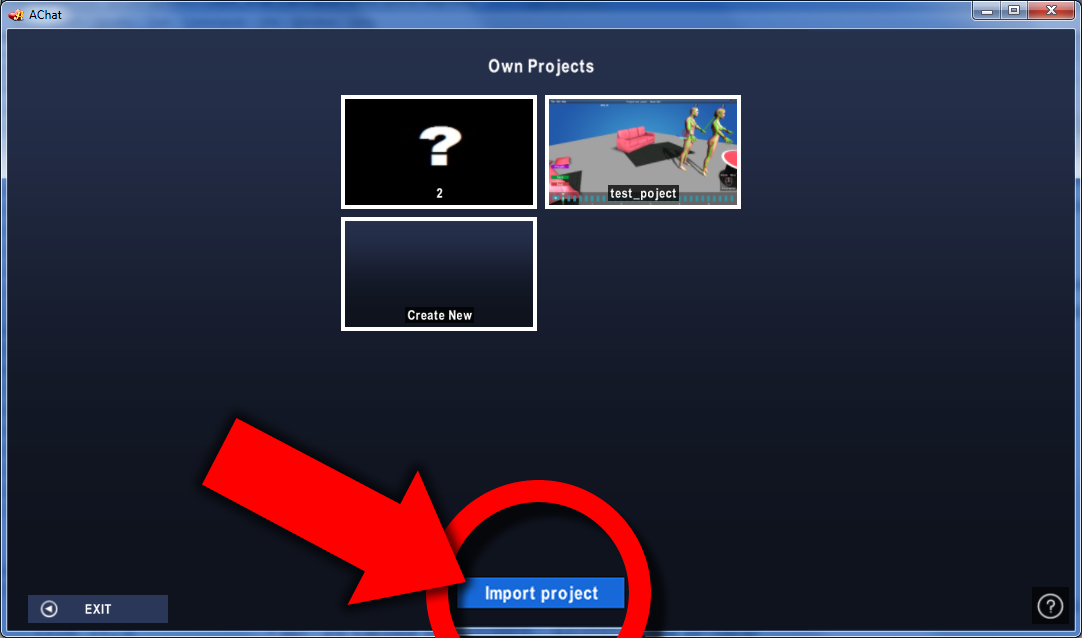
Import project
You can import a "tosend" project. You can use it as a backup system, or even better to cooperate with friends when working on projects. ("tosend" files can be created using the Send project button, it will pack your project into one single file.)
Creating the Base animation
Important:
Start with the Base animation! What is a base animation? Choose any pose in AChat to see it:
Base animation definition: It's a 1 Sec long animation (in AChat, it will start to play cyclically right after pose selection, before any variation is started. In Animation Editor, you can play it with the Play button in bottom left corner of the screen).
It needs a perfect starting position. For this, also called Base position, adjust bones and locks in frame 0 to achieve optimal, believable result. It must be good base for the variants to start from (note: variants can contain bigger moves, as they are 90 frames long, in contrast with the base animation's 30 frames)
It must be clearly recognisable what the characters do. Both characters must make lifelike movements, no body parts should be rigid during the animation.
If you feel you've created a genuine valuable base animation, please send it to us for reviewing! During our review process we'll calculate a 0-100 Quality score for your artwork. Only after you've got a Quality score of 75 or above, start with variations (base animation wrong - everything wrong...).
Quality score of your Base animation will be calculated based on following criteria:
- Correctness
- Sexiness
- Aesthetics
- Uniqueness (among existing AChat poses)
- Imaginativeness (globally)
Correctness means complying following rules:
1. Must comply the "Base animation definition" above
2. The base pose must be in 0th frame of the base animation. Don't place it in eg. frame 14.
3. No major body part is inside or goes trough another major body part visible when playing with the Play button. This also means,
you must carefully plan what limbs or other body parts go from where to where during the animation. 30 frames aren't too much,
you can't do too big moves.
4. No body part makes a jump when playing with the Play button. Avoid to place keys for same bone in close frames!
If you got a Quality score below 75, don't give up, try to make it better. If needed, start from scratch to achieve the goal.
As a general rule, please remember: use as few keys as possible in your animation
Check out the following 3 videos showing a base animation where only in frame 0 and 10 are many keys set.
If you read this first time, it might seem too early, but please watch this 3-parts video overview about anatomy of base animations, importance of frame 0, and the concept of "use as few keys as possible, while aiming lifelike movements of both characters"
Video: Anatomy of base animation I. - Playing the ready base animation
Video: Anatomy of base animation II. - 0th frame is the Base pose's frame: many bones adjusted to achieve the desired character positions. Many locks set to fix behavior of limbs in next frames
Video: Anatomy of base animation III. - Drag timeline cursor, and see: only one frame, the frame 10 has many keys (and frame 0 of course, frame of the Base pose)! Use as few keys as possible, otherwise your animation becomes very difficult to tune!
Moving and rotating characters
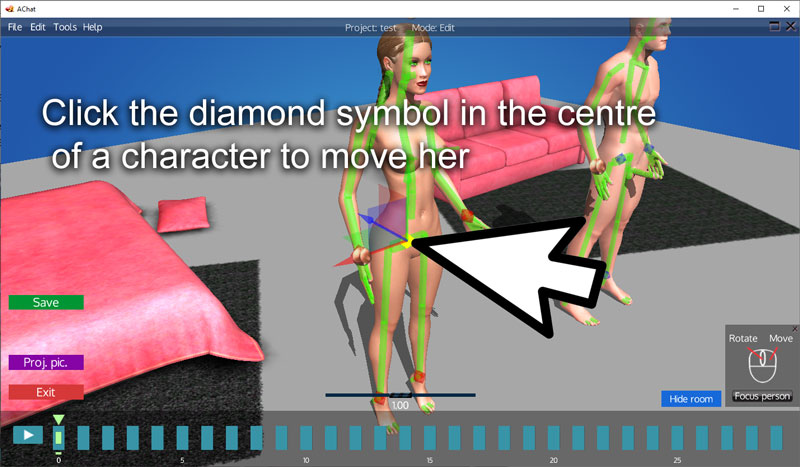
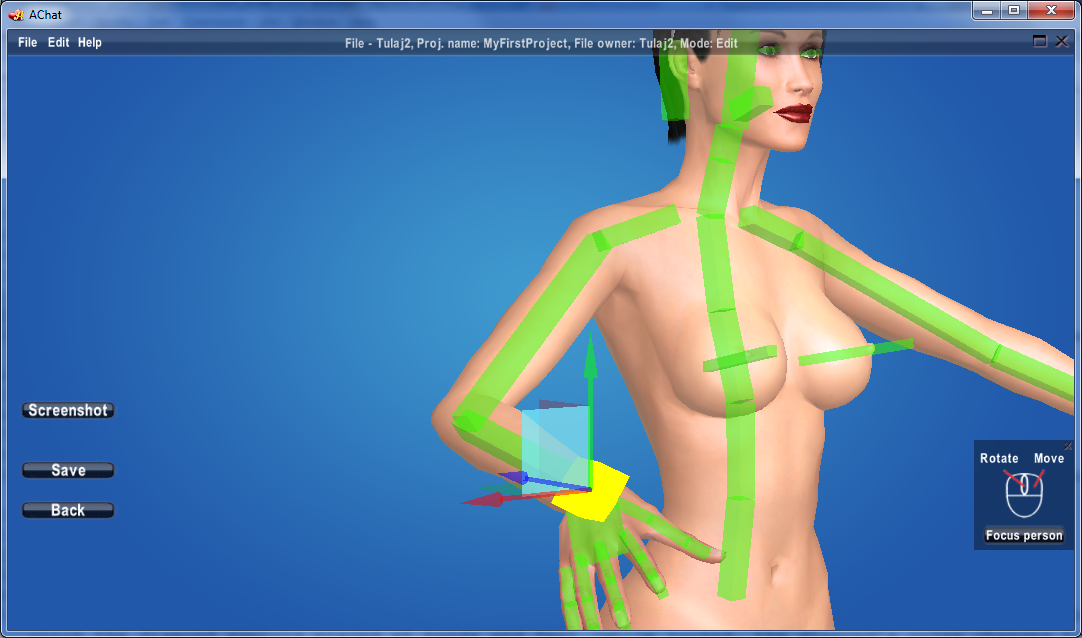
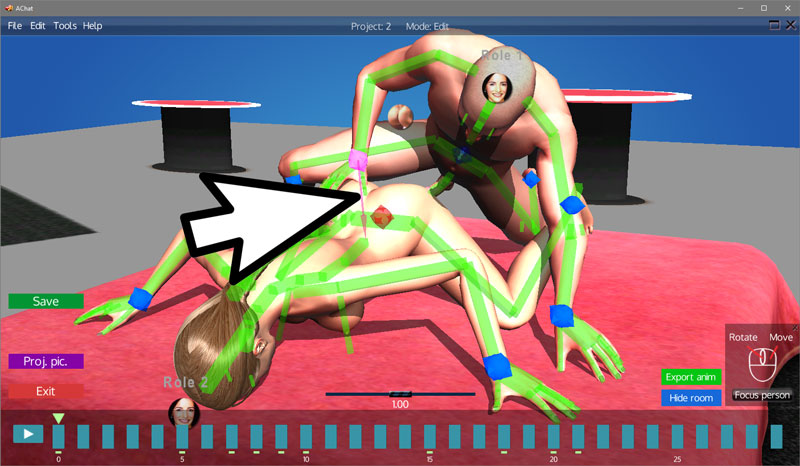
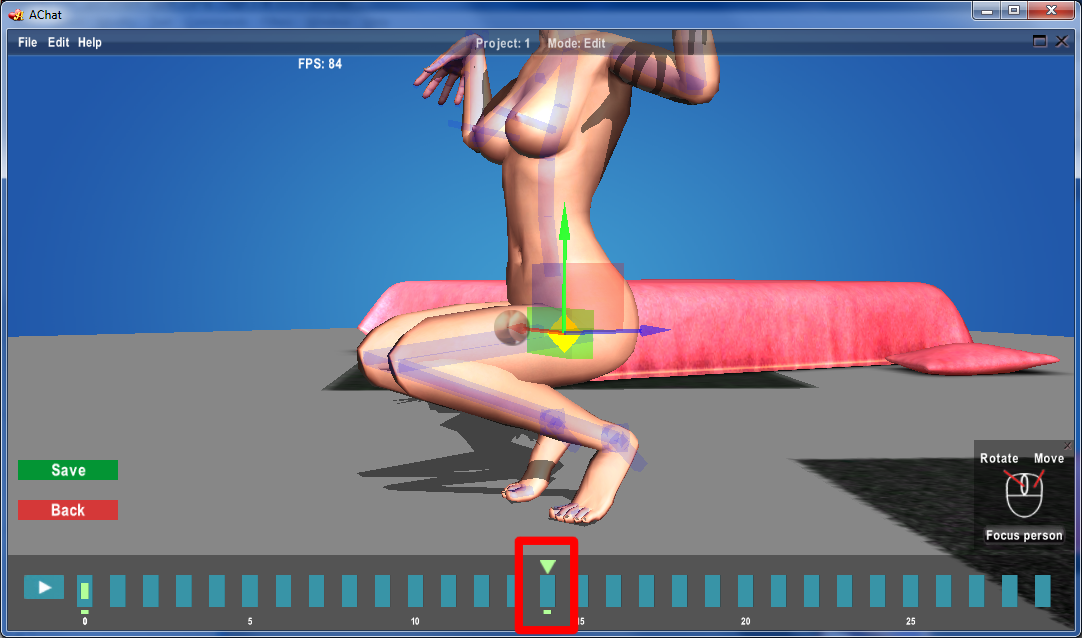
Click the diamond symbol in the centre of a character to move her. Drag and move one of the three arrows or one of the three connecting squares.
For example, if you want to allow movements only along an axis, use the appropriate arrow. If you want to allow movements in a plane, use the appropriate square.
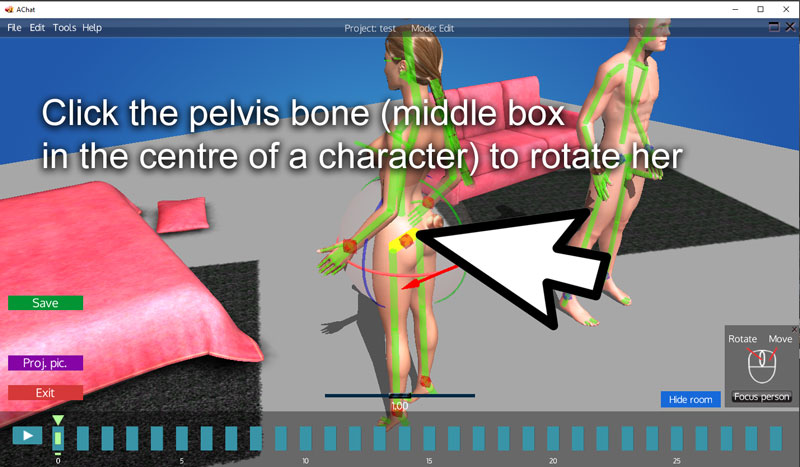
Click the pelvis bone (middle box in the centre of a character) to rotate her. Drag and move one of the three appearing rings.
Video: Move character, rotate bone, undo
In the 0th frame - Select place of action

This must occur in the 0th (leftmost) frame, so click it if it isn't active.
Select a place in the room, e.g. if you plan to use a furniture, then on it, or beside it. For this project, all actions will occur on that place. Click the Person move or Root diamond located inside the pelvis bone, and move characters to the desired place. Use the so-called moving gizmo to perform the moves. (More on this in Moving and rotating characters.)
Note: of course you can decide to use simply the ground (no furniture at all) as well.
Video: in frame 0, select place of action for both characters
Selecting bone of a character
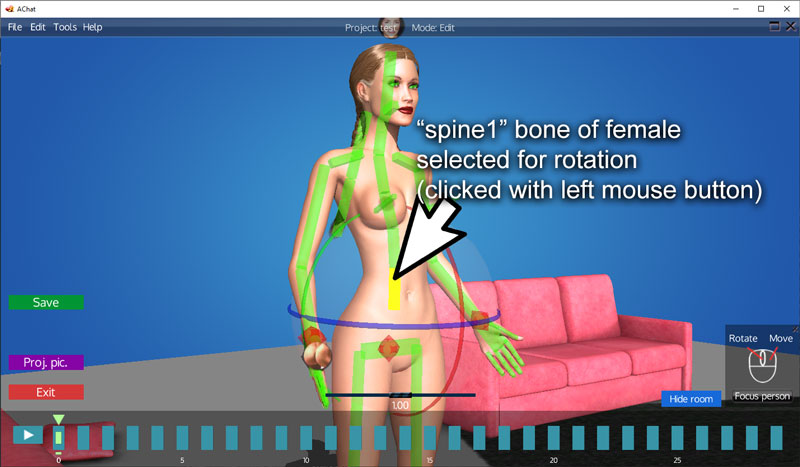
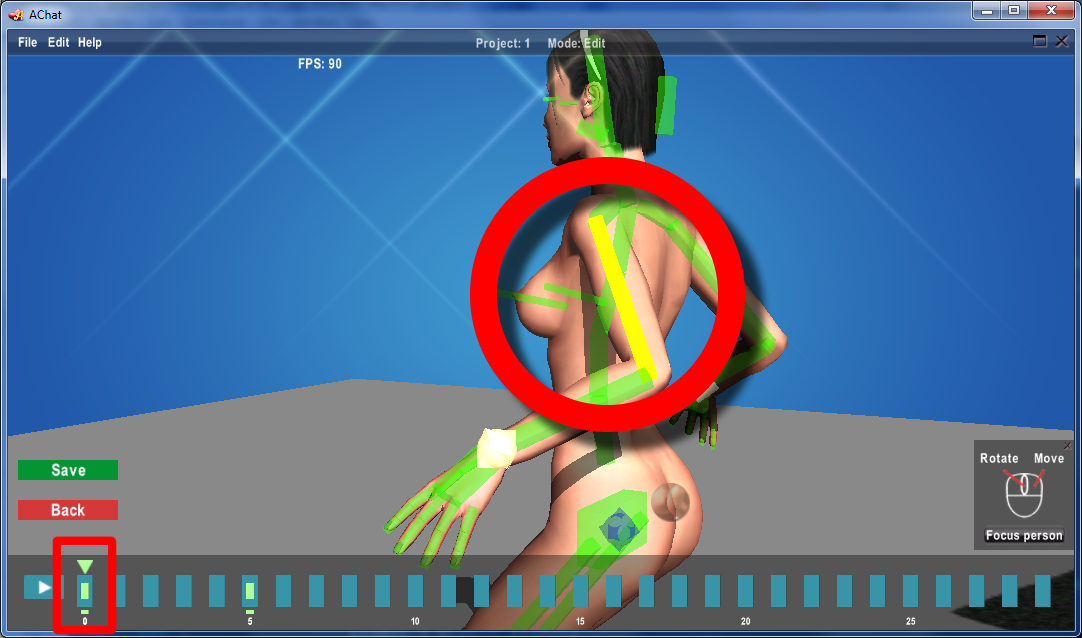
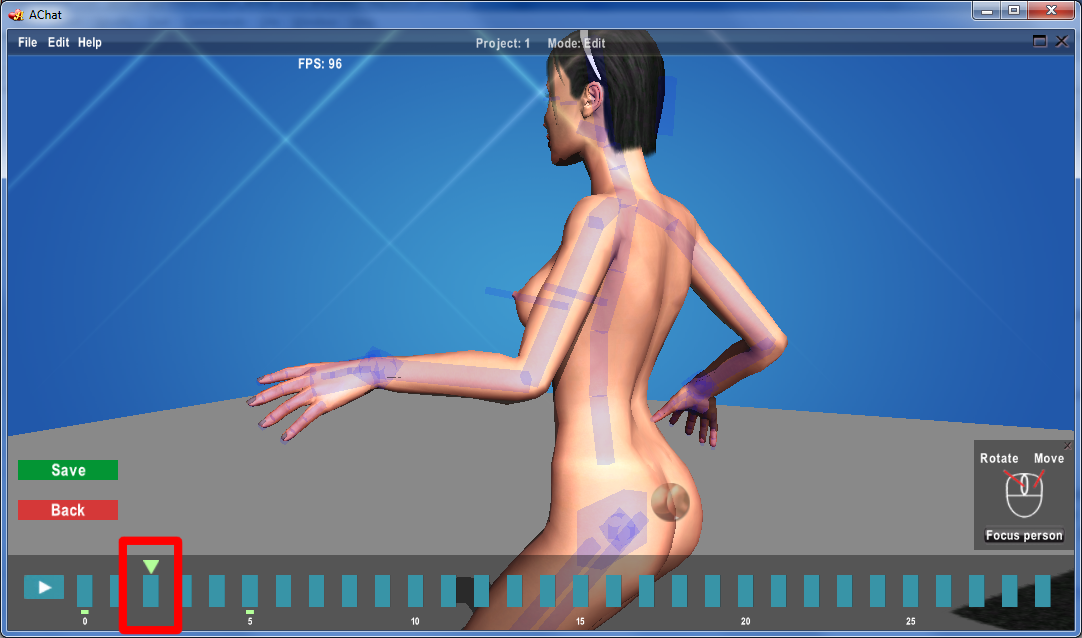
The characters have skeleton consisting of "bones" which appear as rectangular cubes. If they aren't visible, choose Show bones from the Edit menu, or press "s". Click a bone to select it. Selected bones appear in yellow.
Click the background to deselect bones.
Selecting multiple bones
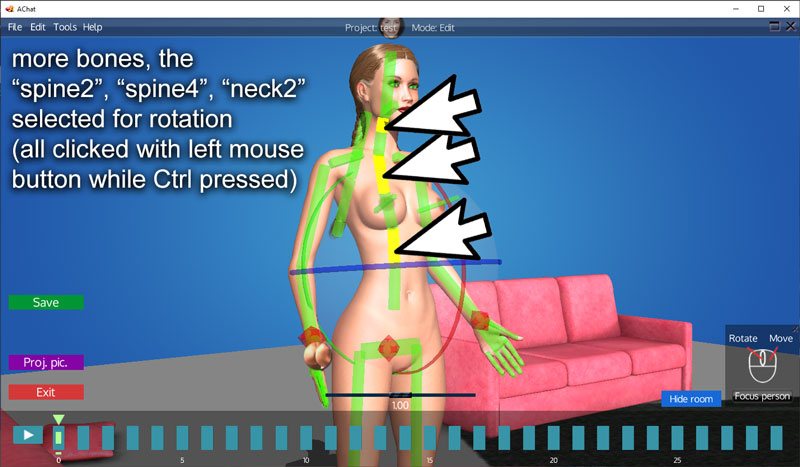
You can also select multiple bones by holding down the Ctrl key while clicking additional bones.
To select many bones at once ("tree of bones"), Alt-leftclick the bone. To select all bones of a character, Alt-leftclick the Pelvis bone. To select all bones of all characters press Ctrl-a.
Click the background to deselect bones.
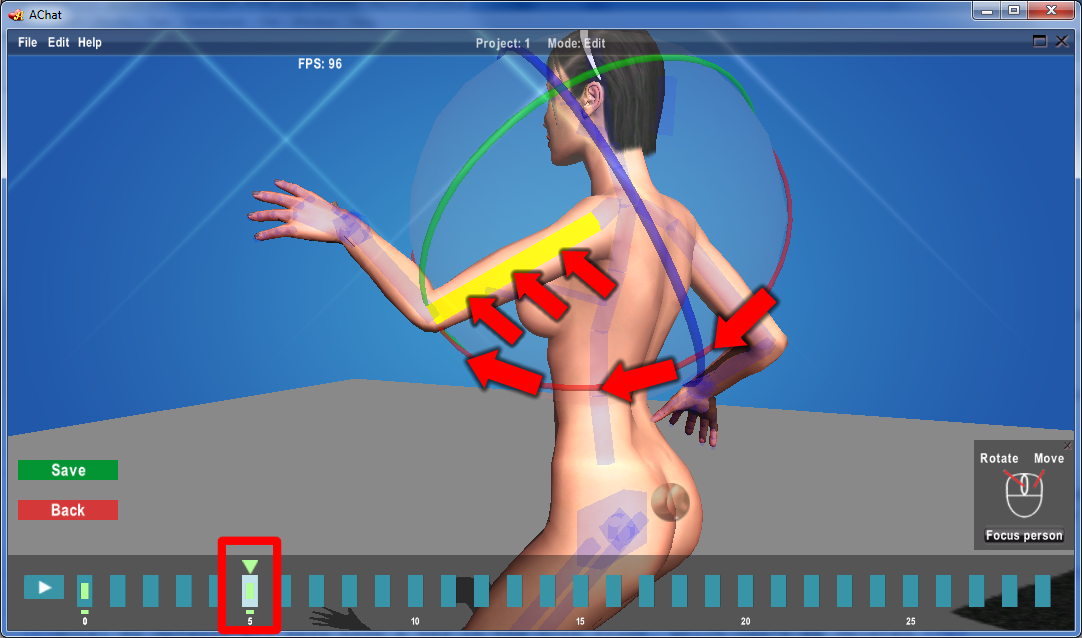
Rotating selected bones
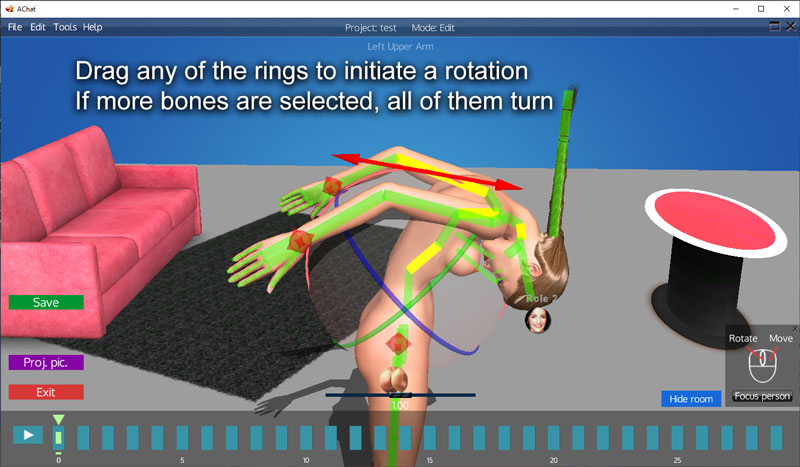
After selecting bones, three rings appear. Drag any of the rings to initiate a rotation, move the mouse in the directions indicated by the appearing small arrows to rotate the selected bones.
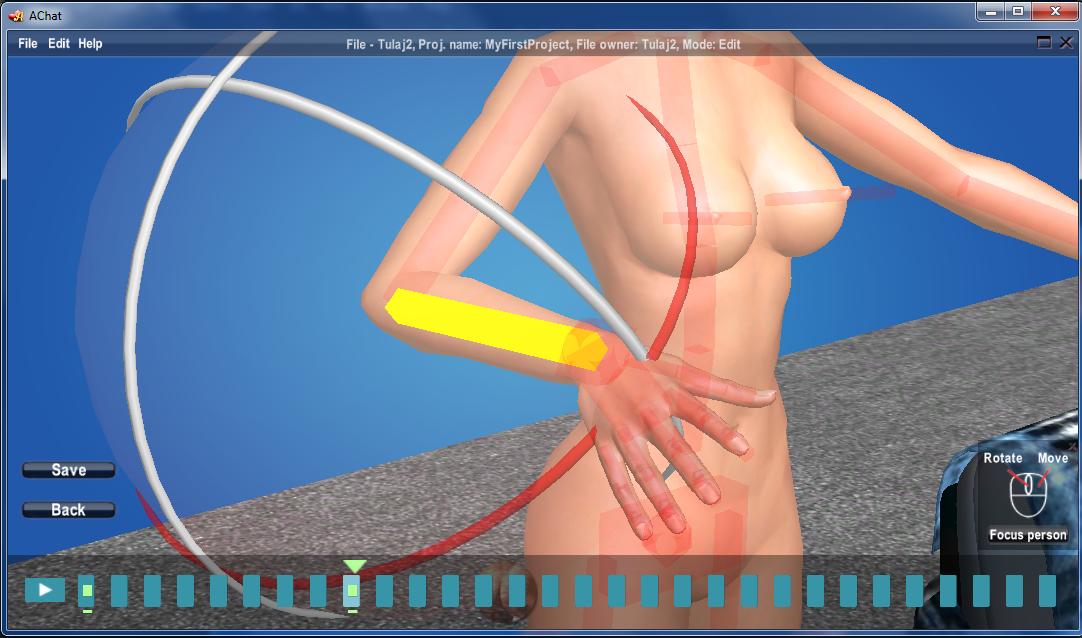
Moving hands and feet
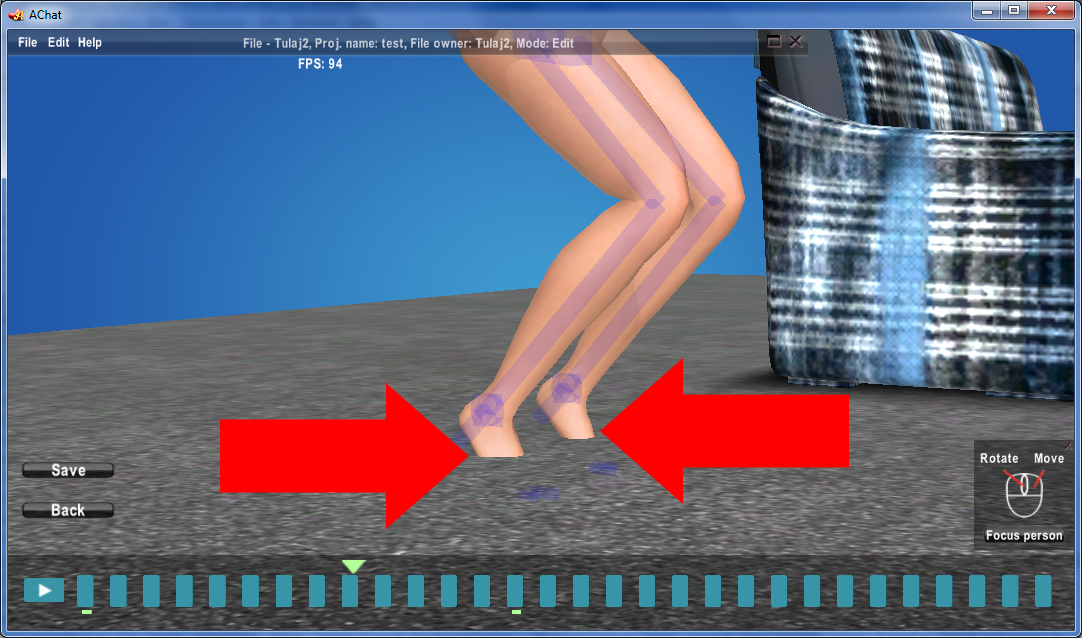
Click the diamond symbol at hands and feet to move a hand or foot. Three arrows with three connecting squares appear. Drag and move any arrow or square to move the hand or foot in the appropriate direction. Note, without applying limb lock (see later), the limb won't stay in adjusted position.
Limbs need locks in 0. frame often
For now just remember, while creating the base animation, the 0th frame has some kind of special handling, where the starting pose is defined. After moving the characters to the right place in room, place limb locks if needed.
Video: In frame 0, rotate pelvis without and with foot locks
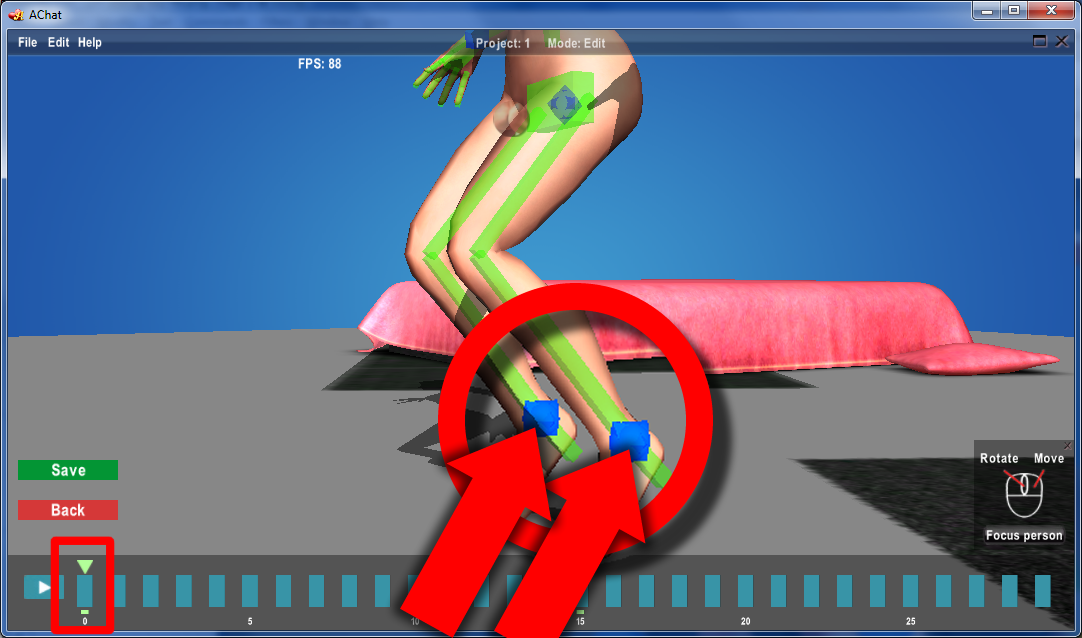
Locking hands and feet between frames - room key
Hands and feet can be locked via room key, thus they'll stay in place while other bones or the character itself change their rotations or positions during the run of frames.
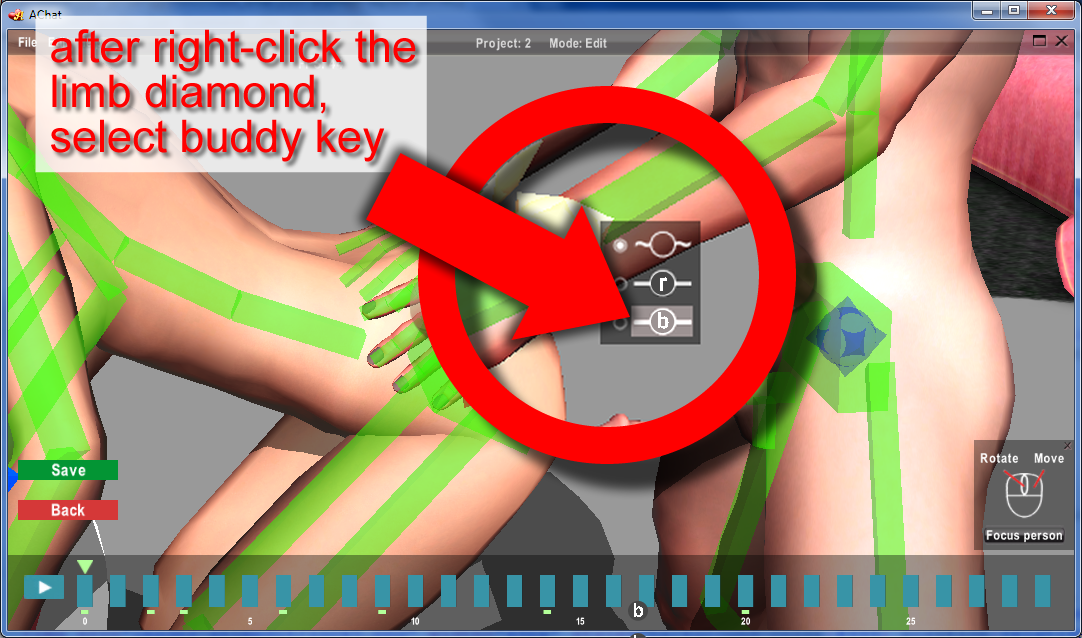
To perform locking of limb via room key, right-click the limb diamond, and select  from the appearing menu.
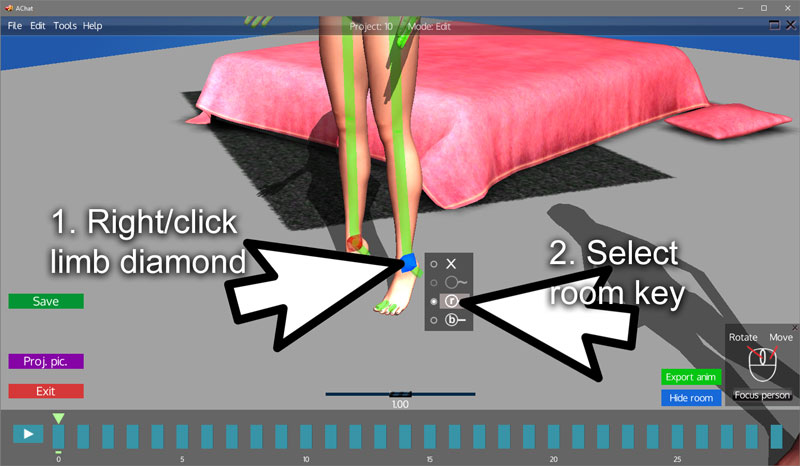
When locked as room key, the limb diamond is showed in blue.
Video: In frame 0, place hand on table, use copy/paste limbpose on the other hand
Video: Change actual frame to frame 15, move hip back without hands locked in frame 0, undo
Video: In frame 15, try to lock hands without handlocks in frame 0 - it's wrong, do it in frame 0, then in frame 15 move hip
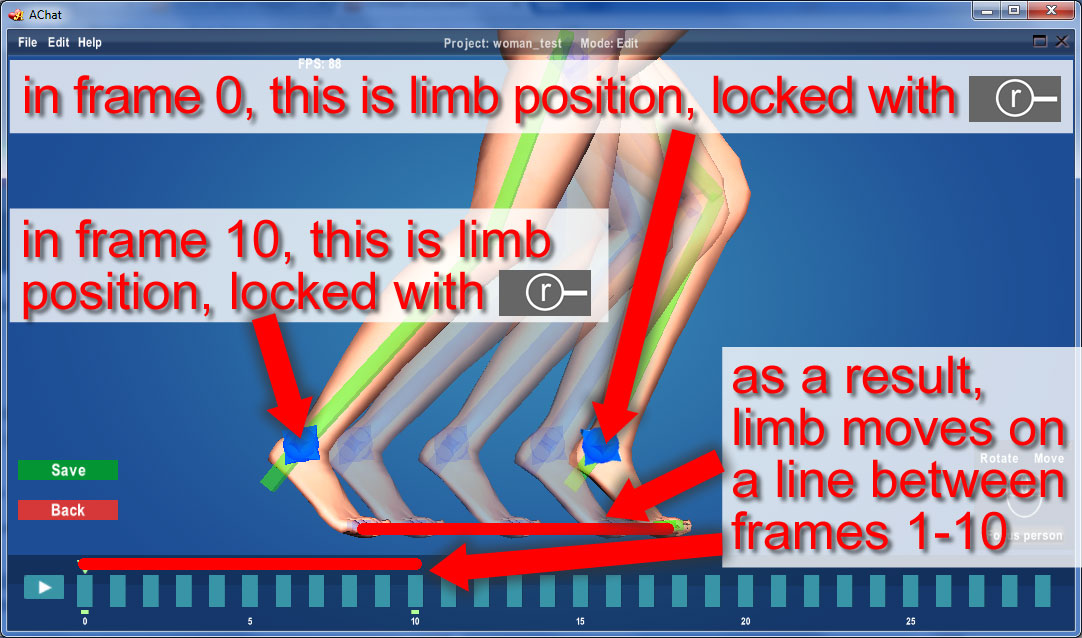
Also, you can apply room keys in different frames for the same limb - in that case, the limb's end will move along a line between the frames (if the lock positions are different).
To try this, set a room key for the limb in frame 0, then go to e.g. frame 14 and set a room key also there, but also move limb diamond to the left (left-click it, then drag and move the move gizmo's appropriate horizontal arrow).


When you let run this animation, you'll see that the limb is moving on a line, and limb's end is holding its angle relative to the room (rather than relative to its parent bone).
Technically speaking, the limb end is interpolated linearly between the room position and angle of the limb in the two frames, and the other main limb bones are adjusted automatically via IK (Inverse kinematics).
To unlock, right-click the limb diamond symbol, and select  .
.
See also Room key details for more details.
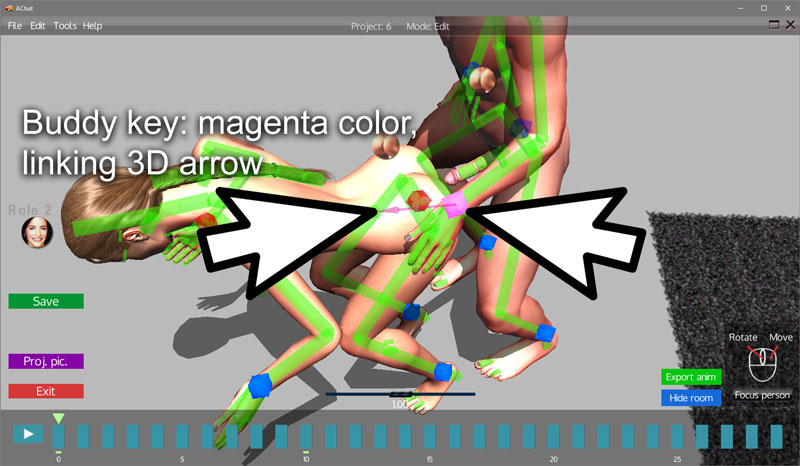
Locking hands and feet between frames - buddy key
Alternatively hands and feet can be locked via buddy key, thus they'll follow a specific bone of the other character while other bones or the character itself change their rotations or positions. To lock, right-click the diamond symbols placed at hands and feet, and select the buddy key icon  from the appearing list.
Then, left-click the just set magenta diamond, and right after that left-click the target bone of the other character.
When locked as buddy key, the diamond is showed in magenta, and a linking 3D arrow symbol is showed.
See also Room key details and Buddy key details for more details.
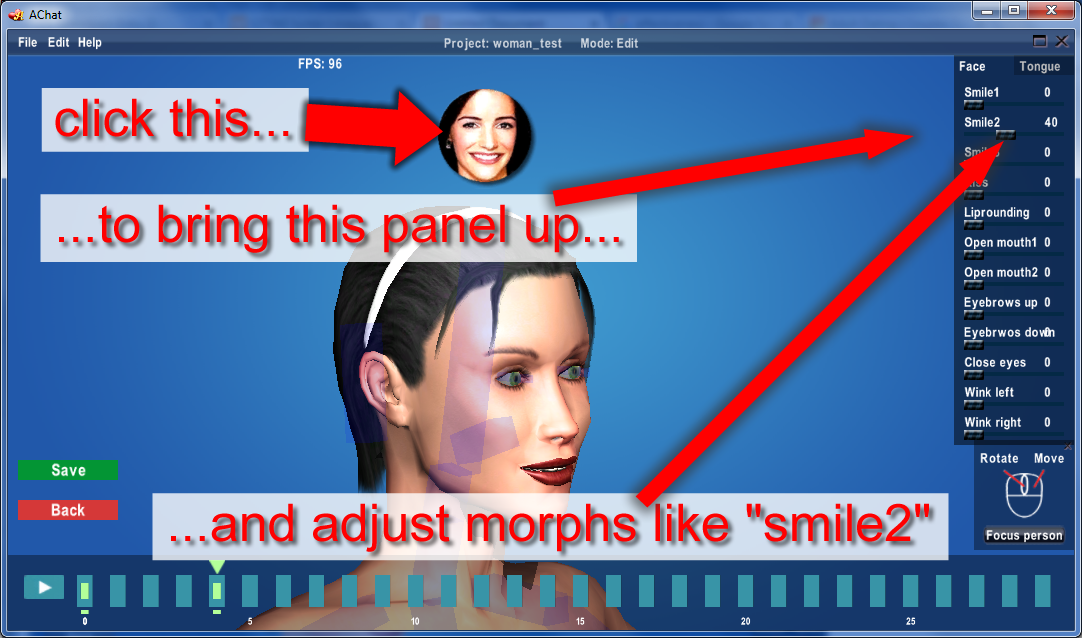
Adjusting face and tongue
Click the face symbol above a character to animate her/his face or tongue. The appearing window contains sliders for a bunch of face and tongue actions. Adjust the sliders to add the desired effects to the face or tongue.
These animations fall into the category "morphs". They are handled very similar to the normal bone animations, the main difference being that for morphs there is no rotating gizmo, rather there are sliders for adjusting the affected mesh. Adjusting morphs also produce keys in the actual frame, which will be handled very similar as bone keys.
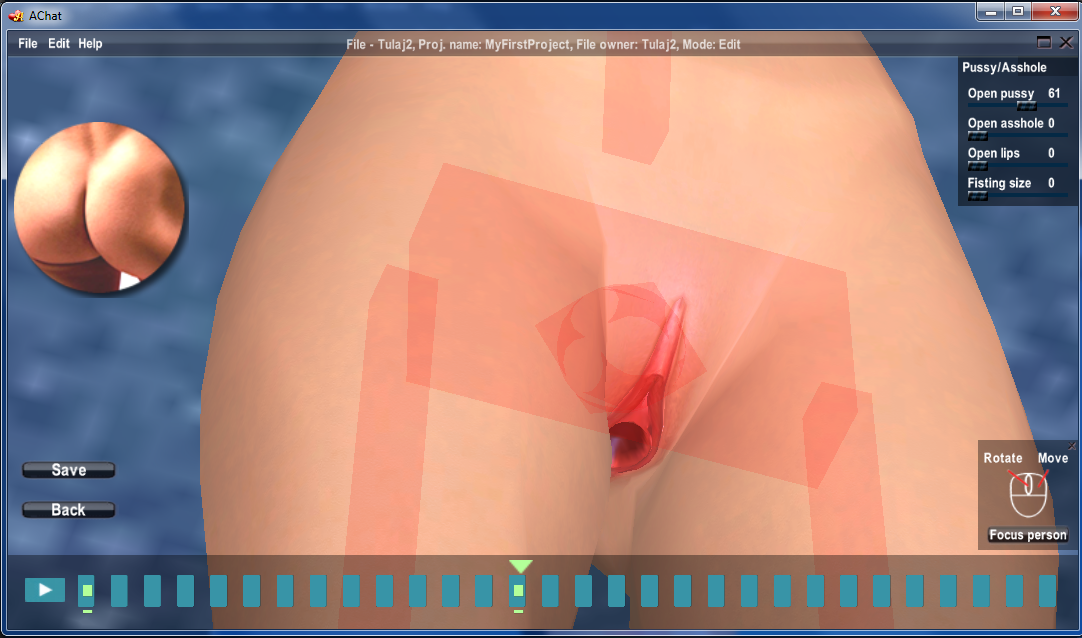
Adjusting pussy/asshole
Similar to face and tongue morphs are handled the pussy/asshole morphs. Click the ass symbol beside a character to animate her/his pussy/asshole. The appearing window contains sliders for a bunch of actions. Adjust the sliders to add the desired effects.
These animations fall into the category "morphs", read more on this here.
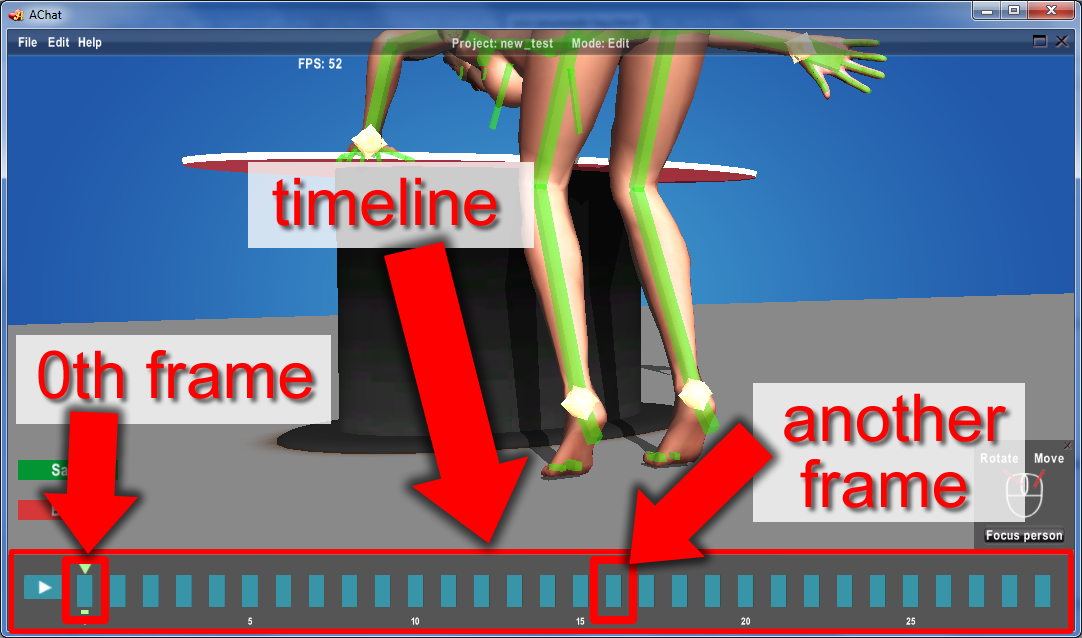
Frames on the timeline
When editing an animation, you'll see a bunch of rectangles in a row at the bottom of the screen, the so-called "frames". They build up the "timeline". Their logic is as simple as follows: adjust characters in some frames as you wish, and then press the play icon to watch how it looks when the frames are played in a quick sequence.
The terminology "FPS" or "Frames per Second" is used for specifying the speed of playback: in our case it is 30 Fps, meaning in 1 Sec 30 frames will be played back.
The base animation contains 30 frames, thus it is 1 Sec long.
The variants contain 90 frames, thus they are 3 Sec long.
Animation: keys on the timeline
When you adjust a character (e.g. rotate a bone), an animation "key" will be placed on the timeline for the adjusted bone(s) or morphs or limb locks, in the actual frame, marked by a square in that frame.
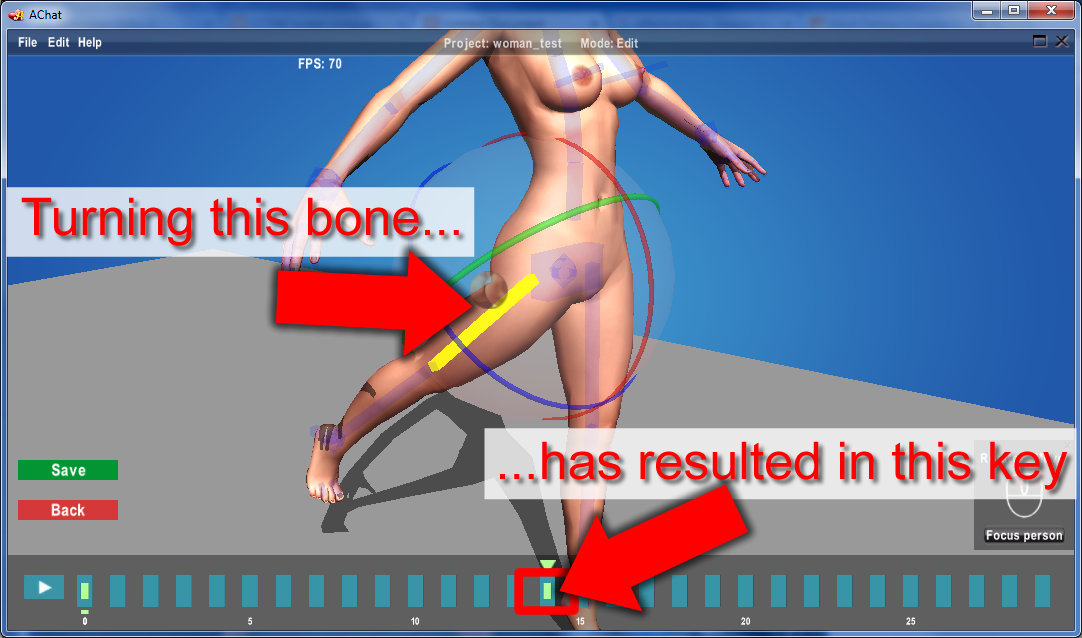
The system binds that adjustment (the data describing the adjustment) to that key. After deselecting, you can still see a little rectangle below the frame, signaling the frame contains some keys.

If you place keys for the same bone or morph in more frames, the system will "interpolate", on the frames in between.
Interpolating simply means, that changes (e.g. bone angle changes, lock position changes, morph % changes) will be distributed in small parts between the frames in between.
Here you see an example where the left upper arm has a base position in frame 0, and then in frame 5 it was moved upwards via the rotation gizmo's red ring.
In the frames in between the left upper arm position will be adjusted automatically. For instance, in frame 2 you'll see this, although it hasn't any key.
Select, copy, move, delete keys
After selecting bones and tongue/face or pussy/asshole animation symbol, click the appearing key-frames to select them. Drag and move to move selected keys on the timeline. Hold down the Shift button while dragging for making copies of the keys.
For all operations, hold down the Ctrl button in case of multiple keys.
Press the Del button to delete selected keys.
Right-clicking a bone which has a key while holding down the Ctrl key will delete the key for that bone in that frame.
Copy limb pose
Limbs (arm and leg poses) can be copied following way:
Select a bone or the diamond of the limb which you want to copy, and press Ctrl-c (or select Copy limb pose from the Tools menu)
Then select a bone or the diamond of the limb on which you want to apply the previously copied limb pose, and press Ctrl-v (or select Paste limb pose from the Tools menu).
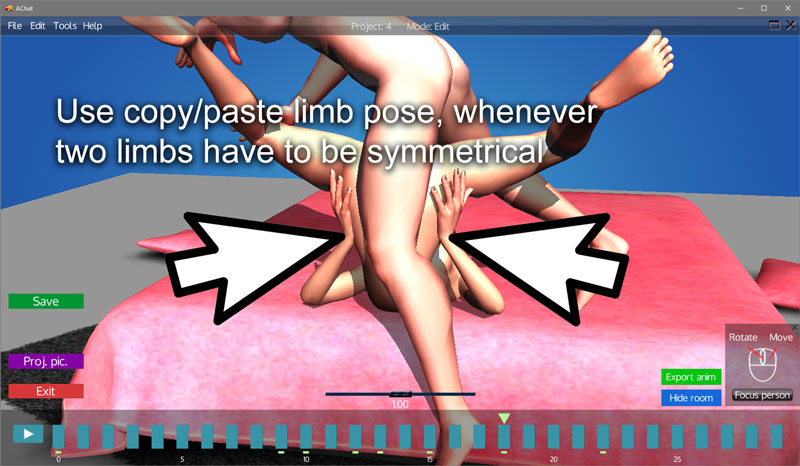
NOTE: if the limb to which you want to copy has already a lock, remove its lock before copying, otherwise the limb position may not refresh correctly.
Key speed characteristics
Right-click a bone which has a key in the actual frame, and you'll see appearing the key speed characteristics choices. Simply set your preference.
Note: For limb diamond bones, use Shift-Rightclick, as right-click has another function for these bones.
This will describe how interpolation steps will be done when the animation is arriving from the previous one into the actual frame for that bone:
- Uniform: interpolation will occur in equal steps
- Natural: smaller amounts at leaving previous key, then becoming bigger, biggest at the half distance between the two keys, then smaller steps again at arriving into actual key
- Accelerated: smaller amounts at leaving previous key, then becoming bigger, biggest at arriving into actual key
- Decelerated: bigger amounts at leaving previous key, then becoming smaller, smallest at arriving into actual key
Room key details
When to use room keys
If you let the leg move simple be turning the thigh bone, the leg's end will move on a curved path:
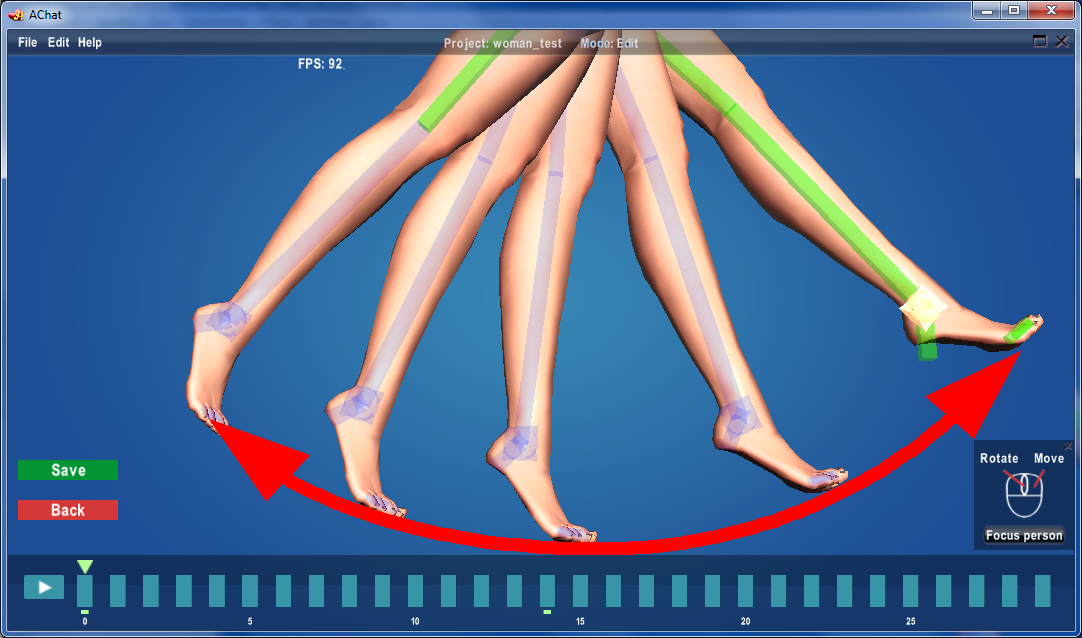
This is not always the required behavior. Sometimes you want to move the leg's end along a line:
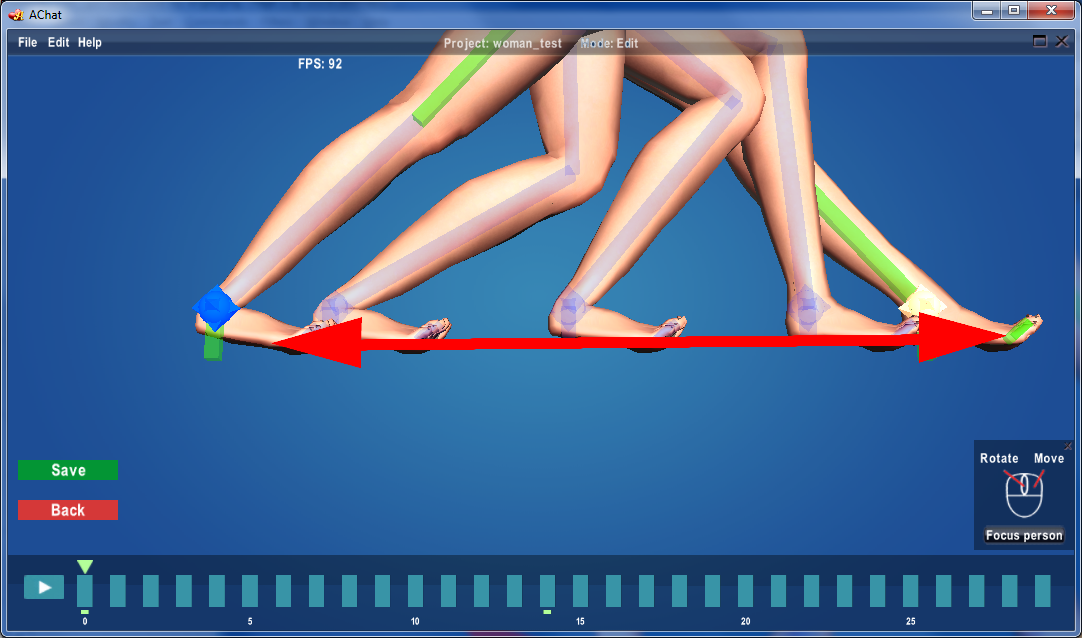
This can be achieved by using room keys.
Also, assume you want to animate a squat from a standing pose:

Using simple bone turns, you'll get this pose in an intermediate frame. Please note, it is kind of error, that the feet go into the ground.
Whenever you need a precise limb end behavior (staying in place, moving on a line, moving along with buddies bone), use room or buddy keys.
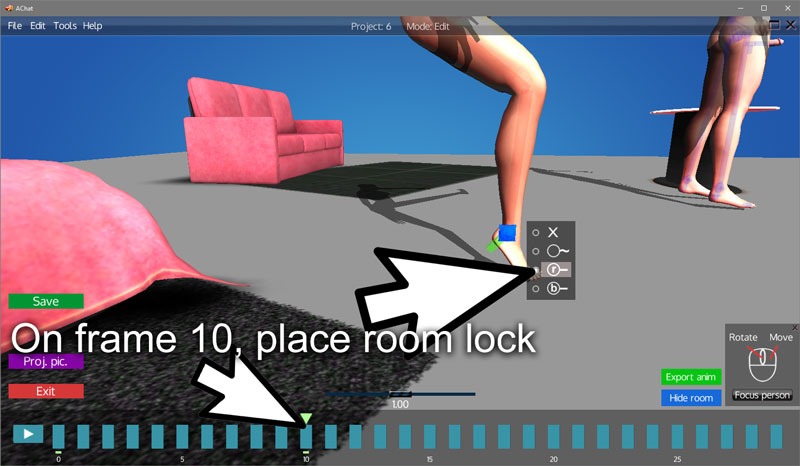
For example, for a "squat from standing" movement simply use room keys on the desired region of frames.
In frame 0, set lock type for the limbs.
This will be effective on all frames to the right, till there is a Switchoff lock  found which invalidates this effect.
limbend won't stay in place, won't move on line, it will move on a curve line, specified by its parent bone angle changes.
We don't place such, so we can go simply to e.g. frame 14, drag the character root diamond, and move it downwards. While moving, you will see the feet moving along, but when you release, the feet position themselves into the right positions. (You can avoid the feet moving along by setting locks for the feet also in frame 14.)
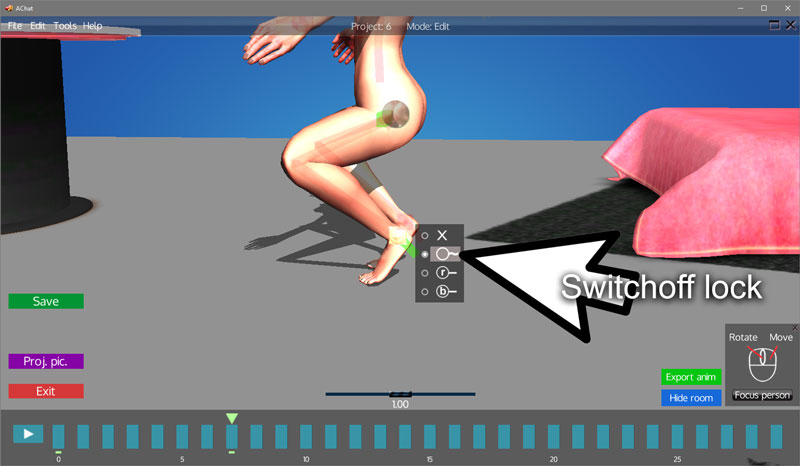
How to switch off limb lock effectiveness
Staying at the previously discussed "squat from standing" example, the feet limb locks, placed in frame 0, are effective in all frames.
If you want to stop lock effectiveness e.g. in frame 7, then set a lock in that frame for the limb. As suggested by the graphics, this will leave lock effect intact on the left side, but will invalidate lock effect on the right side (thus enable angle-based interpolation).
Please test it. Now in frames 0-7 limb end is locked, but in frames 8-29 (and then back to frame 0) limb lock is switched off, the main limb bones are interpolated based on bone angles.
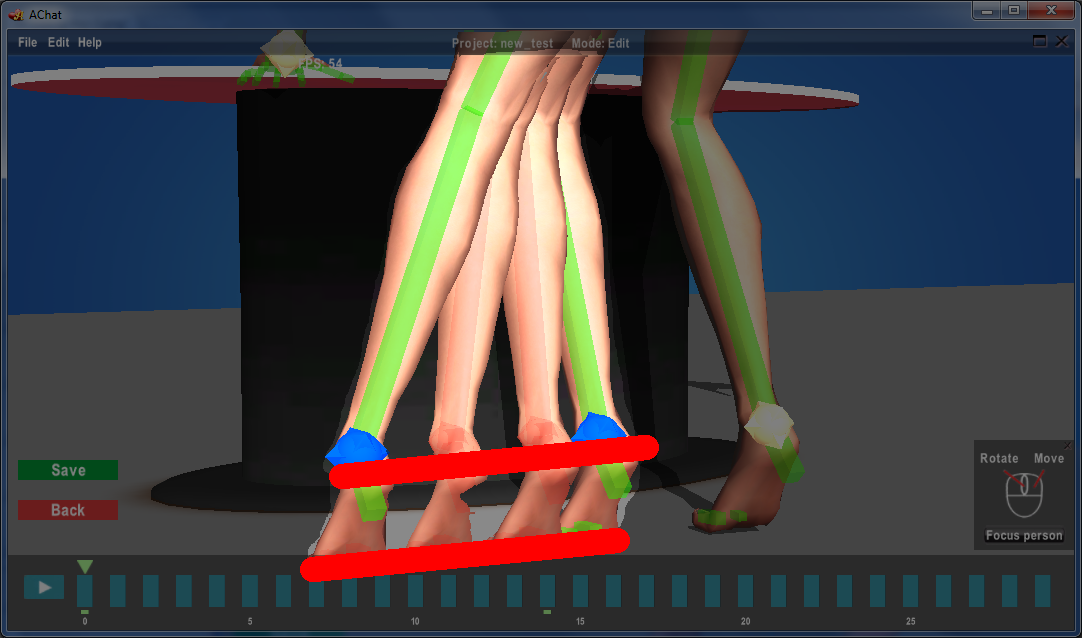
How to use room keys - example 1.
Let's assume, in the 10th frame, you want to move the foot back in a way it moves "on a line" (it should touch the ground along the movement.
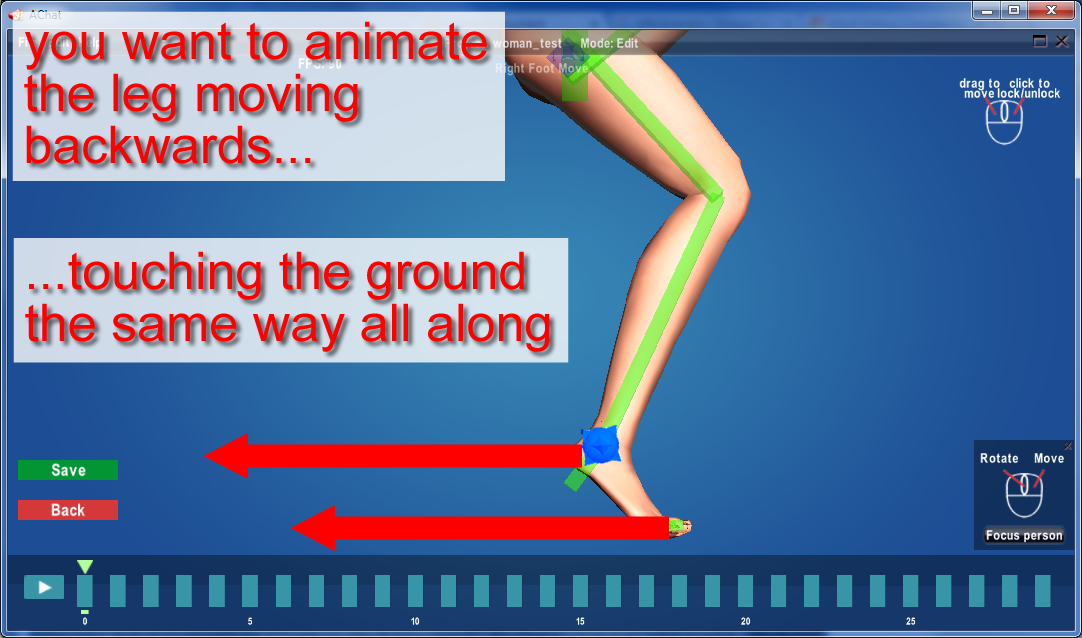
To achieve this, select 0th frame, right-click the leg's diamond symbol, and select
Then, select 10th frame, right-click the leg's diamond symbol, and select

Then left-click the limb diamond to let the move gizmo appear, and move the foot backward by dragging the horizontal arrow.
Move the timeline cursor along the first 10 frames (drag it and move it along), and you'll see that the foot is moving exactly on the ground, along a line.
This is because the mode guarantees that the limb end will move on a line path (or stay in place) on the frames left and right to the actual frame (if not overridden by other locks on the right side). The little straight line on the right side of the symbol refers to this.
How to use room keys - example 2.
Let's assume you have this base pose, and you want to move the body backward while the foot on the ground stays in place.
Same applies as in the previous example: use the for the foot e.g. in the 0th and 10th frame, if you want that on both left and right side of that frame the foot should move precisely on a line path (or stay in place), meaning it stays in one point in this case.
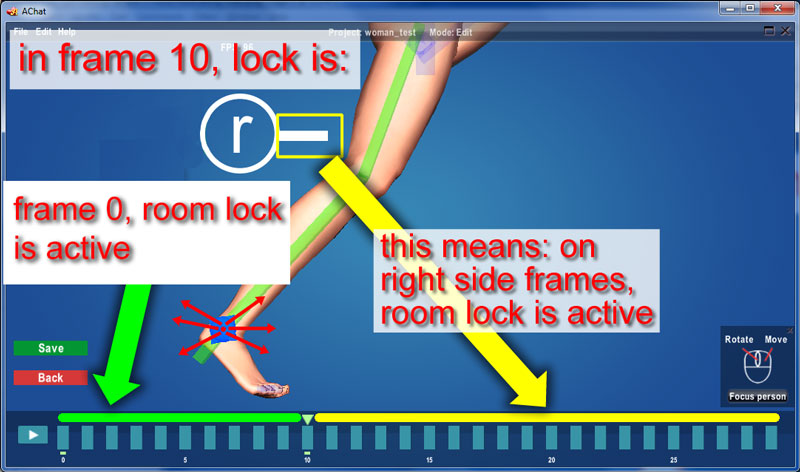
If a limb has locks in more frames, there is a left to right evaluation order for them, meaning right one overrides the effect of the left one.
Buddy key details
There are situations where you want one limb (hand or foot) to move together with one specific bone of the other character:
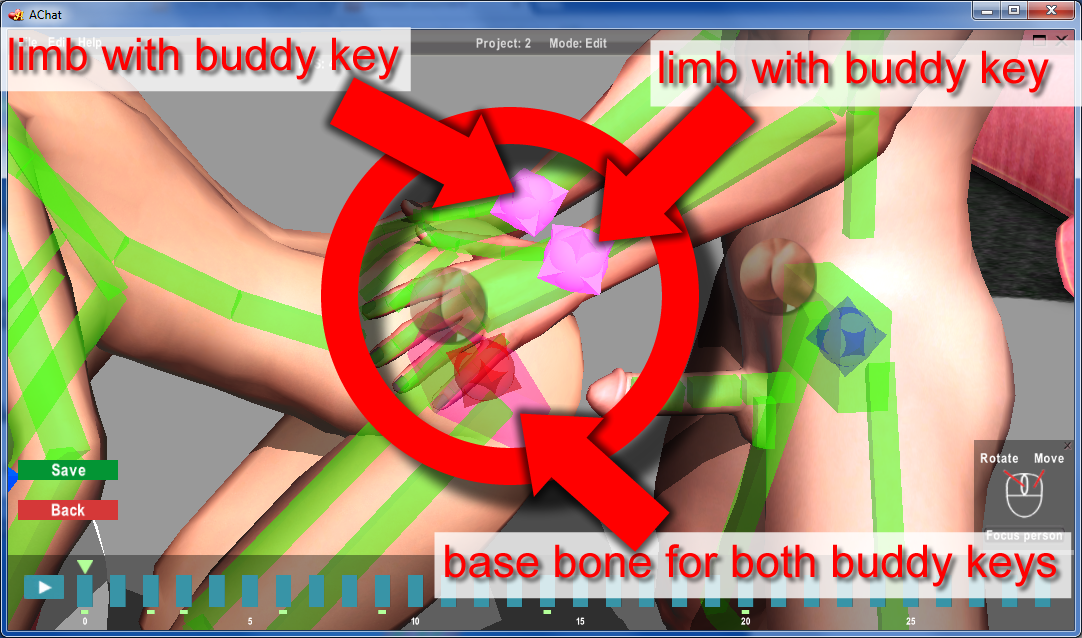
To achieve this, please right click the limb diamond for which you want to set the buddy key, and select
Then, left-click the just set magenta diamond, and right after that left-click the target bone of the other character.
When locked as buddy key, the diamond is showed in magenta, and a linking 3D arrow symbol is showed.
Let the other character move in frames where the set buddy key is effective. You'll see that the limb which has the buddy key, moves together with the other character's appropriate bone.
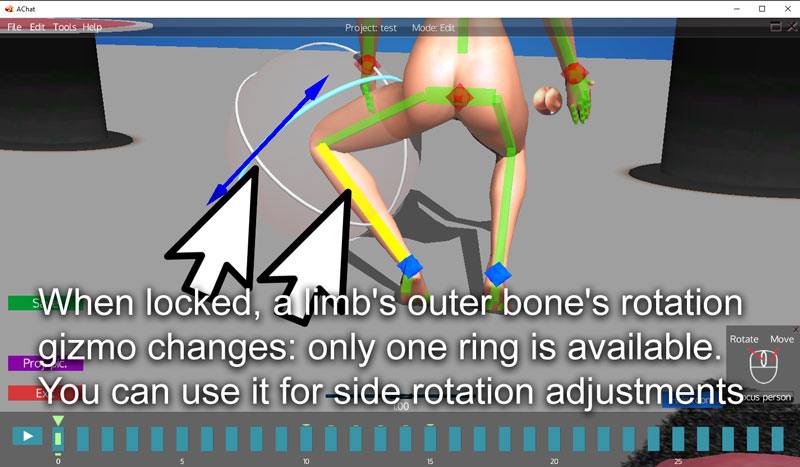
Outer limb bone side rotation for locked limbs
When locked, a limb's outer bone's rotation gizmo changes: only one ring is available.
You can use it for side rotation adjustments of that limb during the lock effectiveness. If more such side-rotations were applied during the lock effectiveness, the system will interpolate this angle on the frames in between.
Evaluation order when using more room or buddy keys for a limb
Every lock has effect on its own frame and the frames right to it, till another lock for same limb isn't found (going from left to right on the frames).
0th frame has some kind of special handling
The 0th frame is a special one, where all bones, limbs and morphs have a key, defining the starting pose.
Thus the system checks and maintains it with priority.
Generally, in the 0th frame, a limb should be unlocked only, if it will move freely during the animation.
In most cases, it makes sense to lock limbs in the 0th frame. As on the following example's frame 0:
In later frames, you can always place switchoff locks when needed.
Animate hairs, eyes, breast, cock as well
The ponytail hair's, and the black female hair (click one bone of the female character, then select Take on from the Edit menu to check them out), bones must be animated as well. Don't forget them!
Video: Set ponytail bones, here with use of "bonetree" (alt-leftclick on start bone to select)
Use the Edit / Take on - take off menu item to take on some items, while editing the base animation.
With this function you can mount a dildo, two kind of it is available, hand and strap-on version. You can freely decide to use any of them, but then it will then appear consequently in the base animation and all variations as well.
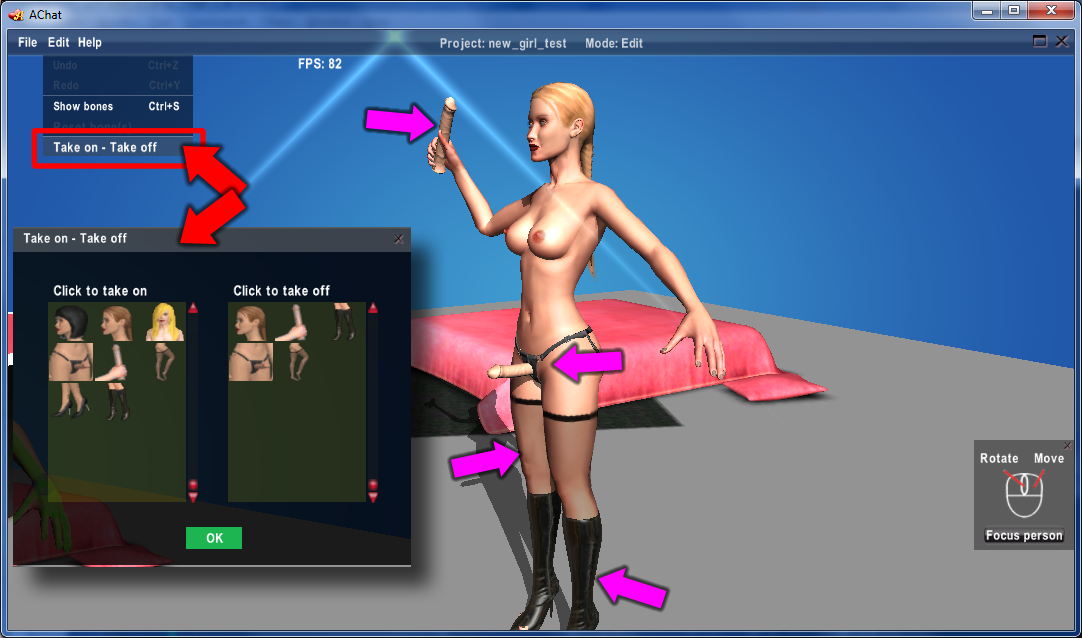
Also some other cloth items are available, but those are only for decorating purposes.
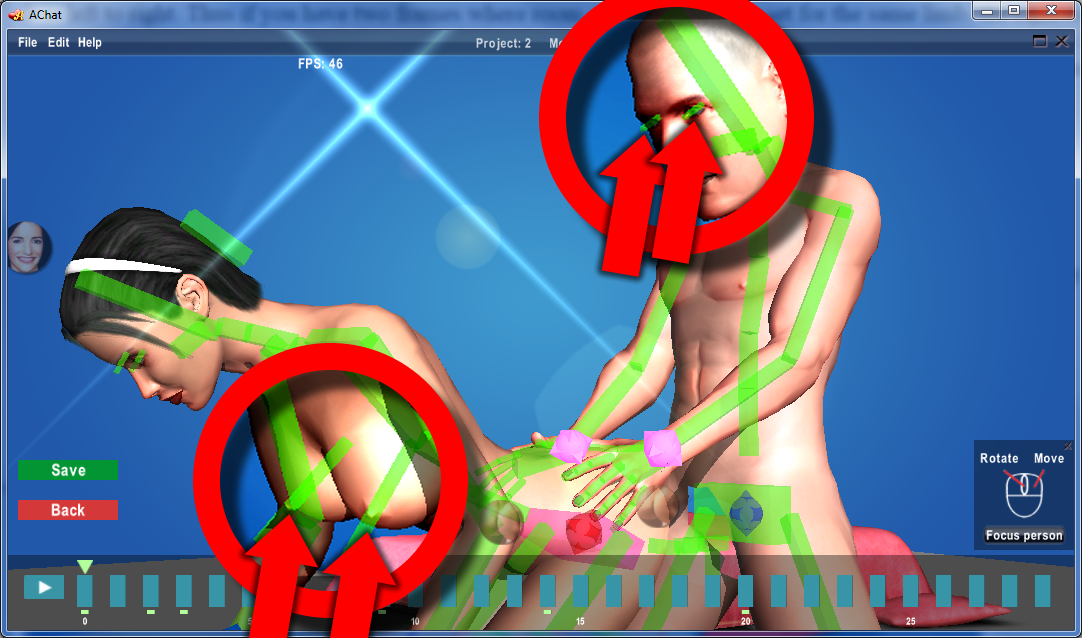
For realistic action, animate eye viewing directions and breast as well!
Video: Head up, pony must be adjusted
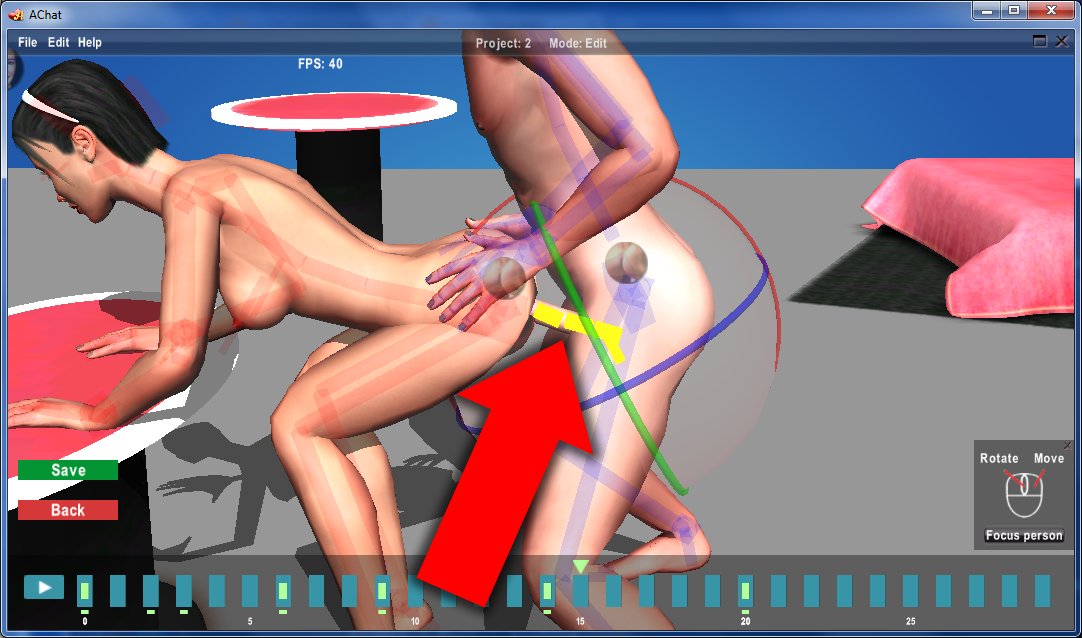
Cock must be animated in a very precise way, when penetrating a hole. On the other side, the hole must be opened accordingly via morph!
Differences between editing base animation or variation
In case of base animation, the timeline contains 30 frames, and it can be used to create a 1 sec long base animation.
The starting pose should be created in the 0th frame.
Optimally, you should prepare the base animation as complete as possible, before beginning with the variants.
In case of variations, a timeline containing 3x30 frames can be used for creating a 3x1 sec. long variation animation.
Base animation's frames will be loaded into the 0-29, 30-59 and 60-89 frame ranges initially. You can't modify 0th frame's bone and morph keys (locks can be modified based on a reduced set), because starting pose must stay valid also for the variant.
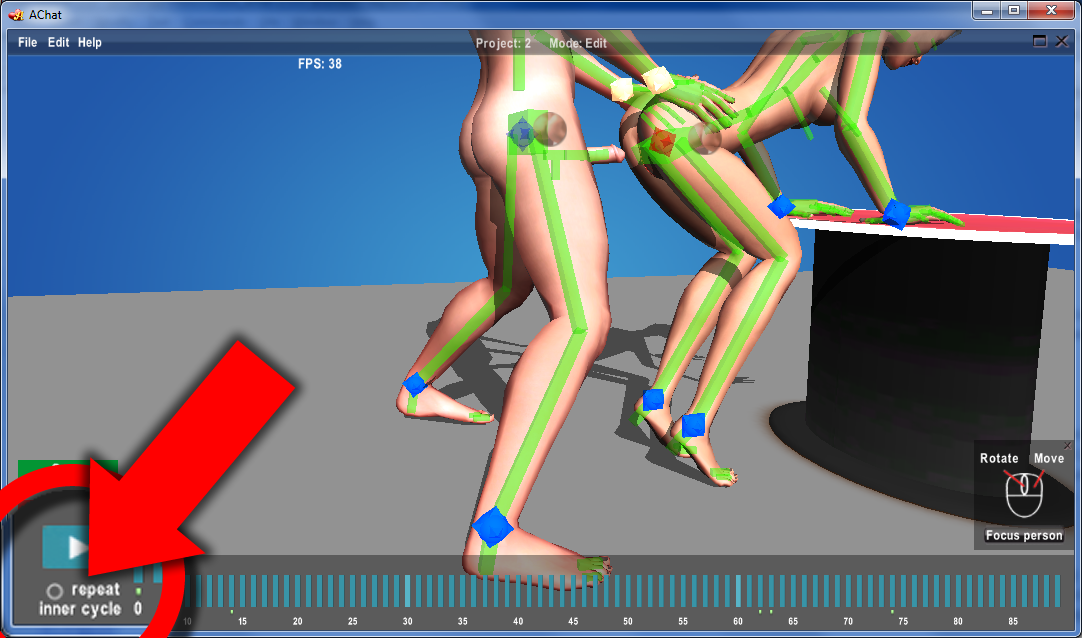
As said, the frame ranges 0-29, 30-59 and 60-89 are set initially based on the base animation - if you let run such a variant, it will repeat the base animation 3 times during its 90 frames. As a first step for creating a variant you will probably reset some middle frame range. This way you can start to create another movement for the variant in that region.
To reset selected bones in a frame interval, press Ctrl-r (or select Reset selected bones on frame interval from the Tools menu).
To reset selected bones in a frame range specified numerically on an input form, press Ctrl-n (or select Reset selected bones on frames specified numerically from the Tools menu).
Then you can start with the animating of the variant action.
Frames 30-59 are the so-called inner frames. You can decide freely if the action on those inner frames should be repeatable. If repeatable, when your pose is added to the live system, users will be able to run the inner frames cyclically, and the 0-29 and 60-89 frames should be only transient frames, connecting inner frame action to the base pose. If decided so, you can use the repeat inner cycle option when playing it back to check how it looks.
One more thing to remember: you can't modify the 60th frame, as it is always the same as the 30th frame. This is to maintain the whole logic of cyclical variants.
See also Frames on the timeline .
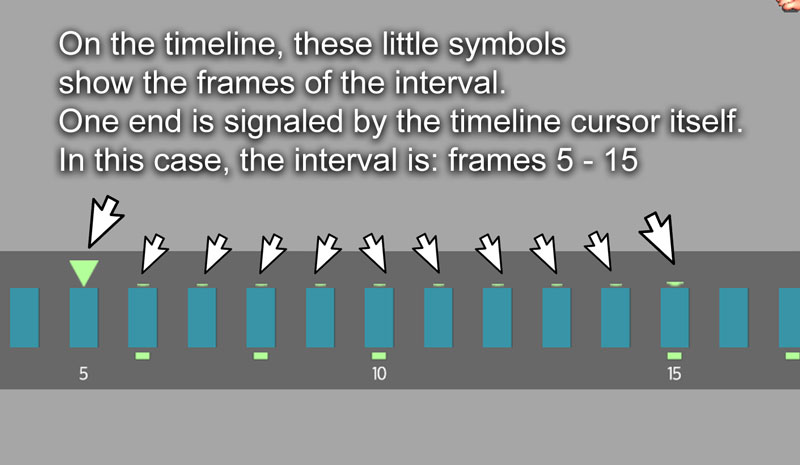
Frame interval
Some operations work on a sequence of frames, so called frame intervals. Left click a frame, and then click another frame again to select such a frame interval. (eg. to select frame interval 3-14, click frame 3 and then frame 14). Tiny marking will show the last selected interval, in a line below timeline's cursor.
Slots: saving, loading animation parts
Slots are good for re-use of already made animation parts in other or same animation.
With slots, it is possible to save any set of bone keys, morph keys placed on a frame range.
Then, at loading a slot, you can select the bones, morphs, as well a frame range, for which the slot's content will be applied..
Ctrl-F1...Ctrl-F10 : save animation parts to slots 1...10
Steps before saving to a slot:
Think of what keys and what frames (from-to) must be included
Select needed bones, from any character
Select needed frame interval
Press Ctrl-F[n] for saving to slot [n]. Eg. Press Ctrl-F5 for saving to slot 5.
F1...F10 : load animation parts from slots 1...10
Steps before loading from a slot:
Think of what keys and what frames (from-to) must be affected by the slot load.
Select needed bones, from any character. Only selected bones can be affected by slot load. And all this only on specified frames, see next point.
Select needed frame interval. If no frame interval is defined, the slot will affect all frames from frame 0 on.
Press F[n] for loading from slot [n]. Eg. Press F1 for loading from slot 1.
Controls, Hot keys
Hold down the mouse wheel and move the camera around the scene with the mouse.
Hold down the right mouse button and move the camera left/right/up/down with the mouse.
Adjust the zoom level with the mouse wheel.
Click the "Focus person" button to focus on a character. Click it again to focus on the other character.

Left click a bone to select it for rotation (the rotation gizmo will appear). Hold down the Ctrl key while left-clicking bones to select more bones.
Video: left click a bone to select it for rotation
Alt-leftclick to select bonetree (Pelvis: select all bones)
Video: Alt-leftclick to select bonetree
Left click a limb diamond to move it (the move gizmo will appear).
Video: left click a limb diamond to move it
Right click a limb diamond to initiate a lock (room or buddy key) for it. A menu will appear beside the limb. Select lock type from it with the left mouse button. After locking a limb, it can be moved the same way as mentioned before, with the left mouse button.
Use the left mouse button to adjust rotation and move gizmos.
Video: use the left mouse button to adjust rotation
Video: use the left mouse button to adjust move gizmos
after that: Copy limb pose, Ctrl-v: Paste limb pose
Left click a frame on the timeline to make it the actual frame. Bones which have keys on this frame, change their color.
The timeline cursor jumps to actual frame. It can be dragged, and where you release it, that frame becomes the actual frame.
During its dragging bone colors will be refreshed.
Video: Left click a frame on the timeline to make it the actual frame
after that: drag timeline cursor
Some advanced Timeline operations
Left click a frame on the timeline to select it (its color will change). Hold down the Ctrl key while left-clicking frames to select more frames.
Drag and move selected frame(s), with the left mouse button, to move them.
Hold down the Shift key, and drag and move selected frames, with the left mouse button, to copy and move them (bone and morph keys will be copied and moved, lock keys won't).
Some operations work on a sequence of frames, so called frame intervals. Left click a frame, and then click another frame again to select such a frame interval. (eg. to select frame interval 3-14, click frame 3 and then frame 14). Tiny marking will show the last selected interval, in a line below timeline's cursor.
Video: how to select frame interval
In this video selected: 3-10, 10-12, 4-12, 4-4 intervals
Hot keys:
Ctrl-s: Save
Ctrl-z: Undo
Ctrl-y: Redo
s: Show/hide bones
Ctrl-a: Select all bones of all characters
Ctrl-r: Reset selected bones on frame interval
Ctrl-n: Reset selected bones on frames specified numerically
Ctrl-c: Copy limb pose (a bone of a limb must be selected)
Ctrl-v: Paste limb pose (a bone of a limb, similar to the copied one, must be selected)
See also the Tips and tricks
Tips and tricks
- Good for a character's all keys removal on a frame: Alt-leftclick the pelvis for selecting all bones of him, then click the actual frame on the timeline, press DEL.
- Same, but for both characters: instead Alt-leftclick, press Ctrl-a, the rest is the same.
- Ctrl-rightclick on a normal bone clears all keys for normal bones in actual frame (for all characters) (only in other frames than the frame 0).
- Remove all keys for normal bones for all characters in a range of frames 1. Alt-leftclick pelvis of first character 2. same for second character 3. on the timeline select all marked and needed frames via Ctrl-leftclick 4. press DEL (5. keys for limbs and morphs must be deleted separately)
- Reset a range of frames (often used, when a variant is opened for the first time). Reset at least the middle 30 (aka. "inner frames") or even more frames, e.g. frames 1-89, (remove keys, locks, etc. of frames) by selecting needed bones and pressing Ctrl-r - it will bring up a popup for deleting keys in a user-specified range of frames.
- Complete copy of a frame, for one character: 1. Alt-leftclick pelvis for selecting all bones 2. Shift-leftclick and hold down the left mouse button for drag and move the frame (this copies all bones keys) 3. do same for two morph symbols if they have morphs 4. select limb diamond (or any limb bone) in source frame, press Ctrl-c to copy limb pose, go to target frame, press Ctrl-v - repeat this for all limbs which have lock.
- 0. frame limb lock statuses will be imported from base animation to variant, but only if variant hasn't existed yet (at variants first opening). This means, if you change limb lock status in the 0th frame of base animation, it wont be copied to already existing variants. Rather, change them in the already existing animations.
- When editing a variant, check "Repeat inner cycle" to watch how the action on the middle 30 frames look.
- When animating, switch bones visibility on/off by pressing "s" frequently, it will help to see better if e.g. fingers are correctly touching any body parts.
- Where the files are stored? For intermediate saving go to the folder "C:\Users\...\AppData\Local\AChat\prog_data_animedit\ae_projects_local\", look for file names like "d-XXXXX-c-b-v10.*" where XXXXX is the wanted project name, * represents anything. Zip those files, save it as a work in progress backup.
- When animating genitals, sometimes it is not easy to see if the cock penetrates the pussy right in the middle, correct position. The trick is as follows: Save the scene, turn thighs away temporarily only for checking the penetration correctness, but don't click Save (because thigh have incorrect position, just remember what adjustments are needed to correct the penetration error), choose Undo (Ctrl-Z) to undo the temporarily thigh turns OR reload the scene, and perform the remembered adjustment. Repeat these steps a few times.
- If Alt, Shift or Ctrl keys seem to "stuck in" then you have probably move the mouse cursor away from Animation Editor's window while that key was held down. Bring the mouse cursor back over Animation Editor's window and hold down/release that key again to correct this issue.
Base animation or Project is complete, send it to us
The easy way to start - B-Shop
B-Shop
- AChat will open a B-Shop in the system, into which all valuable artist work can be put in
- No "10 variant for all roles" criteria in the B-Shop
- Price of product in B-Shop will be agreed between you and us, can be much lower as usual
- You get 35% of revenue in B-Shop (exchange rate is: 2000A$ = 10$)
- Both of us can revoke a product from B-Shop
- You can rework the product in B-Shop, then a new price will be agreed, or even it will be put in into the main Shop
You can become a professional artist for our AChat community
Animator levels
- You start with "Animator level 1"
- Based on number of delivered products, total A$ income, etc., later you'll become "Animator level 2"
- With "Animator level 2" status, if meeting the defined criteria (e.g. 10 variant per roles, suiting AChat quality rules for animation details, etc.) you can deliver for the main Shop. This will mean a higher product price for you. Thus your income after each shop sell, calculated with 35% of the product price, will be higher.
- You'll get your developer console to follow sales already in "Animator level 1".
Read more about these possibilities on the Earn a living with us page
So please go on, make the poses as you wish, the AChat community will judge how perfect it is :) !
Please try to avoid these common mistakes when creating the animations.
How to send the work
Important:
Start with the Base animation! What is a base animation? Choose any pose in AChat to see it:
Base animation definition: It's a 1 Sec long animation (in AChat, it will start to play cyclically right after pose selection, before any variation is started. In Animation Editor, you can play it with the Play button in bottom left corner of the screen).
It needs a perfect starting position. For this, also called Base position, adjust bones and locks in frame 0 to achieve optimal, believable result. It must be good base for the variants to start from (note: variants can contain bigger moves, as they are 90 frames long, in contrast with the base animation's 30 frames)
It must be clearly recognisable what the characters do. Both characters must make lifelike movements, no body parts should be rigid during the animation.
If you feel you've created a genuine valuable base animation, please send it to us for reviewing! During our review process we'll calculate a 0-100 Quality score for your artwork. Only after you've got a Quality score of 75 or above, start with variations (base animation wrong - everything wrong...).
Quality score of your Base animation will be calculated based on following criteria:
- Correctness
- Sexiness
- Aesthetics
- Uniqueness (among existing AChat poses)
- Imaginativeness (globally)
Correctness means complying following rules:
1. Must comply the "Base animation definition" above
2. The base pose must be in 0th frame of the base animation. Don't place it in eg. frame 14.
3. No major body part is inside or goes trough another major body part visible when playing with the Play button. This also means,
you must carefully plan what limbs or other body parts go from where to where during the animation. 30 frames aren't too much,
you can't do too big moves.
4. No body part makes a jump when playing with the Play button. Avoid to place keys for same bone in close frames!
If you got a Quality score below 75, don't give up, try to make it better. If needed, start from scratch to achieve the goal.
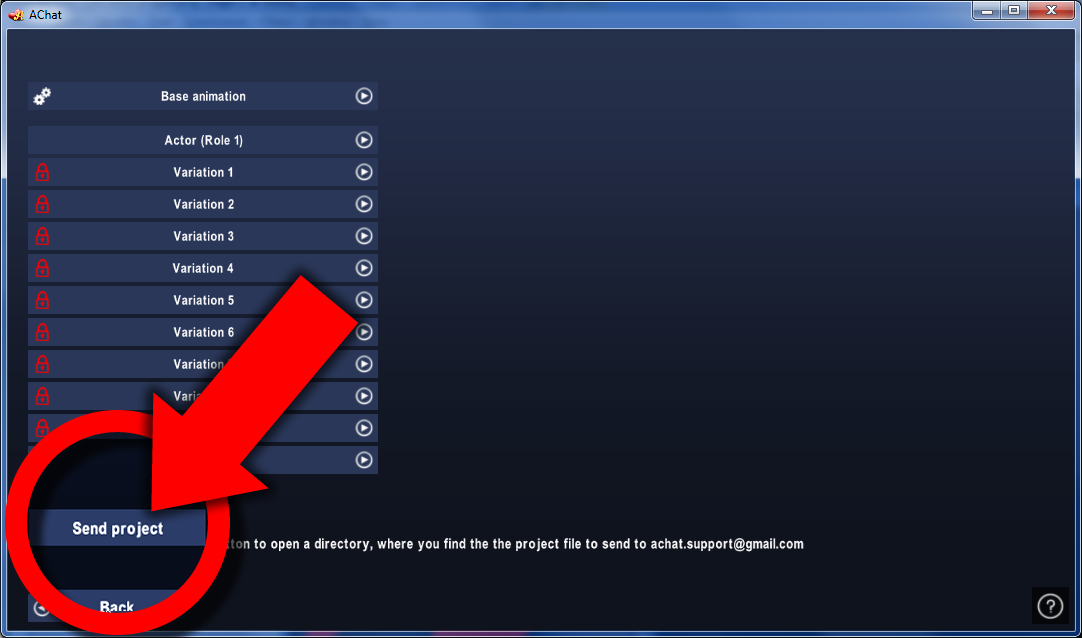
1. Please send the base animation, once it is complete, to us for checking it.
For sending it, use the Send project button to pack your project, and attach the packed file to a email sent to
Please include your username and "base animation" text in the email's subject.
Then wait for a response email from us.
2. For simple (B-Shop) projects, this can be already the moment where we agree the A$ price, and release your artwork.
For full-fledged (main Shop) projects, please wait for our OK for your base animation, then please proceed by making the variants for all roles. When perfect, send them to us in the same way as with the base animation. Wait for our response email. If we list any problems, please correct them, if we find it OK, the product will appear soon in the system.
Use the Send project button to pack your project into a "tosend" file. Attach this file to the email when sending to
Change log & Release notes
April 13, 2021: V1.51
- First lock for a limb can be placed not only in 0th frame
- Slot save and load gives more info about what is going on
- Slot load: in case of multiple selected bones, root won't be affected. Select root alone if you want slot load to affect it.
- Better frame 30 and frame 60 handling in variants
Feb-20, 2021:
Updating this Online Help page: restructuring, adding videos, adding new images
Feb-16, 2021: Release V1.0 Feb-2021 Re-launch
Hi! We're happy and proud to announce our Animation Editor!
Start with the Quick Start Guide