The forums › Quizz, Fav TV, Fav Music, Fav Films, Books… › Easy Recipes to tickle your Tastebuds
- This topic has 127 replies, 3 voices, and was last updated 2 years ago by JessiCapri.
-
AuthorPosts
-
December 2, 2022 at 7:32 pm #200873
Brussels Sprout Salad with Apples & Walnuts.
(Can add grated Parmasan cheese or mature cheddar cheese if you wish)This sweet and tangy Brussels sprout salad is best prepared ahead of time, making it ideal for a buffet.
This Brussels sprouts salad pairs nicely with turkey, ham, or grilled cheese sandwiches.
It can even be a light meal unto itself (try topping it with crispy bacon and serving with good bread).
The salad is best made ahead of time and holds up for hours, so it’s also a great option for a holiday buffet.


(Cheese is optional)Servings: 8
Prep Time: 15 Minutes
Cook Time: 10 Minutes
Total Time: 25 Minutes, plus at least 30 minutes to soften in the refrigeratorINGREDIENTS
680g (1½ pounds) Brussels sprouts, shredded
1 large tart-sweet red apple, such as Honey Crisp, cored and chopped (no need to peel)
3 tablespoons minced shallots, from 1 large shallot / Yellow onion
4 tablespoons extra virgin olive oil
4 tablespoons vegetable oil
6 tablespoons apple cider vinegar
3 tablespoons honey
1 teaspoon salt
¼ teaspoon freshly ground black pepper
80g (¾ cup) walnuts, toasted if desired (see note) and coarsely chopped75g (¾ cup) thinly sliced and crumbled Parmigiano-Reggiano (parmesan cheese) or grated mature cheddar cheese – Optional.
INSTRUCTIONS
1. In a large bowl, combine the shredded Brussels sprouts, apples, shallots, olive oil, vegetable oil, apple cider vinegar, honey, salt, and pepper; toss well.
2. Cover with plastic wrap / cling film and refrigerate for at least 30 minutes and up to 4 hours to allow the sprouts to soften and the flavors to marry.3. When ready to serve, toss the walnuts and Parmigiano-Reggiano / cheese with the salad.
4. Taste and adjust seasoning if necessary, then serve.5. Leftovers keep well in the refrigerator for 1 or 2 days but keep in mind that the flavors will dull the longer the salad sits; add a little more cider vinegar and vegetable oil to perk it up.
Note:
Toasting the walnuts isn’t essential, but it brings out their flavor and makes them crunchier.
To toast them, preheat the oven to 350°F and set an oven rack in the middle position.
Arrange the walnuts in a single layer on a baking sheet. Bake, checking frequently, until lightly toasted and fragrant, 6 to 10 minutes.
Transfer immediately to a plate and let cool.December 3, 2022 at 1:47 am #200875
CREAMY BAKED POTATOES
Prep: 15 mins
Cook: 60 mins
Total: 75 mins
Servings: 8 to 10 servingsI used a mandoline to slice the potatoes, which made it very fast and easy to put this dish together.
Ingredients
Cooking spray
10 medium Yukon Gold potatoes, 3 1/2 to 3 3/4 pounds
2 cups heavy whipping cream
5 cloves garlic, minced
Kosher salt, to taste
Freshly ground black pepper, to taste
1 dash paprika (I use more than a dash. More like a light sprinkle over the top)Directions:
Position a rack in the center of the oven and heat to 450 F/230 C. Spray a 3-quart baking pan with cooking spray.
Wash, peel, and cut potatoes into very thin slices using a sharp knife or a mandoline.
Lay the potatoes in the pan as shown in the picture.
Add the cream and minced garlic to the potatoes. Generously season with salt and pepper. To add some color, sprinkle some paprika on top.
Cover and bake for 45 minutes. Uncover and bake for another 15 minutes. The potatoes should be tender.
Recipe Variations
Add sautéed onions on top of the potatoes before baking.December 3, 2022 at 2:56 am #200876 December 5, 2022 at 12:12 am #200882
PERFECT ROAST PARSNIPS
This recipe delivers perfectly cooked and crispy roasted parsnips every time. Perfect for roast dinners, Christmas lunch… or any time when you fancy perfectly roasted parsnips!

CourseSide Side Dish
Cuisine British
Prep Time 5 minutes
Cook Time 30 minutes
Total Time 35 minutes
Servings 4 peopleIngredients
Metric – US Customary
6 medium parsnips peeled and cut into 6
2 tablespoons olive oil
Salt and pepper to tasteHOW TO CUT PERFECT ROAST PARSNIPS </stronmg>
If you want perfect roast parsnips, you need to cut then right… Cut parsnips for roasting so they are all a similar size and shape. This means you don’t get some burnt and others still half raw. However, this can be tricky given their tapered shape!Instructions
1.Preheat your oven to 220C / 200C fan / gas mark 7 / 425F.
2. Place the prepared parsnips in a shallow roasting tray and drizzle with the olive oil.
3. Scatter over salt and pepper to taste.
4. Toss everything together, so the parsnips are well coated, then arrange in one layer.
5. Place the parsnips in your preheated oven and roast for 20 minutes.
6. After 20 minutes remove from the oven and turn all the parsnips over. Return to the oven for a further 10 minutes or until the parsnips are golden and crispy and just starting to go brown at the edges.
7. Remove from the oven and serve.Notes
1. To cut medium parsnips into 6 equal sized pieces, first cut them in half widthways. Cut the top half into 4 lengthways and the bottom half into 2 lengthways – this creates 6 roughly equal sized parsnip batons, which will roast beautifully. (You may need to adapt this strategy if your parsnips are large or small sized!)Select medium sized parsnips (so much easier if all the parsnips are all roughly the same size) and cut them in half widthways. The top half, cut into 4 lengthways and the bottom, cut into 2 lengthways – this creates 6 roughly equal sized parsnip batons, which will roast beautifully.

2. If you are cooking these in the same oven as a joint that is being cooked at 200C / 180C fan / gas mark 6 / 400F, that’s fine but you may want to add a 3-5 extra minutes to the last 10 minutes of cooking time to ensure you have perfectly golden roast parsnips. If you remove the joint before the parsnips have finished cooking, turn the oven up at that point.
3. One super important factor in ensuring roast parsnip perfection is to make sure the parsnips are well spaced out in the roasting tray.
Ideally none of the parsnips should be touching each other and definitely don’t have more than one layer! Otherwise, the parsnips will steam rather than roast – resulting in soggy soft parsnips, not crispy roasted ones!
4. Suitable for freezing.December 5, 2022 at 12:24 am #200883ROAST PARSNIPS WITH HONEY AND THYME
An essential one for a Christmas dinner table or indeed with any roast dinner, these Roast Parsnips with Honey and Thyme are super easy to make and taste incredible

Course Side Dish
Cuisine British
Prep Time 5 minutes
Cook Time 25 minutes
Total Time 30 minutes
Servings 8 peopleIngredients
Metric – US Customary
6 medium parsnips peeled and cut into 6 (see notes)
2 tablespoons olive oil
Salt and pepper to taste
3 sprigs of thyme plus extra for garnish
2 tablespoons runny honeyInstructions
1. Preheat your oven to 220C / 200C fan / gas mark 7 / 425F.
2. Place the prepared parsnips in a shallow roasting tray and drizzle with the olive oil.
3. Add some salt and pepper and then scatter over the leaves of the thyme.
4. Toss everything together, so the parsnips are well coated, then arrange in one layer.
5. Place the parsnips in the preheated oven and roast for 20 minutes.
6. After 20 minutes remove from the oven, turn all the parsnips over, then drizzle with the honey.
7. Return to the oven for a further 10 minutes or until the parsnips are golden and crispy and just starting to go brown at the edges.
8. Remove from the oven and serve scattered with a little more thyme for garnish.Notes
(1) To cut parsnips into 6 equal sized pieces, first cut them in half widthways. Cut the top half into 4 lengthways and the bottom half into 2 lengthways – this creates 6 roughly equal sized parsnip batons, which will roast beautifully.
(2) One super important factor in ensuring roast parsnip perfection is to make sure the parsnips are well spaced out in the roasting tray. Ideally none of the parsnips should be touching each other and definitely don’t have more than one layer! Otherwise the parsnips will steam rather than roast – resulting in soggy soft parsnips, not crispy roasted ones!
(3) Suitable for freezing.
HOW TO MAKE HONEY ROAST PARSNIPS (AND ENSURE THE HONEY DOESN’T BURN!
One of the problems with honey roast parsnips – or indeed honey roast anything, is that honey has a tendency to burn long before the rest of the food.To ensure honey roast parsnip perfection, simply cook your parsnips without honey for the first 20 minutes, then drizzle with honey and return to the oven for the final 10 minutes. 10 minutes is just enough time for the honey to caramelise slightly, but not long enough to burn – perfect!
The thyme, however, you want in right from the start – the thyme won’t burn and the longer it spends with the parsnips the more of that delicious herby flavour will transfer itself into the parsnips.
Also sprinkle over some extra thyme when serving these Roast Parsnips with Honey and Thyme – partly for the taste, but mostly because it looks really pretty
December 5, 2022 at 12:43 am #200886ROAST PARSNIPS AND CARROTS WITH HONEY MUSTARD GLAZE
These Roast Parsnips and Carrots could not be simpler, simply chop the vegetables up and put them in the oven for 45 minutes.
For extra deliciousness add a honey and mustard glaze for the last 15 minutes.
Course Side Dish
Cuisine British
Prep Time 10 minutes
Cook Time 45 minutes
Total Time 55 minutes
Servings 4 peopleIngredients
Metric – US CustomaryRoast Vegetables:
Olive oil
Salt and pepper
500g (1lb) parsnips peeled and quartered
500g (1lb) carrots halved lengthwaysHoney Mustard Glaze:
2 tablespoons olive oil
2 tablespoons honey
2 tablespoons wholegrain or dijon mustardInstructions
1. Pre-heat the oven to 220C / 200C Fan / gas mark 7 / 425F.
2. Drizzle a baking tray with enough oil to nearly coat the bottom of the tray and sprinkle with salt and pepper.
3. Put the baking tray in the oven to heat up.
4. Peel and chop the parsnips into quarters (cut them in half lengthways and then widthways)
5. Don’t peel the carrots, just chop them in half lengthways. (If your carrots are very large you could give them the same treatment as the parsnips.)
6. Put the vegetables into the hot baking tray, (taking care not to splash yourself with hot fat) and turn them to get them coated.
7. Put the baking tray back into the oven.
8. The vegetables will need to cook for about 45 minutes in total.9. To make the honey mustard glaze, simply mix the three ingredients in a clean jam jar and shake (with the lid on) to combine.
10. After the first 30 minutes, remove the vegetables from the oven, drizzle with the honey mustard glaze and turn them to get them all coated.
11. Return the baking tray to the oven for the last 15 minutes. December 5, 2022 at 9:45 pm #200888
BRAISED RED CABBAGE
Christmas wouldn’t be the same without braised red cabbage. Plus it’s really easy to make and it’s a great make ahead dish for Christmas and beyond!
It’s delicious with roast duck, lentils and mashed potato and brilliant reheated the next day and served with turkey and all the trimmings.
Course Side Dish
Cuisine British
Prep Time 15 minutes
Cook Time 2 hours 30 minutes
Total Time 2 hours 45 minutes
Servings 12 peopleIngredients
Metric – US Customary
500g (1 lb) red cabbage sliced finely
Salt and pepper
2 small red onions (or 1 large one) diced finely
1 large Bramley apple diced finely
1 clove garlic diced finely or crushed
½ teaspoon ground nutmeg
½ teaspoon ground cinnamon
4 cloves ground
2 tablespoons brown sugar
3 tablespoons red or white wine vinegar
10g (½ oz) butterInstructions
1. Prepare all your ingredients as directed above.
2. Mix together the ground spices and brown sugar in a bowl.
3. Preheat your oven to 160C / 140C fan / gas mark 3 / 325F.
4. Arrange about a quarter of the cabbage at the bottom of a large casserole dish
5. Sprinkle over about a third of the onions, a third of the apple, a third of the garlic and a third of the sugar and spice mix.
6. Add a few twists of salt and pepper.
7. Add another layer of cabbage, followed by another layer of onions, apple, garlic, spices, salt and pepper.
8. Repeat a third time and then top with the remaining red cabbage.
9. Pour over 3 tablespoons of red or white wine vinegar (this will help preserve the colour of the cabbage, so don’t miss this step out!) and dot with approximately 10g (0.35 oz) of butter.
10. Put a tight lid on the casserole dish (use foil if you don’t have a lid) and cook in your pre-heated oven for 2½ hours, stirring twice during cooking time.
11. Serve immediately or leave to cool then store in an airtight container in the fridge for a day or two.Notes
1. To reheat, simply place in a saucepan with approximately 100ml water and heat gently with a lid on until the cabbage is hot (about 5 minutes).
2. Suitable for freezing.December 6, 2022 at 10:16 pm #200894ROASTED ROOT VEGETABLES
Deliciously crisp and caramelised roasted parsnips, carrots, red onions and sweet potatoes – all roasted on one tray.
Maximum taste, minimum fuss, healthy and frugal… and only one tray to wash, makes this Roasted Root Vegetables THE BEST side dish!
Perfect with roast dinner favourites, including roast chicken, salmon or nut roast.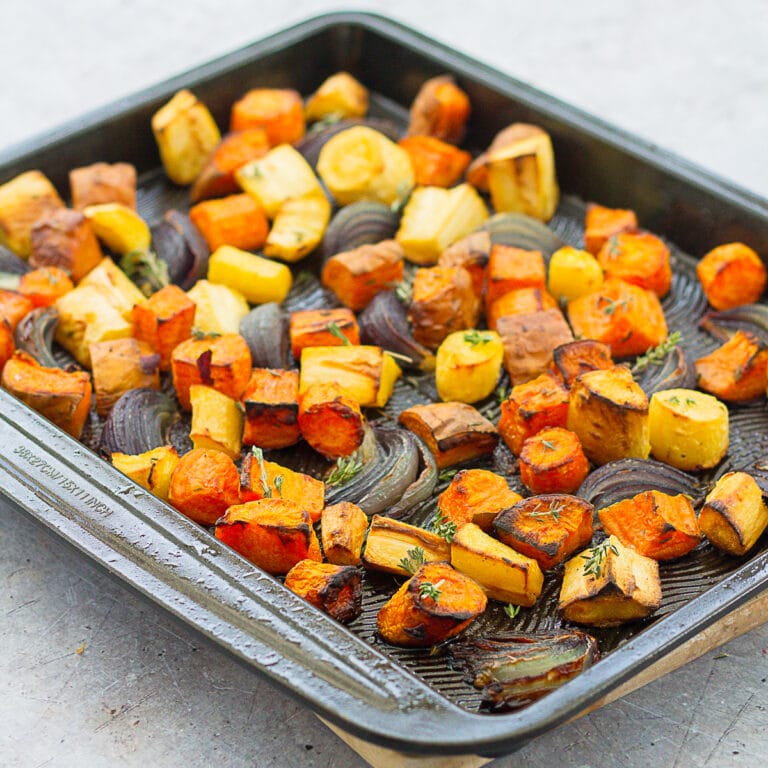
Course Side Dish
Cuisine British
Prep Time 10 minutes
Cook Time 40 minutes
Total Time 50 minutes
Servings 4 peopleIngredients
Metric – US Customary400g (14 oz) sweet potatoes cut into large chunks (leave the skin on!)
400g (14 oz) parsnips peeled and cut into large chunks
400g (14 oz) carrots cut into large chunks (leave the skin on!)
3 tablespoons olive oil
4 sprigs thyme (and/or rosemary) roughly chopped
Salt and pepper to taste see note
2 small red onions each one peeled and cut into 8 wedgesInstructions
1. Pre-heat your oven to 220C / 200C fan / gas mark 7 / 425F.
2. Place the chopped sweet potatoes, parsnips and carrots on a large roasting tray.
3. Drizzle over the olive oil and scatter with the salt, pepper and herbs.
4. Toss thoroughly to get the veggies well-coated in the oil and seasonings, then spread the veggies out so they are well spaced. (Too close and the veggies will steam and go soggy rather than roast and go crispy and caramelised – which is what you want!)
5. Roast for 20 minutes in your pre-heated oven, then turn the veggies and add in the red onion wedges. Take care to ensure the veggies are well spaced out again.
6. Roast for a further 20 minutes, or until the veggies are cooked all the way through and have a nice amount of caramelisation on the edges.
7. Serve as a side dish to roasted meats, fish or nut roast.
Notes
1. Leave the skins on your carrots and sweet potatoes for maximum flavour and nutrition. But feel free to peel them if you prefer.
2. Add about 10 to 15 twists of black pepper and ½ to 1 tablespoon of salt, depending on your preferences. If you love salt then try using coarse sea salt, as you will get these wonderful little ‘pops’ of salt that take this dish to the next level!
3. Not suitable for freezing.CAN YOU FREEZE ROASTED ROOT VEGETABLES?
You can, but honestly, when you reheat them, the texture will not be great (far too soft!)
A best recommendation here is to chuck any leftover roasted root veggies into your blender, along with some leftover gravy / meat juices and a little water to create a wonderful roasted root vegetable soup – then freeze that in individual portion sizes, for a super easy midweek meal!Defrost the soup overnight and reheat in a pan / your microwave until piping hot, then serve with some lovely crusty bread
December 7, 2022 at 6:44 pm #200895CHRISTMAS VEGETABLE TRAYBAKE
Make cooking Christmas dinner less stressful with this Easy Christmas Vegetable Traybake.
Roasting the parsnips, carrots and sprouts all together in one tray means you can relax and have a glass of bubbly instead of juggling pots and pans like a mad thing this Christmas. (Serves 4-6, depending on appetite)

Course Side Dish
Cuisine British
Prep Time 10 minutes
Cook Time 45 minutes
Total Time 55 minutes
Servings 6 peopleIngredients
Metric – US Customary
500g (1 lb) parsnips cut into batons
500g (1 lb) carrots cut into batons
2 tablespoons olive oil
Salt and pepper
A few sprigs of thyme, rosemary, sage or a mixture plus extra for garnish
250g (9 oz) sprouts halved lengthwaysInstructions
1. Pre-heat your oven to 220C / 200C fan / gas mark 7 / 425F.
2. Peel and chop the parsnips and carrots into batons and place in a baking tray.
3. Drizzle with a couple of tablespoons of olive oil and sprinkle over salt, pepper and whichever herbs you are using.
4. Mix everything together to ensure the veggies are evenly coated (Use hands or a spoon if you prefer) and put the baking tray into the oven.
5. Roast for 30 minutes.
6. After the 30 minutes, remove the vegetables from the oven and add the sprouts. Toss everything together again (this time definitely use a spoon!), ensuring none of the carrots are parsnips are sticking, and return the baking tray to the oven for a further 15 minutes.
7. Serve scattered with more herbs.Notes
Suitable for freezing.December 7, 2022 at 7:08 pm #200897Christmas Turkey Traybake
Want a way to take the stress out of cooking this Christmas?
Want to spend more time actually enjoying Christmas Day rather than being stuck in the kitchen, alone, muttering at the oven?
Want a delicious home cooked turkey dinner with all the trimmings?
Want it all ready in under 1h 30 mins, with only 2 pans and a colander to wash up? Impossible!?!
Well, here it is…. Introducing the Easy Christmas Turkey Traybake…


Course Main Course
Cuisine British
Prep Time 20 minutes
Cook Time 1 hour 5 minutes
Total Time 1 hour 25 minutes
Servings 4 people (with leftovers)Ingredients
Metric – US Customary
6 tablespoons olive oil
1kg (2¼ lb) baking potatoes peeled and cut into 50g (1½oz) chunks
Salt and pepper
500g (1 lb) parsnips peeled and cut into batons
500g (1 lb) chantenay carrots left whole
8 garlic cloves gently bashed, skins left on
1 large red onion peeled and cut into 8 wedges
10 cocktail sausages wrapped in bacon you can buy these ready prepared. (Pigs in Blankets)
8 turkey breast fillets each one approximately 100g / 3½oz
8 sage leaves
200g (7 oz) sprouts
Gravy and other sauces to serve.Instructions
1. Preheat your oven to 220C / 200C fan / gas mark 7 / 425F.
2. Drizzle 6 tablespoons of olive oil into the base of a very large roasting tin (roughly 40 x 33cm or 16 x 13inches) and place the tray in the oven to heat up.3. Peel the potatoes and cut them into chunks that weigh roughly 50cm (1½oz).
4. Place them in a large saucepan and cover with boiling water.
5. Add a teaspoon of salt and cook over a medium-high heat for 12 minutes. (Start timing as soon as you turn on the heat, NOT from when the water reboils.)6. Meanwhile peel the parsnips and cut into large batons. Cut the parsnips in half lengthways and then widthways and then cut the top part in half again lengthways so you get 6 roughly even sized batons.
7. Gently bash 8 garlic cloves and peel and cut a red onion into quarters.
8. Slice your sprouts in half and get the sage and carrots out of the fridge, so you are all ready.
9. When the potatoes are done, drain them and shake them in the saucepan with the lid on (to fluff up the edges, so you get plenty of crispy bits!)
10. Then tip the potatoes into the hot fat.
11. Add the parsnips and carrots.
12. Sprinkle over a little salt and pepper and then turn everything in the hot fat (take care not to burn yourself!)
13. Put the tray in the oven and roast for 20 minutes.
14. After 20 minutes, remove the tray and add the garlic cloves and red onion wedges. Return the roasting tray to the oven and roast everything for another 15 minutes.
15. After 15 minutes, season the turkey breast fillets, then add them to the tray along with the halved sprouts, cocktail sausages and sage leaves.
16. Put the tray back in the oven for a further 20 minutes.
17. This would be a good time to make a jug of gravy and any other sauces you want to serve with the traybake (e.g. bread sauce and/or cranberry sauce)
18. After the last 20 minutes, check the turkey is done (cut the largest fillet in half and check there is no pink).
19. Serve with your gravy and sauces.Notes
Not suitable for freezing (except the turkey on its own IS suitable for freezing).December 7, 2022 at 7:18 pm #200898Roasted Corn On The Cob
This is a super simple recipe for Roasted Corn On The Cob – just 3 minutes of hands on time and ready in less than 20 minutes. (And no par-boiling!) Perfect for busy days, when you need a side dish everyone will love.

Course Side Dish
Cuisine American, British, Nandos
Prep Time 3 minutes
Cook Time 15 minutes
Total Time 18 minutes
Servings 4 peopleIngredients
Metric – US Customary
1 teaspoon salt (ideally coarse sea salt)
2 tablespoons olive oil
4 corn on the cobs each one cut in halfInstructions
1. Preheat your oven to 220C / 200C / gas mark 7 / 425F.
2. Mix together the salt and olive oil in a large bowl.
3. Add the corn on the cobs and stir to coat thoroughly. (Or, even better, use your hands!)
4. Place the corn on the cobs on a large non-stick baking tray, ensuring they are well spread out and in a single layer.
5. Roast in the oven for 15 minutes.Notes
1. It’s crucial to ensure the cobs are spread out well over the baking sheet – if they are touching each other too much, or piled on top of each other, they may not cook properly. (If you do not have a baking tray large enough for this, use two smaller baking trays instead.)
2. Use a good non-stick baking tray, the cobs don’t need turning throughout their cooking time, but if you are at all worried do give them a check after 10 minutes and turn them if you think necessary.
3. Suitable for freezing.WHAT TO SERVE ROASTED CORN ON THE COBS WITH?
Roasted corn on the cob makes a great side dish for almost anything: grilled meats and fish, lasagne, pizza, Mexican food
They also go very well as a side dish at barbecues. (You can even cook the corn on the cobs on the BBQ if you want to!)These corn on the cobs obviously go brilliantly with Nando’s style chicken such as:
Peri Peri Chicken Thighs
Peri Peri Chicken Breasts
Peri Peri Chicken Burgers
Peri Peri Chicken Pitta
Peri Peri Chicken TraybakeWHAT TO DO WITH LEFTOVER ROASTED CORN ON THE COBS?
Roasted corn is just as nice the next day! Simply put any leftovers in a lidded container and place in the fridge, where they’ll keep for up to 3 days.
You can either eat them cold or heat them up in the oven.
To re-heat, simply place in an oven, pre-heated to 180C / 160C fan / gas mark 4 / 350F, for 10 minutes or until piping hot.Alternatively, you can use a knife to cut the corn kernels off the cobs and then stir the corn into a rice salad, tuna pasta bake or creamy chicken pasta.
December 7, 2022 at 7:38 pm #200899Homemade Nando’s Macho Peas
Love Nando’s Macho Peas? Now you can make them at home with this easy peasy Homemade Macho Peas recipe. They are super simple to make and taste SO GOOD!


Course Side Dish
Cuisine British, Fusion, Portuguese, South African
Prep Time 2 minutes
Cook Time 3 minutes
Total Time 5 minutes
Servings 4 peopleIngredients
Metric – US Customary
300g (2 cups) frozen peas (the larger kind, usually labelled ‘garden peas’, NOT the smaller ‘petit pois’ – I use Birdseye Garden Peas)
1 tablespoon olive oil
10 leaves fresh mint finely sliced
½ teaspoon salt or to taste.
1 teaspoon chilli flakes or to taste.Instructions
1. Place the peas in a saucepan and cover with boiling water from the kettle.
2. Bring back to the boil and then simmer the peas until they are done how you like them. (Roughly 2-3 minutes.)
3. Drain the peas. For the full Nando’s effect don’t quite fully drain the peas – leave a couple of tablespoons of the cooking water in the pan.
4. Return the peas to the pan, but do not put the pan back on the heat.
5. Lightly mash the peas, using a potato masher – but don’t go too mad here! You are aiming for some, but not all of the peas to be a little mashed – to give a similar texture to the peas you get in Nando’s.
6. Add the olive oil, mint, salt and chilli, and stir to combine.
7. Serve with all your Nando’s favourites!Notes
1. Use a similar amount of salt and chilli as you get in the Macho Peas in Nando’s restaurants as listed above – to give as authentic a taste as possible, however feel free to adjust these quantities higher or lower to suit your own personal tastes.
2. Not suitable for freezing.WHAT TO SERVE WITH MACHO PEAS?
These Macho Peas are the perfect side dish for Nando’s-style Peri Peri Chicken! For example:
Nando’s Peri Peri Chicken Thighs
Nando’s Peri Peri Chicken Breasts
Nando’s Peri Peri Chicken Wings
Nando’s Peri Peri Chicken Burgers
Peri Peri Chicken Traybake
They also go brilliantly with roast chicken, roast lamb (it’s like combining the peas and the mint sauce!), shepherd’s pie, cottage pie, fish pie, lamb hotpot, fish and chips… and well basically anything you usually serve with peas!WHAT TO DO WITH LEFTOVER MACHO PEAS?
Macho Peas taste best made fresh, but any leftover Macho Peas will keep for a day or two in the fridge. Simple put any leftovers in a lidded container and place in the fridge. These peas taste surprisingly good cold – or you can warm them back up in a saucepan or the microwave.CAN YOU FREEZE MACHO PEAS?
Technically you can, but its not recommended. Macho Peas taste much better made fresh!December 7, 2022 at 7:55 pm #200900CUMIN ROASTED CAULIFLOWER AND BUTTERNUT SQUASH (VEGAN)
Super simple, yet utterly delicious, a Cumin Roasted Cauliflower and Butternut Squash side dish is the perfect accompaniment to curries, chillies and tagines.
A great way to get more vegetables, nutrition and deliciousness into your diet with very little effort!
Course Main Course, Side Dish, Starter
Cuisine Fusion, Indian, Mexican, Middle Eastern
Prep Time 10 minutes
Cook Time 30 minutes
Total Time 40 minutes
Servings 4 peopleIngredients
Metric – US Customary
½ large butternut squash (ideally the bottom half)
1 small cauliflower (or half a large one)
2 tablespoons olive oil
2 teaspoons cumin seeds
1 teaspoon salt (ideally coarse sea salt)Instructions
1. Preheat your oven to 220C / 200C fan / gas mark 7 / 425F.
2. Cut the butternut squash in half vertically, scoop out the seeds and cut into slices – roughly 1.5cm (½ inch) thick.
3. Break the cauliflower up into florets
4. Place the vegetables on a large non-stick oven tray – large enough so the vegetables can be spread out in a single layer – otherwise they will steam and not roast (use two oven trays if need be).
5. Drizzle over the olive oil and scatter over the cumin and sea salt. Turn the vegetables in the oil and then spread out again.
6. Place the tray in your preheated oven and roast for 30 minutes or until soft and gently browned, turning halfway.
7. Serve as a side dish with a curry, chilli or tagine.
Alternatively serve as part of an Indian themed starter.Notes
Suitable for freezing.
HOW TO PREPARE THE LOWER HALF OF A BUTTERNUT SQUASH
1. Preparing the lower half of a butternut squash is not nearly as daunting as it first appears.
Simply cut the butternut squash in half vertically, scoop out the seeds using a dessert spoon or similar. (Top tip – scoop out slightly below the seeds – you lose a little of the flesh, but the result is much cleaner).
2. Finally cut thick slices – about 1.5-2cm (½ to ¾ of an inch) thick.
3. Don’t peel the skin off. The skin is perfectly edible, once roasted.
And if you really don’t like it – it’s much easier to peel off when the butternut squash has been roasted, so do it then.This little bit of prep takes 5 minutes tops – and so worth it, both for a delicious side dish AND for reducing food waste!
WHAT TO SERVE WITH CUMIN ROASTED CAULIFLOWER AND BUTTERNUT SQUASH?
This recipe was MADE to go with Yellow Split Pea and Spinach Dhal.
But these cumin roasted veggies are so versatile, they would go with any cuisine that pairs well with cumin – it makes the perfect side dish alongside any curry or dhal, but also chillies and other Tex-Mex and Mexican inspired dishes, and of course it’s great with tagines and other Middle Eastern dishes too.In fact, this veggie side dish is so substantial, you could even serve it as a light main course – along with a side salad and maybe some hummus and/or some roasted sweet potato cubes and/or pittas.
Alternatively, you could serve these cumin roasted vegetable as part of an Indian themed starter, with pickles, chutneys, a raita, onion bhajis and poppadoms and/or chapattis.
December 8, 2022 at 1:36 am #200901Yellow Split Pea and Spinach Dhal (Vegan)
Quick to prepare and full of flavour, this Easy Yellow Split Pea and Spinach Dhal is a delicious, healthy, meat-free curry – equally at home served on its own with brown rice, as a nutritious midweek meal, or as part of a larger Indian themed meal at the weekend.
100% plant-based, this recipe is great for vegans, vegetarians and anyone looking to eat less meat but still enjoy great tasting food. And it’s gluten free too!

Course Main Course, Side Dish
Cuisine British, Fusion, Indian
Prep Time 5 minutes
Cook Time 55 minutes
Total Time 1 hour
Servings 4 peopleIngredients
Metric – US Customary
1 tablespoon olive oil
1 onion diced
3cm (1 inch) ginger grated or finely chopped
3 cloves garlic crushed or grated
½ teaspoon chilli flakes (or to taste, or use fresh chilli if you prefer!)
1 teaspoon cumin
1 teaspoon turmeric
3 cloves left whole
1 cinnamon stick broken in half
250g (1¼ cups) yellow split peas (see note 1)
750ml (3 cups) vegetable stock from a cube is fine – (can use 1 Kallo Organic stock cube, which is vegan and gluten free)
2 tablespoons tomato puree
125g (4½ oz) spinach (optional)To serve:
Brown rice or white rice / naans / chapatis
1 portion Cumin Roasted Cauliflower and Butternut Squash (See above recipe)Instructions
1. Place the olive oil and diced onions in a large lidded sauce pan and cook gently, with the lid on for 3-4 minutes, until softened but not browned.
2. Add the ginger and garlic and cook for 1 more minute over a low heat, with the lid off.
3. Add the chilli flakes, cumin, turmeric, cloves and cinnamon and cook for 2 more minutes – add a splash or two of water if the pan gets dry.
4. Add the yellow split peas, vegetable stock and tomato puree, give everything a good stir and then bring to the boil.5. Turn the heat down low and cover with a lid. Simmer for 40-45 minutes until most of the liquid is absorbed and the split peas are done to your liking.
6. If all the water gets absorbed before the split peas are done to your liking, add a little more water and continue cooking until they are done.
7. When the dhal (dal or dahl – dried lentils, beans, or peas in split or whole form or to the dish made from them) is just cooked, add the spinach on top and stir until all the spinach leaves have just wilted, but still retain some texture. (It will look like way 8. too much spinach to start with, but keep stirring and have faith!)9. Serve with brown or white rice and Cumin Roasted Cauliflower and Butternut Squash. (Or serve whatever you like best with a curry!)
Notes
1. Split peas vary enormously in how long they take to cook – so follow the packet instructions and also test as you go along. It is likely to take between 40 minutes and 1 hour.
2. The precise amount of liquid you will need will depend on how long your split peas take to cook and quite what shape your saucepan is! Start with 750mls (3 cups) and see how you go – add extra water at the end if it starts to get dry!
3. Don’t add salt to this recipe because the brand of stock cube can be quite salty – enough for this dish.
4. If you are using a low salt stock cube or homemade vegetable stock, you may wish to add a little salt to this dish to bring out the flavours.
5. Suitable for freezing.December 8, 2022 at 5:24 pm #200904LEFTOVER CHICKEN or TURKEY AND EGG FRIED RICE
How to adapt using leftovers: For leftover turkey fried rice, simply use leftover turkey instead of leftover chicken.
Otherwise follow the recipe exactly as written.
Total time using leftovers: 15 minutes
Use 300-500g leftover roast turkey, serves 4This recipe will also work really well with leftover pork, ham, bacon or pre-cooked prawns.
Alternatively, to make a vegetarian version, you could use tofu or Quorn chicken pieces.
This recipe is naturally dairy free and if you make sure you use gluten free soy sauce (tamari), it is gluten free too.This recipe makes good use of leftovers, turning them into a really easy, family friendly weeknight dinner.
What’s more, by using a pack of ready prepared rice and easy veggies (hardly any chopping!), it’s quick too – this recipe takes just 15 minutes from start to finish – perfect for when time is tight, but you still want to eat well.No leftover chicken? No problem – simply pan fry two chicken breasts for about 6-7 minutes on each side on a medium heat, leave to rest for 5 minutes, shred using a couple of forks and then continue with the recipe below.

To make this meal a little healthier use brown rice, but it will work just as well if you use white rice.
Using pre-cooked rice to makes this dish really quick and easy, but if you prefer to cook your own rice, do that first – you will need about 170g uncooked rice to produce 500g cooked rice.
When you have cooked your rice, you must cool it down first before starting this recipe – warm rice will not work as well!
The quickest way to do this is to drain my cooked rice in a sieve and then run the cold tap over it until it is cool.Finally, leave it to sit over the pan it cooked in until it has dried out a little bit.
Alternatively leave your rice to cool to room temperature, then put it in a plastic box in the fridge until you need it.Course Main Course
Cuisine Chinese
Prep Time 5 minutes
Cook Time 10 minutes
Total Time 15 minutes
Servings 4 peopleIngredients
Metric – US Customary
2 tablespoons olive, rapeseed or coconut oil
300-500g (10½-17½ oz) leftover chicken / Turkey shredded (or pork, ham, bacon or pre-cooked prawns)
500g (2½ cups) pre-cooked brown rice
100g (¾ cup) frozen peas
100g (¾ cup) frozen sweetcorn
1 red pepper diced
4 spring onions sliced finely (plus 2 extra for garnish)
3 cloves garlic crushed or grated
4 medium eggs
2 tablespoons sesame oil
2 tablespoons soy sauce (or GF tamari)Instructions
1. Put 2 tablespoons olive, rapeseed or coconut oil in a large frying pan or wok and heat over a medium-high heat for 1 minute.
2. Add the cooked rice, shredded chicken, frozen peas, frozen sweetcorn, red pepper and spring onions.
3. Stir fry 3-4 minutes, until everything is warmed through and the frozen veg is no longer frozen.
4. Add the garlic and stir fry for 1 more minute.
5. Meanwhile crack the eggs into a large mug or small jug and whisk together lightly with a fork.
6. Make a well in the middle of the rice mixture and pour in the eggs – cook for 30 seconds, then mix the rice mixture and eggs together.
7. Continue frying for a couple of minutes, stirring occasionally, until you start to get some nice crispy brown bits.
8. Pour in the soy sauce and sesame oil and fry for 1 more minute.
9. Serve scattered with a few extra spring onions.
10. Put the bottles of soy sauce and sesame oil on the table for everyone to help themselves to extra, if needed.Notes
No leftover chicken? No problem – simply pan fry two chicken breasts for about 6-7 minutes on each side on a medium heat, leave to rest for 5 minutes, shred using a couple of forks and then continue with the recipe above. -
AuthorPosts
- You must be logged in to reply to this topic.
Optimizing new Forum... Try it, and report bugs to support.
The forums › Quizz, Fav TV, Fav Music, Fav Films, Books… › Easy Recipes to tickle your Tastebuds