Forum Replies Created
-
AuthorPosts
-
This is a strange but true tradition in Catalan, Spain. Merry Christmas Everyone.
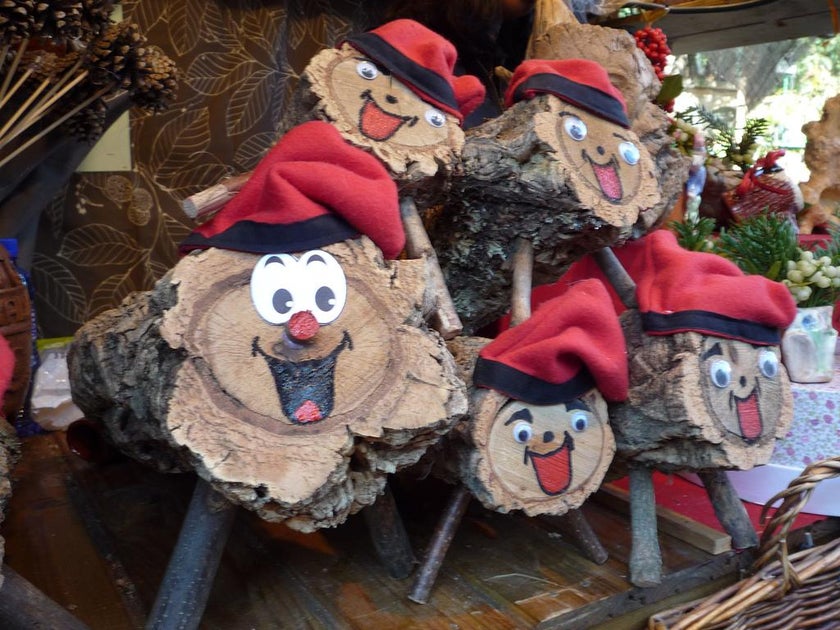
Feeding the Poop Log: A Catalan Christmas Tradition
It’s Christmas Eve, which means children across Spain’s Catalan region are gathering in their homes for the traditional whacking of the festive shit log.
Tió de Nadal (Christmas log), a hollow log with stick legs, a smiley face, and a floppy red hat, is a yule branch with a scatological spin. (Its other name is Caga Tió, or “shit log,” for reasons that will shortly become apparent.)
On December 8 each year — the Feast of the Immaculate Conception — families bring out the happy log.
Every night until December 24, children are tasked with “feeding” the log by offering him nuts, dried fruit, and water.
Kids must also cover Tió de Nadal with a blanket to ensure he stays warm and comfortable.On Christmas Eve, it is time for the little shit log to shine.
Children gather around the red-hatted branch and beat him with sticks while singing the traditional Tió de Nadal song:Shit log,
Shit nougats,
Hazelnuts and mató cheese,
If you don’t shit well,
I’ll hit you with a stick,
Shit log!Then comes the miracle: the kids look under Tió de Nadal’s blanket and discover that the dear log has pooped out a pile of candies and presents.
(The end of the defecation session is signaled by the presence of a stinky herring.)
When everyone has collected their gifts from Tió de Nadal, the family burns him for warmth.The poop log is not Catalonia’s only defecation-based festive tradition.
Take a close look at any nativity scene in the area and you’ll spot Caganer, a porcelain man copping a squat in the presence of Mary, Joseph, and the Three Wise Men. Caganer is not meant to be sacreligious — his fertilization of the holy ground heralds a prosperous harvest in the new year.https://slate.com/human-interest/2013/12/feeding-the-poop-log-a-catalan-christmas-tradition.html
More is explained here
Sweet idea Max.
So much so I thought it would be better in a topic of its own.I really do like the way you think. Lets hope Achat or one of our member pose creators picks up on the idea and see what they can materialise.
Great idea. I hope you post more of your ideas and views.
Hi Max,
Welcome back to forum.Thanks for your input. You have some interesting ideas which I’m sure Achat will take note of.
The B – Shop was created by Achat to sell poses made by members that were slightly inferior to the more regular poses. The pose costs also reflect this.
As members skills and pose standards improve, the poses are then promoted to be sold in the regular shop known as the A Shop.
I’m not sure Achat would sell their own poses in there.As far as I am aware, the “Flexy Girl” Pose has just been upgraded with new actions, as per Achat’s poster.
I don’t think any of the “old” actions have been removed, but I could be wrong.
Possibly the ones you refer to are on the “ladies” side?Can anyone confirm this and list the new actions for Flexy Girl?
It would be useful too, if members could write reviews and what you think of this upgrade?Max, Your ideas for a pose like “Foreplay For Innocence” sounds really interesting.
Maybe you could explore this idea more and perhaps identify more actions and ideas for a whole new pose that one of our member creators could pick up on.
I would certainly be interested in buying such a pose.I hope you post more in our Forum.
Anne-Marie Greatest Hits Up to Now
CHRISTMAS STAR BISCUITS
Deliciously easy, melt-in-the-mouth cookies, with just a touch of spice, these Easy Christmas Star Biscuits are the perfect Christmas treat. They make great homemade Christmas presents and are super simple – so a great recipe to make with kids.
Course – Christmas Baking, Snack
Cuisine – American, British
Prep Time – 20 minutes minutes
Cook Time – 10 minutes minutes
Total Time – 30 minutes minutes
Servings – 40 biscuitsEquipment
2 large baking trays (or whatever you’ve got…pizza trays, roasting trays and cake tins all work well)
Baking paper or the butter wrapper (for greasing the baking trays)
Mixing bowl
Wooden spoon
Rolling pin
Star shaped cutters (or any other shape you fancy)
Wire cooling rack (or improvise with your grill rack or a roasting rack)
Biscuit tin for storing your biscuits in when they’ve cooled downIngredients
250g () self raising flour (US – self rising four) (plus extra for rolling out)
125g () cold butter cut into 1cm (½inch) cubes (plus extra for greasing)
½ teaspoon cinnamon
½ teaspoon ginger
125g () caster sugar
1 egg beatenInstructions
1. Grease 2 large baking sheets with a thin layer of butter.
2. Preheat your oven to 200C / 180C fan / gas mark 6 / 400F.
3. Place the flour in a large mixing bowl (you can sieve it if you like, but I never bother) and add the cubes of cold butter.
4. Rub the butter and flour between your fingers (as if you are trying to rub the flour into the butter) until it resembles breadcrumbs.
5. Add the sugar and spices, and stir in thoroughly.
6. Then add the beaten egg and stir again.
7. Gradually the mixture should start to come together as a dough, but if it doesn’t all stick together, add a tiny bit of water to help it come together. Don’t add too much, though!
8. As soon as your biscuit mixture starts coming together, use your hands to squish it together into a ball.
9. Sprinkle your work surface with a little flour and pop your ball of biscuit dough on top.
10. Sprinkle some more flour on top of your dough, then roll out the biscuit dough to a thickness of about 5mm / ¼inch (it doesn’t have to be perfect – no need to get your ruler out!)
11. Using a selection of star shaped cutters, cut out your stars and gently lay them on the prepared baking tray.
12. Be sure to spread them out a bit as they will grow a little in the oven.
13. When you have got as many stars out of the biscuit dough as possible, squish the mixture back together, shape into a ball again and then roll out again.
You should find you can get a few more stars out of the re-rolled dough. Keep squishing and rerolling until you have run out of biscuit dough.
14. Put the biscuits in your preheated oven for 10-15 minutes, until the stars are pale gold on top and just a little bit darker round the edges. Start checking after 5 minutes and if in doubt get them out! They can always be popped back in if they are not done enough.
15. When your biscuits are cooked, place them on a wire rack to cool. They can be eaten warm or cold.
16. When they are completely cool they can be stored in a biscuit tin or other airtight container, where they will keep for about a week.Notes
1. The length of time these biscuits take to cook varies enormously, depending on the size and thickness of your stars. Use the colour of the biscuits in the photos as your guide. They should be pale gold on top and just a little bit darker round the edges.
2. They will still be a little soft when you get them out of the oven, but will harden as they cool. If in doubt, take them out of the oven! You can always pop them back in if they are not done enough!
3. Not suitable for freezing.Frangipane Topped Mince Pies
Delicious homemade mince pies topped with frangipane and flaked almonds.
These Easy Frangipane Mince Pies look and taste impressive, but are actually super simple to make.Mincemeat is a combination of chopped dried fruits, spices, sugar, nuts, distilled spirits, a fat of some type and sometimes meat.
Frangipane, is a sweet almond-flavored custard, typical in French pastry, used in a variety of ways, including cakes and such pastries.Course – Dessert, Pudding, Snack
Cuisine – British
Prep Time – 20 minutes minutes
Cook Time – 20 minutes minutes
Total Time – 40 minutes minutes
Servings 12 mince piesEquipment
Mixing bowl
Wooden spoon
Rolling pin
8cm (3¼inch) fluted circular cutter (non-fluted is also fine!)
12 hole cupcake tray (holes 6cm/2½in wide, 2cm/¾in deep)
Sieve (for dusting the mince pies with sugar)Ingredients
Mince Pies
200g (1 1/2 cups) plain flour (US – all purpose flour)
100g (3 1/2oz) butter cut into small cubes (plus extra for greasing)
Cold water (approximately 6 tablespoons – you may need less)
250g (1 cup) good quality mincemeat (shop-bought is fine – I used Tesco finest)
A small handful of flaked almonds
Icing sugar (US – confectioner’s sugar) for dusting (optional)Frangipane Topping
100g (3 1/2oz) butter softened
100g (1/2 cup) caster sugar
1 medium egg
1 teaspoon vanilla extract (optional)
100g (1 cup) ground almonds (US – almond flour)Instructions
1. Preheat your oven to 180C / 160C fan / gas mark 4 / 350F and grease a 12 hole cupcake tray with a little butter. (See Note 1.)
2. Place the flour and the cubed butter in a mixing bowl and rub the butter into the flour until it resembles breadcrumbs. (You can do this in a food processor if you prefer!)
3. Slowly add the cold water 1 tablespoon at a time until the mixture just starts to come together.
4. Use your hands to form the mixture into a ball, but take care not to overwork the dough.
5. Wrap the pastry dough in clingfilm (or similar) and place in the fridge until needed.
6. Next, place the softened butter into a mixing bowl together with the caster sugar.
7. Beat until pale and fluffy. Add the egg and beat again, then add the vanilla extract (if using) and the ground almonds, and stir to combine.
This is your frangipane.
8. Take the pastry dough out of the fridge and roll out until it is a little bigger than your cupcake tray.
9. Carefully cut out circles of pastry with a fluted cutter that is 8cm (3¼inches) in diameter.
10. Place the pastry circles in the prepared cupcake tray.
11. Next place 2 teaspoons of mincemeat in each pastry case.
12. Cover the mincemeat with 1 tablespoon of frangipane and scatter with a few flaked almonds.
13. Place the mince pies in your pre-heated oven and cook for 20-25 minutes until golden brown on top and cooked through. (The frangipane should spring back slightly when you press it down lightly with a finger – take care not to burn yourself, though!).
14. Leave the mince pies to cool in the tin for 10 minutes, then turn them out onto a cooling rack.
15. Finally, dust the mince pies with a little icing sugar (US – confectioner’s sugar).
16. Serve the mince pies warm or cold, on their own or with custard / cream / ice-cream.Notes
1. Please note – a teaspoon and a tablespoon here refer to a standard UK teaspoon (5ml / ⅙floz) and a standard tablespoon (15ml / ½floz). It is important you stick to these measures to obtain optimum results.
2. Suitable for freezing.Christmas Cake
This Easy Peasy Christmas Cake is a well tried and tested family recipe that has stood the test of time (several decades in my family).
It doesn’t need feeding (with alcohol) and so is suitable to give to kids – if they’ll eat it!!Course – Dessert, Pudding, Snack
Cuisine – British
Prep Time – 1hour hour
Cook Time – 3hours hours
Total Time – 4hours hours
Servings – 30 slicesIngredients
Cake
250g (9oz) softened butter
250g (9oz) light soft brown sugar
250g (9oz) sultanas
250g (9oz) seedless raisins
250g (9oz) currants
60g (2oz) ground almonds
125g (4 1/2oz) diced mixed peel
125g (4 1/2oz) glace cherries
3 large eggs
50ml (1/4 sherry) sherry (or apple juice if you want to make this alcohol free)
1 very heaped tablespoon golden syrup
250g (9oz) self-raising flour
1 teaspoon cinnamon
1 teaspoon mixed spice
1 teaspoon nutmeg
Icing (optional)
Shred-less marmalade or sieved apricot jam
Ready-rolled marzipan
Ready-rolled white icing
Decorations (optional)Equipment
A large mixing bowl
Two smaller mixing bowls and a little bowl for the cherries
A jug
A 20cm / 8 inch cake tin
Greaseproof paper
Brown paper
Baking sheet
A skewer
A cooling wireInstructions
Preparation
1. Cream the butter and sugar in a large bowl until pale.
2. In a separate bowl mix together the flour, ground almonds and spices.
3. Wash the sultanas, raisins and currants and place in a third bowl together with the chopped mixed peel.
4. Rinse and dry the cherries. Place in a small bowl and dust with a little flour (to stop them sinking in the cake).
5. In a jug, mix the eggs, golden syrup and sherry (or apple juice).
6. Line the base and sides of a 20cm / 8inch cake tin with a double layer of greased greaseproof paper, having greased the tin first.
7. Make sure the paper which lines the sides stands 7cm above the rim of the tin.
8. To ensure the cake does not have a hard base, line a baking sheet with 4 layers of thick brown paper.
9. Preheat your oven to 165C / 145C fan / gas mark 3 / 325F.Assembly
1. Add a handful (or large spoonful) of flour to the creamed butter and sugar.
2. Then add a small amount of the egg mixture and a handful of the fruit mixture and work together well, ideally with your hands (but you could do it with a wooden spoon if you don’t fancy the idea of getting your hands messy).
3. Repeat this process until all the ingredients are well mixed, then finally add the cherries and mix again.
4. Put the mixture in the prepared tin and flatten down evenly.Baking
1. Place the cake tin on the prepared baking sheet and put into your preheated oven for 1 hour.
2. Reduce the heat to 150C / 130 fan / gas mark 2 / 300F and cook for a second hour.
3. Cover with a little hat of greaseproof paper and bake for a third hour.
4. Remove from the oven and check it is cooked properly by inserting a skewer – the skewer should be clean when removed.After Baking
1. Trim the greaseproof paper back to the level of the tin’s rim and place on a cooling wire upside down still in its tin.
2. Leave until completely cold (ideally the next day).
3. Slide the cake out, wrap securely with foil and store in a cake tin until Christmas.
4. Icing (optional)
5. Cover the entire cake in warmed shred-less marmalade (or sieved apricot jam).
6. Place the ready-rolled marzipan onto the cake and gently smooth down the sides. Trim off any excess.
7. Lightly cover and leave for 1-2 days, ideally.
8. Lightly brush the marzipan with water and place the ready-rolled icing on top of the cake.
9. Gently smooth down the sides and trim off any excess.
10. Decorate if desired.Notes
Suitable for freezing.A Quick Christmas Cake
Left making your Christmas cake to the last minute? Suddenly and unexpectedly need a Christmas cake? Or perhaps you just want a really quick and easy Christmas cake recipe? Either way, this Last Minute Emergency Christmas Cake is your answer… ready in just 1 hour 30 minutes, it requires just a handful of classic ingredients and it can be decorated and served on the same day you make it!
Course – Cake, Dessert, Pudding, Snack
Cuisine – British
Prep Time – 30minutes minutes
Cook Time – 1hour hour
Total Time – 1 hour hour 30 minutes minutes
Servings – 12 slicesEquipment
A large saucepan
2 wooden spoons
Baking paper
A round cake tin pan measuring approximately 20cm / 8inches in diameter and at least 5cm / 2 inches deep.
A large mixing bowl
A skewer (You can improvise with a teaspoon handle if you don’t have one)
A wire cooling rack (You can improvise with a grill rack or oven shelf if you don’t have one)
A rolling pin
A sharp knife
Star shaped cutters of various sizes (Or whatever Christmas shapes you like!)Ingredients
For the cake…
500g ( 18oz) mixed dried fruit (ideally including mixed peel – see note)
Juice of 1 orange
100ml (1/2 cup) sherry (or brandy / whisky / gin / rum – or use apple juice if you want this to be alcohol free)
100ml (1/2 cup) boiling water
150g (5 1/4oz) butter softened (plus extra for greasing)
150g (3/4 cup) soft dark brown sugar (or muscovado sugar)
2 large eggs
150g (1 1/4 cup) self-raising flour (US – self-rising flour)
2 teaspoons mixed spice (or pumpkin spice)
1 teaspoons cinnamon
200g (7oz) glacé cherries halvedTo decorate…
500g (18oz) marzipan (I prefer the paler ‘natural’ colour… but the bright yellow stuff works too!)
250g (9oz) white fondant icing
Icing sugar (US – confectioner’s sugar) (for rolling out the marzipan and fondant icing)Instructions
For the cake…
1. Place the dried fruit in a large saucepan. Squeeze over the juice of the orange and pour over the sherry and boiling water.
2. Bring to the boil, then simmer for 10 minutes, stirring every couple of minutes. Leave to stand until needed.
3. Preheat your oven to 160C / 140C fan / gas mark 3 / 325F.
4. Grease and line your cake pan with baking paper (see above).
5. In a large mixing bowl, beat together the butter and sugar thoroughly.
6. Add the eggs, one at a time, beating the mixture until smooth after each one.
7. Gently fold in the flour, mixed spice and cinnamon until fully incorporated.
8. Add the glacé cherries and the dried fruit, plus any remaining liquid from the saucepan. (There should be very little liquid left, as most of it will have soaked into the fruit or evaporated.)
9. Stir gently until the fruit is evenly distributed.
10. Tip the cake mixture into your prepared cake tin and get it straight into the oven.
11. Bake for 50 minutes to 1 hour or until a skewer, inserted into the middle of the cake, comes out clean. (I check every 5 minutes from 50 minutes. It usually takes 55 minutes in my oven.)
12. Leave to cool for 10 minutes in the tin (or until cool enough to handle without burning your hands!), then remove the cake from the tin and allow to fully cool on a wire cooling rack… The cake should take approximately 2 hours from the time it comes out of the oven to cool fully.
Do not decorate until completely cool!To decorate…
1. Dust your work surface with icing sugar.
2. Take half the marzipan and roll it out to just a fraction larger than the cake.
3. Cut out a circle the same size as the top of the cake, using a knife – use the cake tin as a guide to help you get the circle just the right size!
4. Brush the cake with a very small amount of cold water. (This is to help the marzipan stick to the cake – be very sparing, you don’t want to make the cake wet!)
5. Place the marzipan circle on top of the cake and trim any overhanging edges with a sharp knife.
6. Roll out the white fondant icing to just a fraction larger than the cake.
7. Cut a circle the same size as the top of the cake, using a knife – again, use the cake tin to help you get the circle just the right size!
8. Brush the marzipan layer with a very small amount of cold water.
9. Place the fondant on top of the cake and trim any overhanging edges with a sharp knife.
10. Roll out the remaining marzipan and cut out a variety of different sized stars. (Or whatever Christmas shapes you like!)
11. Place these stars at random on top of the cake, using a little cold water on the back of each star to stick them down.
12. Your cake is now ready to eat!Notes
1. Ideally you want the dried mixed fruit to be a mix of sultanas, raisins, currants and candied mixed peel. You can usually find this ready mixed in supermarkets. I have used both – supermarket bought and my home made one in the past.
If you can’t find it ready mixed, buy the ingredients individually and go for these proportions:
40% sultanas / 30% raisins / 20% currants / 10% candied mixed peel.
2. Suitable for freezing.Pigs In Blankets
Anne-Marie x Aitch – PSYCHO
Copacetic
Meaning
Very good; excellent; completely satisfactory ; In good order, hunky-dory.It can also be used in place of Fine and Okay.
Examples
And his smile told him that everything was copacetic.
—Robert BlochBut all was not copacetic, as Ross revealed this week in a flurry of X (formerly known as Twitter) posts and Instagram Live broadcasts.
—Seth Abramovitch, The Hollywood Reporter, 22 Sep. 2023But the Bruins also rarely overthought its lineup configuration over the grind of an 82-game slate, especially in regards to a copacetic goalie rotation and a stout six-man defensive unit.
—Conor Ryan, BostonGlobe.com, 29 Apr. 2023Rather than working towards a copacetic co-parenting relationship with the mother of his four kids, West is choosing violence, opting to take the offensive by claiming that Kardashian is attempting to isolate him from their family through the divorce.
—Ineye Komonibo, refinery29.com, 16 Mar. 2022We have new poses for the ladies. A clothed and nude version of Romance.
FF. Pose Review Request. 95. Romance – In Clothing and 96. Romance – In Lingerie.
Released Saturday 9 December 2023.PRICE A$ 399 for both poses.
Why not do a pose review for our members?
For Pose Reviews, See HereTopics (Forum Home Page) » Woman with Woman in AChat » FF. Pose Review Request. 95. Romance – In Clothing and 96. Romance – In Lingerie.
OR to find the page:
Check the FF Pose Index in Woman with Woman in Achat No. 95. Romance – In Clothing and 96. Romance – In Lingerie.
Traditional mincemeat for Mince Pies
Try making your mincemeat well in advance of Christmas to give the flavours maximum time to mature.
Prep: 20 mins Plus soaking.
Makes about 2kg (4 x 500ml jars)Ingredients
250g raisins
375g currants
100ml brandy (OR orange juice or cranberry juice or earl grey tea or regular black tea for alcohol free)
zest of 1 lemon, juice of ½
300g shredded suet (OR Alternative – 150g melted unsalted butter. Mix all ingredients and poor the melted butter on top and mix.)
250g dark brown sugar
85g chopped mixed peel
½ small nutmeg, grated
1 large Bramley apple, peeled and gratedMethod
1. Soak the raisins and currants in the brandy and lemon juice for 1 hr until plumped up, then drain and set the brandy aside.
2. Mix all the ingredients together in the order given, then pour in the brandy when everything else is well mixed.
3. Spoon and press into sterilised jars, to exclude any air (the easiest way to sterilise jars is to run them through a dishwasher on its hottest setting).
4. Cover and leave for at least a fortnight.
5. Will keep in the fridge for up to 6 months.NOTE :
1. 150 grams melted unsalted butter can be used instead of the 300g suet. Mix all ingredients and poor the melted butter on top and mix.2. You can leave the 300g shredded suet out altogether for a fat free version (although take care it doesn’t burn when you come to cook it in mince pies etc).
You could also add some grated cold butter or use vegetable suet instead if you prefer.3. If you don’t like apples, you can used pears instead. Go for fairly firm pears (about 2 medium pears).
4. If you wish for your mincemeat to be alcohol free ie: no Brandy, you can replace the Brandy with orange juice or cranberry juice or even earl grey tea or regular black tea (as you would in a tea loaf).
Without the alcohol though, the mincemeat won’t keep as long.
We’d suggest freezing it if making in advance, or you could keep it in a jar or airtight container in the fridge for about 10 days.Easy Peasy Mini Mince Pies
Nothing beats homemade mince pies!
These star topped mini mince pies are super easy to make and utterly delicious. Ideal for making with kids (but grownups love them too!)
They also freeze beautifully, meaning you can have homemade mince pies whenever you want.Course – Dessert, Pudding, Snacks
Cuisine – British
Prep Time – 20minutes minutes
Cook Time – 15minutes minutes
Total Time – 35minutes minutes
Servings – 24 mince piesEquipment
2 cupcake trays (each with 12 holes)
Baking paper (or the butter wrapper will do)
Mixing bowl
Wooden spoon
Rolling pin
Circle shaped cutter, 8cm / 3inch diameter (Normal or Fluted)
Star shaped cutter, 7cm / 2½inch from point to point
Pastry brush
Wire cooling rack (or improvise with your grill rack or a roasting rack)
Sieve
Cake tin for storing your mince pies when they’ve cooled down (if there are any left!)Ingredients
350g (12oz) plain flour plus extra for dusting
175g (6oz) cold butter cut into 1cm / ½inch cubes (plus extra for greasing)
A little cold water (roughly 6-8 tablespoons)
250g (8oz) mincemeat (you can use shop bought ready made Mincemeat if you wish – Marks and Spencer Classic Mincemeat is a good one)
A little milk
3 tablespoons icing sugarInstructions
1. Grease the holes of 2 cupcake trays (24 holes in total), using a little butter on some baking paper.
2. Preheat your oven to 220C / 200C fan / gas mark 7 / 425F.
3. Place the flour in the bowl (you can sieve it if you like, but I never bother) and add the cubes of cold butter.
4. Rub the butter and flour between your fingers (as if you are trying to rub the flour into the butter) until it resembles breadcrumbs. (See Note 1.)
5. Stir in a tablespoon of cold water and stir into the butter/flour mixture thoroughly.
6. Add another tablespoon of cold water and stir in thoroughly.
7. Repeat this process until the mixture just starts to come together. I usually find this happens after about 6-8 tablespoons but it does vary. Don’t add too much water!
8. As soon as your pastry starts coming together, stop adding water and use your hands to squish the pastry together into a ball.
9. Sprinkle your work surface with a little flour and pop your ball of pastry on top.
10. Roll your pastry out as thin as it will go. (It might be easier, depending on the size if your work surface, to split the pastry into 2 balls and do them 1 at a time.)
11. Using a circle shaped cutter, cut out 24 circles and place them into the greased holes of you cupcake trays.
12. Put 1 teaspoonful of mincemeat in the centre of each circle.
13. Squish together the pastry, roll it into a ball and roll out thinly again.
14. This time cut out 24 stars, using your star shaped cutter. Place each star on top of the mincemeat, roughly in the centre (this is a bit hit and miss with children!) and press down slightly so the star sticks.
15. Using a pastry brush, brush over a little milk. (Not strictly necessary, but it makes the mince pies go a more golden colour.)
16. Put the mince pies in your preheated oven for 15-20 minutes, until the mincemeat is bubbling and the pastry is golden on top.
17. Take your mince pies out of the cupcake tin and place them on a wire rack to cool – I find it easiest to lever the mince pies out with a dessert spoon – take care not to burn yourself as they will be super-hot!
18. While the mince pies are still warm, put a couple of tablespoons of icing sugar into a sieve and dust the icing sugar over the mince pies. (You can use an icing sugar dredger if you prefer.) This is the “Snow” on the Mince pies. 🙂
19. The mince pies can be eaten warm or cold, on their own or with cream or custard.
20. When the mince pies are completely cool they can be stored in a cake tin, or other air tight container… that is if there are any left!Notes
1. You can of course make the pastry in a food processor, if you prefer. Just pop the flour and the cubed butter in your processor and pulse until it resembles breadcrumbs, then add the water drop by drop and pulse until it starts to come together, then take the pastry out of the processor and roll it into a ball by hand.
2. Suitable for freezing.
3. It is essential for this recipe that the pastry is rolled out thinly – so thin you can almost see through it!
4. Mince pies with a little star on top makes it Christmassy. You can if you wish, put on a full pastry lid but the stars makes for a better pastry to mincemeat ratio.
These mini mince pies can obviously be made with any shape you choose on top. You can even make a lattice. If you do make a full top, you will probably have to make a little more pastry if you want to give them a full lid, and don’t forget to make a snip in the top to let the steam escape.WHAT TO SERVE WITH MINCE PIES
Of course, mince pies are delicious on their own as a snack, but if you want to turn them into more pudding there are lots of delicious options:Custard (or “Crème anglaise” if you want to be fancy 😉 )
Cream (any kind, but my favourite is the extra thick double cream)
Brandy butter
Brandy creamHOW TO STORE MINCE PIES
Once the mince pies have cooled completely, they should be stored in an airtight container (for example a cake tin). They will keep for about a week.CAN YOU REHEAT MINCE PIES?
Yes, you can. Simply place the mince pies on a baking tray and place in a preheated oven, set to 220C / 200C fan / gas mark 7 / 425F, for 5-10 minutes.CAN YOU FREEZE MINCE PIES?
Mince pies freeze really well. Once cooled, simply place them in a plastic lidded container (put a sheet of baking parchment or greaseproof paper in between the layers) and pop them in the freezer, where they will keep for up to 3 months. Defrost at room temperature for a couple of hours.Once defrosted, you can eat them at room temperature or reheat them as above.
Roast Tinned Potatoes
Save Time And Roast Canned Potatoes For The Simplest Side Dish
Here is a simple side dish that is sure to impress without much effort. Roast tinned potatoes for a dish that’s quick and delicious.
While you technically don’t need to cook canned potatoes, they’ll taste much better after they’re heated up. Crisp with a creamy interior, roasted potatoes are one of the best ways to eat the spuds. As incredible as they are, potatoes can take up to 50 minutes to roast. However, since canned potatoes are partially cooked, they only take half the time.
1. Preheat your oven to 400 F and rinse the canned potatoes to remove the excess salt.
2. Pat them dry and toss them in olive oil or melted butter.
3. Sprinkle them in salt and pepper.
4. Place in a roast tin and allow them to roast for 25 minutes or until they’re golden brown.Serve like the picture in a dish with sprinkles of Rosemary and Garlic.
Slow cooker pork, apple and cider pie recipe
A dish that can be cooked in a slow cooker or traditional oven, yielding tender meat in a rich sauce and a buttery, mashed-potato topping that is golden and delicious.
Serves 4.
Timings – Prep time: 15 minutes
Cook time: 6½ hours (slow cooker); 2 hours (oven)Ingredients
3 tbsp cornflour
1kg pork shoulder meat, cut into 3cm cubes
3 tbsp olive oil
1 red onion, finely chopped
2 garlic cloves, finely chopped
2 tbsp finely chopped sage
1 tsp fennel seeds, coarsely ground
330ml apple cider
2 granny smith apples, peeled, cored, cut into 3cm cubes
1kg désirée potatoes, peeled, cut into 4cm cubes
50g butter
3 tbsp milkTo Serve – Chopped parsley.
Method
In the slow cooker
1. Put the cornflour into a bowl and season well with salt and pepper.
2. Coat the pork in the seasoned flour.
3. Heat one tablespoon of the oil in a large frying pan over a high heat and cook the pork for about five minutes or until browned.
4. Transfer to the slow cooker.
5. Reduce the heat to medium, add the onion, garlic, sage and fennel and cook for two minutes or until softened.
6. Add the cider and let it boil for one to two minutes to evaporate the alcohol.
7. Transfer to the slow cooker, along with the apples, and mix.
8. Season well with salt and pepper, then cook on low for six hours until the pork is tender.9. Meanwhile, put the potatoes in a large saucepan of cold salted water.
10. Bring to the boil and cook for 12 minutes until tender.
11. Drain and mash with a potato masher.
12. Add the butter and milk and mix well.
13. Spoon the potato on to the surface of the pork and apple mixture, making a scalloped pattern with the back of the spoon, if you like.
14. Cook for a further 15 minutes or until warmed through.15. Serve with the chopped parsley.
In the oven
1. Preheat the oven to 160C/140C fan/Gas 3.
2. Put the cornflour into a bowl and season well with salt and pepper.
3. Coat the pork in the seasoned flour.
4. Heat one tablespoon of the oil in a large frying pan over high heat and cook the pork for about five minutes or until browned. Remove and set aside.
5. Reduce the heat to medium, add the onion, garlic, sage and fennel and cook for two minutes or until softened.
6. Return the pork to the pan, pour in the cider and let it boil for one to two minutes to evaporate the alcohol.
7. Transfer to a 2.5 litre baking dish, along with the apples, and mix to combine.
8. Season well with salt and pepper, then cover tightly with foil and bake for one and a half hours until the pork is tender.9. Meanwhile, put the potatoes in a large saucepan of cold salted water.
10. Bring to the boil and cook for 12 minutes until tender. Drain and mash with a potato masher.
11. Add the butter and milk and mix well.
12. Increase the oven temperature to 190C/170C fan/Gas 5.
13. Spoon the potato on to the surface of the pork and apple mixture, making a scalloped pattern with the back of the spoon, if you like.
14. Bake for 15 minutes until warmed through and lightly golden.15. Serve with the chopped parsley.
-
AuthorPosts