Forum Replies Created
-
AuthorPosts
-
It’s that cold time of year again. Frost, iced up cars and the dreaded condensation.
Here’s some tips to make life easier.
How to prevent condensation on windows throughout the winter
As temperatures drop outside and we turn our heating on, condensation can start to appear on our windows, causing damage to windows and potentially developing into dangerous damp patches if not treated.
What causes condensation?
Condensation occurs frequently throughout the winter
Condensation occurs when the air inside a room is warmer than the surface temperature of the window. It builds up faster and more frequently during the winter as we are more likely to turn the heating on, along with our usual daily activities such as cooking, showering, and even breathing.
Is condensation dangerous to health?
The condensation itself isn’t harmful, as it is only water. However, when it remains on wood or plaster the moisture can be absorbed into the material and will create damp patches.
Not only can this cause damage to your windowsills, frames and surrounding walls, but it can also cause health issues due to mould developing.
This can cause respiratory problems such as asthma and allergies, with babies, children and the elderly most at risk according to the NHS.Opening your windows can help to prevent condensation
How to prevent condensation on windows
Cleaning experts have shared their top tips to tackle condensation, including a window vacuum cleaner, and how to prevent condensation developing in the first place.1. Remove moisture before it has time to set in
Soaking up or drawing in the moisture from the room before it has time to manifest can be an easy way to combat condensation and prevent damp from occurring. Unconventional methods include putting cat litter in a sock, tying it up and placing it on a window sill. This one is good for cars too. Place it on your dashboard. (To dry it again, just zap it in the microwave)
Putting a bowl of salt on the window sill has also proven to be a good hack.
If you’re able to invest in the solution, there are some great humidifiers on the market which absorb all the moisture in the air.2. Vacuum the damp away with a window vacuum
Cleaning up condensation with a Window Vac can get instant results with a simple swipe.
Window vacs can effortlessly sucks up moisture leaving flat surfaces sparkling clean and streak-free.
Window vacuums can also be used on any flat surface in the home including windows, showers, and mirrors, ensuring they all stay spotless and streak-free.3. Let the air in
Keeping windows and doors shut throughout the winter months can have negative effects. Ventilating the home by opening the windows for even just 20 minutes a day can drastically reduce the effects of condensation and dampness in homes.
Keeping windows open during activities that cause a lot of moisture in the home such as cooking, showering, and drying clothes can also help minimise condensation.4. Ensure your home has good insulation
Investing in reinsulating the walls of the house could be worth considering if condensation is a recurring issue in your home. Not only will this keep your home warm and reduce costs for heating, but having good insulation greatly determines how much condensation builds up and how long it takes to dry.5. Keep the room temperature regulated
Keeping rooms in the house at a regular warm temperature will stop surfaces from getting cold enough for condensation to build.
The heating doesn’t need to be on constantly throughout the day, but a timer can be used to switch on the heating during the coldest periods, or for a period during the night to utilise lower energy rates to save on energy bills.
Keeping surfaces warm will prevent condensation from forming.
Before switching your heating on for the first time in the winter, take the time to bleed (or vent) your radiators too to ensure they are running efficiently.6. Move your indoor plants and furniture
Consider removing plants from windowsills
Indoor plants that live on the windowsill naturally release moisture into the air.
Consider moving them away from the window during colder months to help reduce the amount of water they release.
Your plants may thank you for it too, as window sills are often much colder in winter than in summer and plants like to maintain an all-year round ambient temperature.
If possible, furniture near external walls should also be moved as far away as possible to allow for air to circulate more freely.How to de-ice your car quickly
What you shouldn’t do to de-ice your car
1. Use boiling water
Research revealed a whopping half of all motorists have used a kettle of hot water to defrost their car windscreen.
But that could be a costly mistake as the sudden warmth hitting your windscreen in chilly temperatures could lead to the glass cracking. FINANCIAL OUCH!2. Just leave it
Sure, it’s tempting to stick the heater on full and drive off hoping the screen will soon clear, but that’s a move that could land you in trouble.
According to the Highway Code, “windscreens and windows must be kept clean and free of obstructions to vision.”
During the icy winter months, this is particularly relevant and you must clear the ice (or snow) from all of your windows, as well as both the front and rear windscreen, before driving. (Dont forget your lights too)
This is the same with clearing the condensation that forms inside the car.
The risk of not doing so is a potential fine and possible points on your licence for driving with limited vision.3. Don’t be tempted to leave your car to defrost while you head back in the warm either as you’ll be risking a fine with more added on if you don’t pay it in time and penalty points on your licence for leaving your car to defrost while the engine is idling.
The law says if your car’s engine is running, you need to be in control of it, which rules out you being in your house in the warm while your car ticks over outside.And, of course, if you’re busy getting breakfast or whatever inside, your car could also be an easy target for thieves.
4. Stick on the heater and wait for it to clear
While ultimately effective, this is the least environmentally-friendly option thanks to the extra fuel you’ll use and the extra pollution you’ll cause (which will have the same effect as leaving the engine running to de-ice). Avoid for the sake of the planet.5. Start the wipers
Tempting though it might be to speed the process along by using your wipers to help shift the ice, starting up wipers that are frozen to the windscreen or jammed by snow could cause damage to the mechanism.
A useful hack is to put a sock over each of the wipers to protect them from frost and ice.6. Use a credit card
Over a third (35%) of drivers have admitted to using a bank card to scrape ice from their windscreen.
While it may seem like a good idea, using anything other than a proper ice-scraper risks scratching the glass.
Of course, it could also cause your precious card to snap too, rendering you card-less, and potentially therefore cash-less in the run-up to Christmas.Effective (and safe) ways to de-ice your car
1. Use a windscreen scraper or de-icer
Both offer the easiest and safest method to free your car of frost.2. Make a DIY de-icer
While de-icers are effective, there are some more cash-conscious and environmentally-friendly ways to remove ice from your screen (NOT the credit card though, remember).Solution of water with a teaspoon of salt
One easy method is to mix up a solution of water with a teaspoon of salt, before pouring it over any frozen areas.
Use this sparingly, however, as salt could cause damage to the windscreen and avoid hitting the paintwork as it is also corrosive.Solution three parts of vinegar to one part of water
Mixing up three parts of vinegar to one part of water will also do the trick, but could be a little on the smelly side.
Again, Use this sparingly, as vinegar could cause damage to the windscreen rubber seal and avoid hitting the paintwork as it is also corrosive.Solution of mixing water with rubbing alcohol or surgical spirit
Meanwhile Experts suggest an alternative solution of mixing water with rubbing alcohol or surgical spirit which you can get from any pharmacy.
Mix one part water with two parts rubbing alcohol and fill the spray bottle with the solution. This can then be sprayed on your windscreen to melt the ice.
The best part is that this solution will not freeze, as rubbing alcohol has a freezing point of around -88 degrees celsius, which means the bottle can be kept in your car until next time.Other winter weather car hacks
1. Keep your car frost-free overnight
Want to avoid the morning frost-clearing rush?
Try soaking an old towel in a solution of water and table salt and placing it over your car windows the night before.
It works because salt lowers the freezing point of water, which means moisture is prevented from frosting over on your screen.2. Spray your car doors with cooking spray oil.
Every part of your car’s exterior is liable to freeze and stick in place overnight.
If you’re worried about your car doors jamming shut, the experts suggest spraying a simple cooking oil spray along the rubber edges of your car doors, handles and locks.
Wipe away the excess then close the doors and leave it overnight.
In the morning, they should open easily (even if the rest of the car is icy).3. Put socks on your windscreen wipers
If you’re parking outside during winter, you may find that your windscreen wipers can stick to the window.
Strange as it may sound, to stop this from happening, you can pop a pair of long socks on your windscreen wipers to stop snow and ice from collecting there.
Remove them in the morning when you need your car, then remember to put them on again before you leave your car for the night.4. Use hand sanitiser to defrost keys
In today’s post-pandemic times everyone tends to still have hand sanitiser on them with COVID-19 and flu still circling, which makes this particular hack all the more convenient.
If you use a manual car key, it’s a common occurrence for the keyhole to freeze over making it impossible to turn the lock. If you break the key in the lock, replacement car keys cost up to £250, so it can be a costly issue to solve. FINANCIAL OUCH.
One of the key ingredients of hand sanitiser is alcohol, which will cause any ice to simply melt away.
Cover your keys in hand sanitiser and it should glide in no problem.Happy (pain-free) de-icing!
Useful Buys for your car
1. Gloves to protect your hands as you clean your car
2. Soft hand brush to brush snow off your car.
3. Windscreen Frost Protector Car Snow Cover. Black side out for protection from snow/ice. Silver side out for protection from the Sun and heat.
4. De-icer
5. Screen Wash – (Can make your own solution of water and a couple of squirts of washing up / dish liquid)
6. Socks for your windscreen wipers.LEFTOVER CHICKEN or TURKEY AND EGG FRIED RICE
How to adapt using leftovers: For leftover turkey fried rice, simply use leftover turkey instead of leftover chicken.
Otherwise follow the recipe exactly as written.
Total time using leftovers: 15 minutes
Use 300-500g leftover roast turkey, serves 4This recipe will also work really well with leftover pork, ham, bacon or pre-cooked prawns.
Alternatively, to make a vegetarian version, you could use tofu or Quorn chicken pieces.
This recipe is naturally dairy free and if you make sure you use gluten free soy sauce (tamari), it is gluten free too.This recipe makes good use of leftovers, turning them into a really easy, family friendly weeknight dinner.
What’s more, by using a pack of ready prepared rice and easy veggies (hardly any chopping!), it’s quick too – this recipe takes just 15 minutes from start to finish – perfect for when time is tight, but you still want to eat well.No leftover chicken? No problem – simply pan fry two chicken breasts for about 6-7 minutes on each side on a medium heat, leave to rest for 5 minutes, shred using a couple of forks and then continue with the recipe below.

To make this meal a little healthier use brown rice, but it will work just as well if you use white rice.
Using pre-cooked rice to makes this dish really quick and easy, but if you prefer to cook your own rice, do that first – you will need about 170g uncooked rice to produce 500g cooked rice.
When you have cooked your rice, you must cool it down first before starting this recipe – warm rice will not work as well!
The quickest way to do this is to drain my cooked rice in a sieve and then run the cold tap over it until it is cool.Finally, leave it to sit over the pan it cooked in until it has dried out a little bit.
Alternatively leave your rice to cool to room temperature, then put it in a plastic box in the fridge until you need it.Course Main Course
Cuisine Chinese
Prep Time 5 minutes
Cook Time 10 minutes
Total Time 15 minutes
Servings 4 peopleIngredients
Metric – US Customary
2 tablespoons olive, rapeseed or coconut oil
300-500g (10½-17½ oz) leftover chicken / Turkey shredded (or pork, ham, bacon or pre-cooked prawns)
500g (2½ cups) pre-cooked brown rice
100g (¾ cup) frozen peas
100g (¾ cup) frozen sweetcorn
1 red pepper diced
4 spring onions sliced finely (plus 2 extra for garnish)
3 cloves garlic crushed or grated
4 medium eggs
2 tablespoons sesame oil
2 tablespoons soy sauce (or GF tamari)Instructions
1. Put 2 tablespoons olive, rapeseed or coconut oil in a large frying pan or wok and heat over a medium-high heat for 1 minute.
2. Add the cooked rice, shredded chicken, frozen peas, frozen sweetcorn, red pepper and spring onions.
3. Stir fry 3-4 minutes, until everything is warmed through and the frozen veg is no longer frozen.
4. Add the garlic and stir fry for 1 more minute.
5. Meanwhile crack the eggs into a large mug or small jug and whisk together lightly with a fork.
6. Make a well in the middle of the rice mixture and pour in the eggs – cook for 30 seconds, then mix the rice mixture and eggs together.
7. Continue frying for a couple of minutes, stirring occasionally, until you start to get some nice crispy brown bits.
8. Pour in the soy sauce and sesame oil and fry for 1 more minute.
9. Serve scattered with a few extra spring onions.
10. Put the bottles of soy sauce and sesame oil on the table for everyone to help themselves to extra, if needed.Notes
No leftover chicken? No problem – simply pan fry two chicken breasts for about 6-7 minutes on each side on a medium heat, leave to rest for 5 minutes, shred using a couple of forks and then continue with the recipe above.Last surviving Dambuster Johnny Johnson has died on 7 December 2022


The last survivor of the World War Two Dambusters has died aged 101.
Sq Ldr George “Johnny” Johnson, was a bomb-aimer in the 617 Squadron, which destroyed key dams in Germany during the war.His family said he died peacefully in his sleep on Wednesday.
Celebrating his 100th birthday in November last year, Mr Johnson told the BBC: “I’ve had a very lucky life in every respect.”
He was born in Lincolnshire and lived in Bristol, and was just 21 when he took part in the 1943 operation, which involved experimental bouncing bombs that were targeted at dams in the Ruhr Valley, releasing huge quantities of water into areas used by Germany for war production.
Mr Johnson was made an MBE in 2017 after a long-running campaign
It was Mr Johnson’s job to target the Sorpe Dam as part of the attack, which was codenamed Operation Chastise and carried out by the RAF’s 617 Squadron, based at RAF Scampton.
It was one of the most dangerous air operations of the war, with 53 men killed and three captured.
Sgt George Johnson (extreme left) was part of 617 Squadron based at Scampton, LincolnshireIn the last few years of his life Mr Johnson, who lived in Westbury-on-Trym in north Bristol, was involved in charity work and made many public appearances.
In 2019, he had an inter-city train named after him and was also given an honorary doctorate by the University of Lincoln in 2017.
After 22 years of service in the air force, he worked as a teacher in Newark in Nottinghamshire.
He and his wife Gwyn later moved to Devon, where he became a Conservative councillor.Thank You for your Service. RIP.
Released Thurs 8 Dec 2022
Sexy Dresses by BreeStyle
Beautiful and stylish dresses, just in time for Xmas in pretty red and stunning white.
The detail is exquisite.
PRICE A$ 569AND
Full Body Tattoo by Bella
Let out the wild girl in you!
PRICE A$ 449
Why not do an Outfit Review Here?
Topics (Forum Home Page) » Upgrades and newly added features » New added clothes to shop. Post pics & reviews to help our members.
Yellow Split Pea and Spinach Dhal (Vegan)
Quick to prepare and full of flavour, this Easy Yellow Split Pea and Spinach Dhal is a delicious, healthy, meat-free curry – equally at home served on its own with brown rice, as a nutritious midweek meal, or as part of a larger Indian themed meal at the weekend.
100% plant-based, this recipe is great for vegans, vegetarians and anyone looking to eat less meat but still enjoy great tasting food. And it’s gluten free too!

Course Main Course, Side Dish
Cuisine British, Fusion, Indian
Prep Time 5 minutes
Cook Time 55 minutes
Total Time 1 hour
Servings 4 peopleIngredients
Metric – US Customary
1 tablespoon olive oil
1 onion diced
3cm (1 inch) ginger grated or finely chopped
3 cloves garlic crushed or grated
½ teaspoon chilli flakes (or to taste, or use fresh chilli if you prefer!)
1 teaspoon cumin
1 teaspoon turmeric
3 cloves left whole
1 cinnamon stick broken in half
250g (1¼ cups) yellow split peas (see note 1)
750ml (3 cups) vegetable stock from a cube is fine – (can use 1 Kallo Organic stock cube, which is vegan and gluten free)
2 tablespoons tomato puree
125g (4½ oz) spinach (optional)To serve:
Brown rice or white rice / naans / chapatis
1 portion Cumin Roasted Cauliflower and Butternut Squash (See above recipe)Instructions
1. Place the olive oil and diced onions in a large lidded sauce pan and cook gently, with the lid on for 3-4 minutes, until softened but not browned.
2. Add the ginger and garlic and cook for 1 more minute over a low heat, with the lid off.
3. Add the chilli flakes, cumin, turmeric, cloves and cinnamon and cook for 2 more minutes – add a splash or two of water if the pan gets dry.
4. Add the yellow split peas, vegetable stock and tomato puree, give everything a good stir and then bring to the boil.5. Turn the heat down low and cover with a lid. Simmer for 40-45 minutes until most of the liquid is absorbed and the split peas are done to your liking.
6. If all the water gets absorbed before the split peas are done to your liking, add a little more water and continue cooking until they are done.
7. When the dhal (dal or dahl – dried lentils, beans, or peas in split or whole form or to the dish made from them) is just cooked, add the spinach on top and stir until all the spinach leaves have just wilted, but still retain some texture. (It will look like way 8. too much spinach to start with, but keep stirring and have faith!)9. Serve with brown or white rice and Cumin Roasted Cauliflower and Butternut Squash. (Or serve whatever you like best with a curry!)
Notes
1. Split peas vary enormously in how long they take to cook – so follow the packet instructions and also test as you go along. It is likely to take between 40 minutes and 1 hour.
2. The precise amount of liquid you will need will depend on how long your split peas take to cook and quite what shape your saucepan is! Start with 750mls (3 cups) and see how you go – add extra water at the end if it starts to get dry!
3. Don’t add salt to this recipe because the brand of stock cube can be quite salty – enough for this dish.
4. If you are using a low salt stock cube or homemade vegetable stock, you may wish to add a little salt to this dish to bring out the flavours.
5. Suitable for freezing.CUMIN ROASTED CAULIFLOWER AND BUTTERNUT SQUASH (VEGAN)
Super simple, yet utterly delicious, a Cumin Roasted Cauliflower and Butternut Squash side dish is the perfect accompaniment to curries, chillies and tagines.
A great way to get more vegetables, nutrition and deliciousness into your diet with very little effort!
Course Main Course, Side Dish, Starter
Cuisine Fusion, Indian, Mexican, Middle Eastern
Prep Time 10 minutes
Cook Time 30 minutes
Total Time 40 minutes
Servings 4 peopleIngredients
Metric – US Customary
½ large butternut squash (ideally the bottom half)
1 small cauliflower (or half a large one)
2 tablespoons olive oil
2 teaspoons cumin seeds
1 teaspoon salt (ideally coarse sea salt)Instructions
1. Preheat your oven to 220C / 200C fan / gas mark 7 / 425F.
2. Cut the butternut squash in half vertically, scoop out the seeds and cut into slices – roughly 1.5cm (½ inch) thick.
3. Break the cauliflower up into florets
4. Place the vegetables on a large non-stick oven tray – large enough so the vegetables can be spread out in a single layer – otherwise they will steam and not roast (use two oven trays if need be).
5. Drizzle over the olive oil and scatter over the cumin and sea salt. Turn the vegetables in the oil and then spread out again.
6. Place the tray in your preheated oven and roast for 30 minutes or until soft and gently browned, turning halfway.
7. Serve as a side dish with a curry, chilli or tagine.
Alternatively serve as part of an Indian themed starter.Notes
Suitable for freezing.
HOW TO PREPARE THE LOWER HALF OF A BUTTERNUT SQUASH
1. Preparing the lower half of a butternut squash is not nearly as daunting as it first appears.
Simply cut the butternut squash in half vertically, scoop out the seeds using a dessert spoon or similar. (Top tip – scoop out slightly below the seeds – you lose a little of the flesh, but the result is much cleaner).
2. Finally cut thick slices – about 1.5-2cm (½ to ¾ of an inch) thick.
3. Don’t peel the skin off. The skin is perfectly edible, once roasted.
And if you really don’t like it – it’s much easier to peel off when the butternut squash has been roasted, so do it then.This little bit of prep takes 5 minutes tops – and so worth it, both for a delicious side dish AND for reducing food waste!
WHAT TO SERVE WITH CUMIN ROASTED CAULIFLOWER AND BUTTERNUT SQUASH?
This recipe was MADE to go with Yellow Split Pea and Spinach Dhal.
But these cumin roasted veggies are so versatile, they would go with any cuisine that pairs well with cumin – it makes the perfect side dish alongside any curry or dhal, but also chillies and other Tex-Mex and Mexican inspired dishes, and of course it’s great with tagines and other Middle Eastern dishes too.In fact, this veggie side dish is so substantial, you could even serve it as a light main course – along with a side salad and maybe some hummus and/or some roasted sweet potato cubes and/or pittas.
Alternatively, you could serve these cumin roasted vegetable as part of an Indian themed starter, with pickles, chutneys, a raita, onion bhajis and poppadoms and/or chapattis.
Homemade Nando’s Macho Peas
Love Nando’s Macho Peas? Now you can make them at home with this easy peasy Homemade Macho Peas recipe. They are super simple to make and taste SO GOOD!


Course Side Dish
Cuisine British, Fusion, Portuguese, South African
Prep Time 2 minutes
Cook Time 3 minutes
Total Time 5 minutes
Servings 4 peopleIngredients
Metric – US Customary
300g (2 cups) frozen peas (the larger kind, usually labelled ‘garden peas’, NOT the smaller ‘petit pois’ – I use Birdseye Garden Peas)
1 tablespoon olive oil
10 leaves fresh mint finely sliced
½ teaspoon salt or to taste.
1 teaspoon chilli flakes or to taste.Instructions
1. Place the peas in a saucepan and cover with boiling water from the kettle.
2. Bring back to the boil and then simmer the peas until they are done how you like them. (Roughly 2-3 minutes.)
3. Drain the peas. For the full Nando’s effect don’t quite fully drain the peas – leave a couple of tablespoons of the cooking water in the pan.
4. Return the peas to the pan, but do not put the pan back on the heat.
5. Lightly mash the peas, using a potato masher – but don’t go too mad here! You are aiming for some, but not all of the peas to be a little mashed – to give a similar texture to the peas you get in Nando’s.
6. Add the olive oil, mint, salt and chilli, and stir to combine.
7. Serve with all your Nando’s favourites!Notes
1. Use a similar amount of salt and chilli as you get in the Macho Peas in Nando’s restaurants as listed above – to give as authentic a taste as possible, however feel free to adjust these quantities higher or lower to suit your own personal tastes.
2. Not suitable for freezing.WHAT TO SERVE WITH MACHO PEAS?
These Macho Peas are the perfect side dish for Nando’s-style Peri Peri Chicken! For example:
Nando’s Peri Peri Chicken Thighs
Nando’s Peri Peri Chicken Breasts
Nando’s Peri Peri Chicken Wings
Nando’s Peri Peri Chicken Burgers
Peri Peri Chicken Traybake
They also go brilliantly with roast chicken, roast lamb (it’s like combining the peas and the mint sauce!), shepherd’s pie, cottage pie, fish pie, lamb hotpot, fish and chips… and well basically anything you usually serve with peas!WHAT TO DO WITH LEFTOVER MACHO PEAS?
Macho Peas taste best made fresh, but any leftover Macho Peas will keep for a day or two in the fridge. Simple put any leftovers in a lidded container and place in the fridge. These peas taste surprisingly good cold – or you can warm them back up in a saucepan or the microwave.CAN YOU FREEZE MACHO PEAS?
Technically you can, but its not recommended. Macho Peas taste much better made fresh!Roasted Corn On The Cob
This is a super simple recipe for Roasted Corn On The Cob – just 3 minutes of hands on time and ready in less than 20 minutes. (And no par-boiling!) Perfect for busy days, when you need a side dish everyone will love.

Course Side Dish
Cuisine American, British, Nandos
Prep Time 3 minutes
Cook Time 15 minutes
Total Time 18 minutes
Servings 4 peopleIngredients
Metric – US Customary
1 teaspoon salt (ideally coarse sea salt)
2 tablespoons olive oil
4 corn on the cobs each one cut in halfInstructions
1. Preheat your oven to 220C / 200C / gas mark 7 / 425F.
2. Mix together the salt and olive oil in a large bowl.
3. Add the corn on the cobs and stir to coat thoroughly. (Or, even better, use your hands!)
4. Place the corn on the cobs on a large non-stick baking tray, ensuring they are well spread out and in a single layer.
5. Roast in the oven for 15 minutes.Notes
1. It’s crucial to ensure the cobs are spread out well over the baking sheet – if they are touching each other too much, or piled on top of each other, they may not cook properly. (If you do not have a baking tray large enough for this, use two smaller baking trays instead.)
2. Use a good non-stick baking tray, the cobs don’t need turning throughout their cooking time, but if you are at all worried do give them a check after 10 minutes and turn them if you think necessary.
3. Suitable for freezing.WHAT TO SERVE ROASTED CORN ON THE COBS WITH?
Roasted corn on the cob makes a great side dish for almost anything: grilled meats and fish, lasagne, pizza, Mexican food
They also go very well as a side dish at barbecues. (You can even cook the corn on the cobs on the BBQ if you want to!)These corn on the cobs obviously go brilliantly with Nando’s style chicken such as:
Peri Peri Chicken Thighs
Peri Peri Chicken Breasts
Peri Peri Chicken Burgers
Peri Peri Chicken Pitta
Peri Peri Chicken TraybakeWHAT TO DO WITH LEFTOVER ROASTED CORN ON THE COBS?
Roasted corn is just as nice the next day! Simply put any leftovers in a lidded container and place in the fridge, where they’ll keep for up to 3 days.
You can either eat them cold or heat them up in the oven.
To re-heat, simply place in an oven, pre-heated to 180C / 160C fan / gas mark 4 / 350F, for 10 minutes or until piping hot.Alternatively, you can use a knife to cut the corn kernels off the cobs and then stir the corn into a rice salad, tuna pasta bake or creamy chicken pasta.
Christmas Turkey Traybake
Want a way to take the stress out of cooking this Christmas?
Want to spend more time actually enjoying Christmas Day rather than being stuck in the kitchen, alone, muttering at the oven?
Want a delicious home cooked turkey dinner with all the trimmings?
Want it all ready in under 1h 30 mins, with only 2 pans and a colander to wash up? Impossible!?!
Well, here it is…. Introducing the Easy Christmas Turkey Traybake…


Course Main Course
Cuisine British
Prep Time 20 minutes
Cook Time 1 hour 5 minutes
Total Time 1 hour 25 minutes
Servings 4 people (with leftovers)Ingredients
Metric – US Customary
6 tablespoons olive oil
1kg (2¼ lb) baking potatoes peeled and cut into 50g (1½oz) chunks
Salt and pepper
500g (1 lb) parsnips peeled and cut into batons
500g (1 lb) chantenay carrots left whole
8 garlic cloves gently bashed, skins left on
1 large red onion peeled and cut into 8 wedges
10 cocktail sausages wrapped in bacon you can buy these ready prepared. (Pigs in Blankets)
8 turkey breast fillets each one approximately 100g / 3½oz
8 sage leaves
200g (7 oz) sprouts
Gravy and other sauces to serve.Instructions
1. Preheat your oven to 220C / 200C fan / gas mark 7 / 425F.
2. Drizzle 6 tablespoons of olive oil into the base of a very large roasting tin (roughly 40 x 33cm or 16 x 13inches) and place the tray in the oven to heat up.3. Peel the potatoes and cut them into chunks that weigh roughly 50cm (1½oz).
4. Place them in a large saucepan and cover with boiling water.
5. Add a teaspoon of salt and cook over a medium-high heat for 12 minutes. (Start timing as soon as you turn on the heat, NOT from when the water reboils.)6. Meanwhile peel the parsnips and cut into large batons. Cut the parsnips in half lengthways and then widthways and then cut the top part in half again lengthways so you get 6 roughly even sized batons.
7. Gently bash 8 garlic cloves and peel and cut a red onion into quarters.
8. Slice your sprouts in half and get the sage and carrots out of the fridge, so you are all ready.
9. When the potatoes are done, drain them and shake them in the saucepan with the lid on (to fluff up the edges, so you get plenty of crispy bits!)
10. Then tip the potatoes into the hot fat.
11. Add the parsnips and carrots.
12. Sprinkle over a little salt and pepper and then turn everything in the hot fat (take care not to burn yourself!)
13. Put the tray in the oven and roast for 20 minutes.
14. After 20 minutes, remove the tray and add the garlic cloves and red onion wedges. Return the roasting tray to the oven and roast everything for another 15 minutes.
15. After 15 minutes, season the turkey breast fillets, then add them to the tray along with the halved sprouts, cocktail sausages and sage leaves.
16. Put the tray back in the oven for a further 20 minutes.
17. This would be a good time to make a jug of gravy and any other sauces you want to serve with the traybake (e.g. bread sauce and/or cranberry sauce)
18. After the last 20 minutes, check the turkey is done (cut the largest fillet in half and check there is no pink).
19. Serve with your gravy and sauces.Notes
Not suitable for freezing (except the turkey on its own IS suitable for freezing).CHRISTMAS VEGETABLE TRAYBAKE
Make cooking Christmas dinner less stressful with this Easy Christmas Vegetable Traybake.
Roasting the parsnips, carrots and sprouts all together in one tray means you can relax and have a glass of bubbly instead of juggling pots and pans like a mad thing this Christmas. (Serves 4-6, depending on appetite)

Course Side Dish
Cuisine British
Prep Time 10 minutes
Cook Time 45 minutes
Total Time 55 minutes
Servings 6 peopleIngredients
Metric – US Customary
500g (1 lb) parsnips cut into batons
500g (1 lb) carrots cut into batons
2 tablespoons olive oil
Salt and pepper
A few sprigs of thyme, rosemary, sage or a mixture plus extra for garnish
250g (9 oz) sprouts halved lengthwaysInstructions
1. Pre-heat your oven to 220C / 200C fan / gas mark 7 / 425F.
2. Peel and chop the parsnips and carrots into batons and place in a baking tray.
3. Drizzle with a couple of tablespoons of olive oil and sprinkle over salt, pepper and whichever herbs you are using.
4. Mix everything together to ensure the veggies are evenly coated (Use hands or a spoon if you prefer) and put the baking tray into the oven.
5. Roast for 30 minutes.
6. After the 30 minutes, remove the vegetables from the oven and add the sprouts. Toss everything together again (this time definitely use a spoon!), ensuring none of the carrots are parsnips are sticking, and return the baking tray to the oven for a further 15 minutes.
7. Serve scattered with more herbs.Notes
Suitable for freezing.ROASTED ROOT VEGETABLES
Deliciously crisp and caramelised roasted parsnips, carrots, red onions and sweet potatoes – all roasted on one tray.
Maximum taste, minimum fuss, healthy and frugal… and only one tray to wash, makes this Roasted Root Vegetables THE BEST side dish!
Perfect with roast dinner favourites, including roast chicken, salmon or nut roast.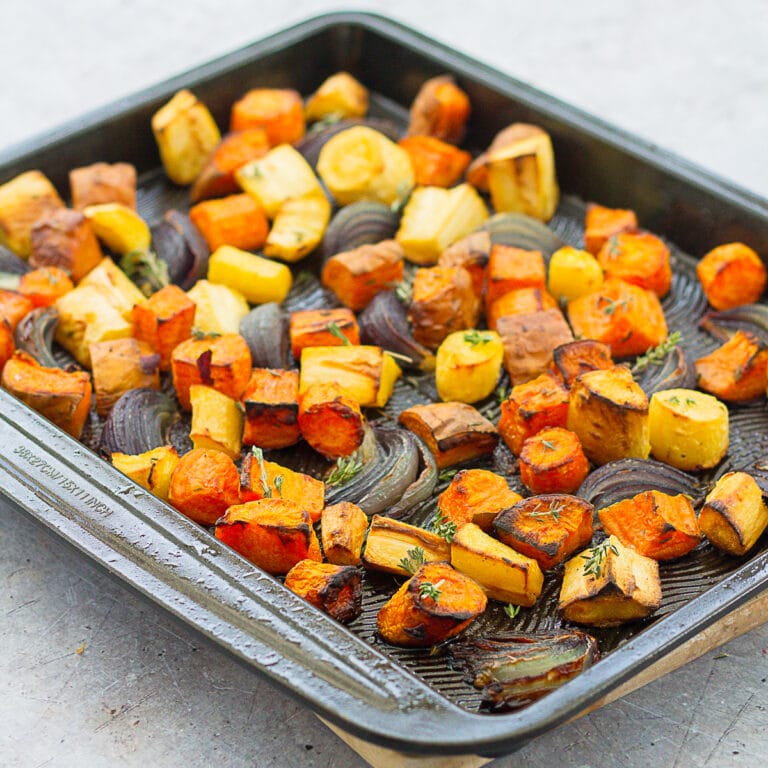
Course Side Dish
Cuisine British
Prep Time 10 minutes
Cook Time 40 minutes
Total Time 50 minutes
Servings 4 peopleIngredients
Metric – US Customary400g (14 oz) sweet potatoes cut into large chunks (leave the skin on!)
400g (14 oz) parsnips peeled and cut into large chunks
400g (14 oz) carrots cut into large chunks (leave the skin on!)
3 tablespoons olive oil
4 sprigs thyme (and/or rosemary) roughly chopped
Salt and pepper to taste see note
2 small red onions each one peeled and cut into 8 wedgesInstructions
1. Pre-heat your oven to 220C / 200C fan / gas mark 7 / 425F.
2. Place the chopped sweet potatoes, parsnips and carrots on a large roasting tray.
3. Drizzle over the olive oil and scatter with the salt, pepper and herbs.
4. Toss thoroughly to get the veggies well-coated in the oil and seasonings, then spread the veggies out so they are well spaced. (Too close and the veggies will steam and go soggy rather than roast and go crispy and caramelised – which is what you want!)
5. Roast for 20 minutes in your pre-heated oven, then turn the veggies and add in the red onion wedges. Take care to ensure the veggies are well spaced out again.
6. Roast for a further 20 minutes, or until the veggies are cooked all the way through and have a nice amount of caramelisation on the edges.
7. Serve as a side dish to roasted meats, fish or nut roast.
Notes
1. Leave the skins on your carrots and sweet potatoes for maximum flavour and nutrition. But feel free to peel them if you prefer.
2. Add about 10 to 15 twists of black pepper and ½ to 1 tablespoon of salt, depending on your preferences. If you love salt then try using coarse sea salt, as you will get these wonderful little ‘pops’ of salt that take this dish to the next level!
3. Not suitable for freezing.CAN YOU FREEZE ROASTED ROOT VEGETABLES?
You can, but honestly, when you reheat them, the texture will not be great (far too soft!)
A best recommendation here is to chuck any leftover roasted root veggies into your blender, along with some leftover gravy / meat juices and a little water to create a wonderful roasted root vegetable soup – then freeze that in individual portion sizes, for a super easy midweek meal!Defrost the soup overnight and reheat in a pan / your microwave until piping hot, then serve with some lovely crusty bread
December 6, 2022 at 9:34 pm in reply to: FIFA World Cup. Football. World Cup. Qatar 2022 Contest. #200893Here are todays results:
Morocco – Devil4you V Spain – Vaughan
Portugal – Skal V Switzerland – Omar_96
Commiserations to
Spain – Vaughan
Switzerland – Omar_96These teams have been eliminated from the tournament.
Well done to Morocco – Devil4you and Portugal – Skal who progress on to the last 8 teams in the tournament – The Quarter Finals.
These are the teams that have been eliminated in the “Round of 16 stage”
Senegal – Morkovxxx
USA – Skal
Australia – JessiCapri
Poland – Saga55
Japan – Michelle989
Spain – Vaughan
South Korea – Vaughan
Switzerland – Omar_96These are the teams still in to play in the Quarter Finals: Congratulations and Good Luck.
France – LadyHot
Portugal – Skal
Brazil – PC_666
Netherlands – Huny_yumyum
England – dear_abby
Argentina – Devil4you
Morocco – Devil4you
Croatia – ZuzannahThe next matches are on Friday 9 Dec 2022
Fridays matches GMT times.
Croatia – Zuzannah V Brazil – PC_666
Netherlands – Huny_yumyum V Argentina – Devil4you
BRAISED RED CABBAGE
Christmas wouldn’t be the same without braised red cabbage. Plus it’s really easy to make and it’s a great make ahead dish for Christmas and beyond!
It’s delicious with roast duck, lentils and mashed potato and brilliant reheated the next day and served with turkey and all the trimmings.
Course Side Dish
Cuisine British
Prep Time 15 minutes
Cook Time 2 hours 30 minutes
Total Time 2 hours 45 minutes
Servings 12 peopleIngredients
Metric – US Customary
500g (1 lb) red cabbage sliced finely
Salt and pepper
2 small red onions (or 1 large one) diced finely
1 large Bramley apple diced finely
1 clove garlic diced finely or crushed
½ teaspoon ground nutmeg
½ teaspoon ground cinnamon
4 cloves ground
2 tablespoons brown sugar
3 tablespoons red or white wine vinegar
10g (½ oz) butterInstructions
1. Prepare all your ingredients as directed above.
2. Mix together the ground spices and brown sugar in a bowl.
3. Preheat your oven to 160C / 140C fan / gas mark 3 / 325F.
4. Arrange about a quarter of the cabbage at the bottom of a large casserole dish
5. Sprinkle over about a third of the onions, a third of the apple, a third of the garlic and a third of the sugar and spice mix.
6. Add a few twists of salt and pepper.
7. Add another layer of cabbage, followed by another layer of onions, apple, garlic, spices, salt and pepper.
8. Repeat a third time and then top with the remaining red cabbage.
9. Pour over 3 tablespoons of red or white wine vinegar (this will help preserve the colour of the cabbage, so don’t miss this step out!) and dot with approximately 10g (0.35 oz) of butter.
10. Put a tight lid on the casserole dish (use foil if you don’t have a lid) and cook in your pre-heated oven for 2½ hours, stirring twice during cooking time.
11. Serve immediately or leave to cool then store in an airtight container in the fridge for a day or two.Notes
1. To reheat, simply place in a saucepan with approximately 100ml water and heat gently with a lid on until the cabbage is hot (about 5 minutes).
2. Suitable for freezing.December 5, 2022 at 9:24 pm in reply to: FIFA World Cup. Football. World Cup. Qatar 2022 Contest. #200887Here are todays results:
Japan – Michelle989 V Croatia – Zuzannah
Brazil – PC_666 V Korea Republic – Vaughan
Commiserations to
Japan – Michelle989
Korea Republic – VaughanThese teams have been eliminated from the tournament.
Well done to Croatia – Zuzannah and Brazil – PC_666 who progress on to the next stage.
The next matches are tomorrow
Tuesdays matches GMT times.
Morocco – Devil4you V Spain – Vaughan
Portugal – Skal V Switzerland – Omar_96 -
AuthorPosts